

I have a little rust repair to do by the hinge mounting points. When I do that repair, I want to bring that area up a bit and make it so the hinge sits in a "pocket" more or less. There should only be a small line around the perimeter of the hinge base and it will all blend together if I can pull it off.
SPark
'62 Unibody Still Plugging Along
Re: '62 Unibody
Last edited by LM14 on June 3, 2015, 8:50 pm, edited 2 times in total.
1932 Ford 5 window coupe. 302/C4
1962 8V-390/C6 Unibody Short Bed Soon to be Big Window - The Lincoln that never was
2013 F150 Super Crew Eco Boost 4x4
2015 Ford Edge for the little lady, because she said so!
2007 Mustang GT, 4.6-3V/5 Speed. Only 8680 miles on the clock.
More toys, I need more toys!!!
1962 8V-390/C6 Unibody Short Bed Soon to be Big Window - The Lincoln that never was
2013 F150 Super Crew Eco Boost 4x4
2015 Ford Edge for the little lady, because she said so!
2007 Mustang GT, 4.6-3V/5 Speed. Only 8680 miles on the clock.
More toys, I need more toys!!!
Re: '62 Unibody
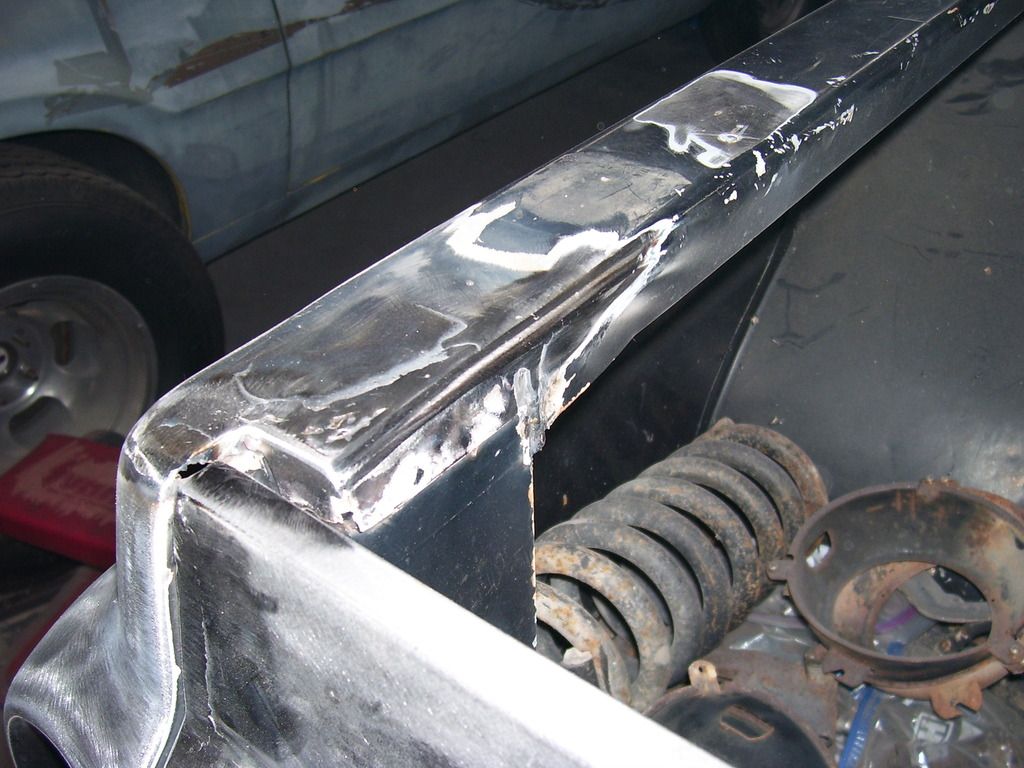
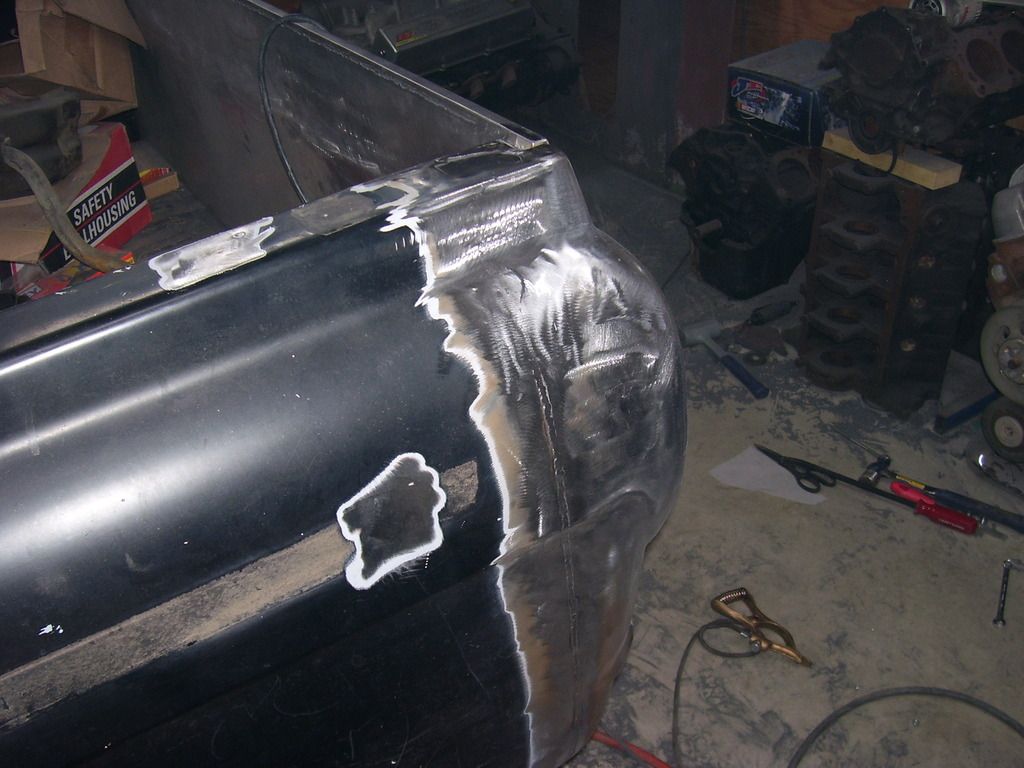
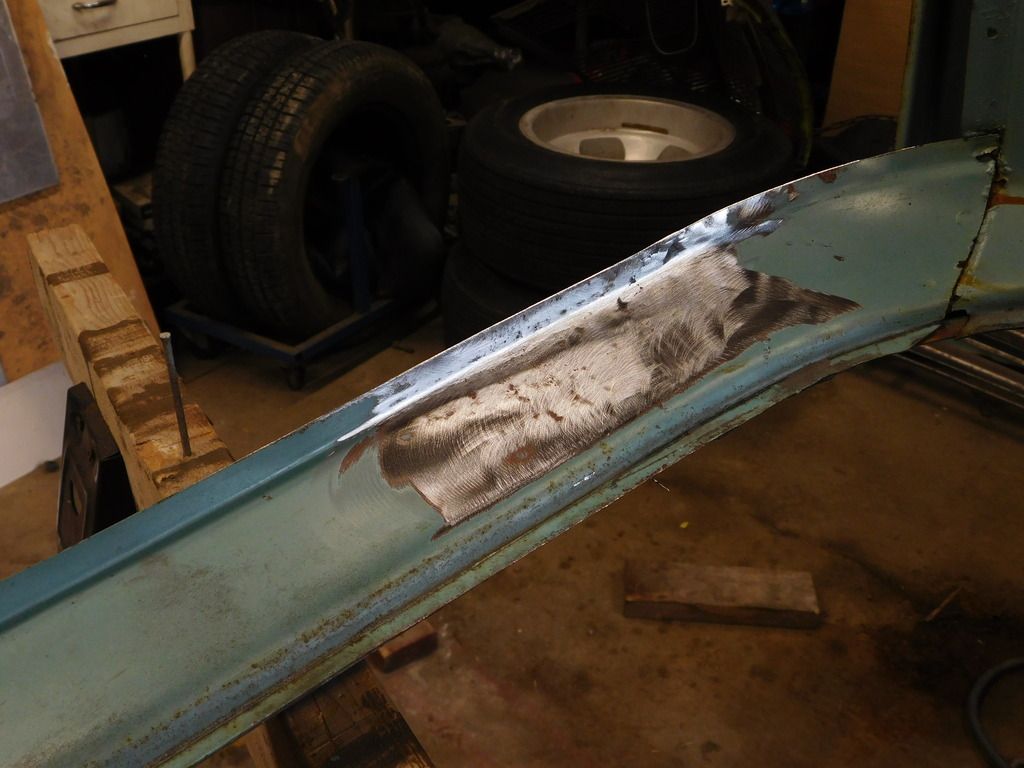
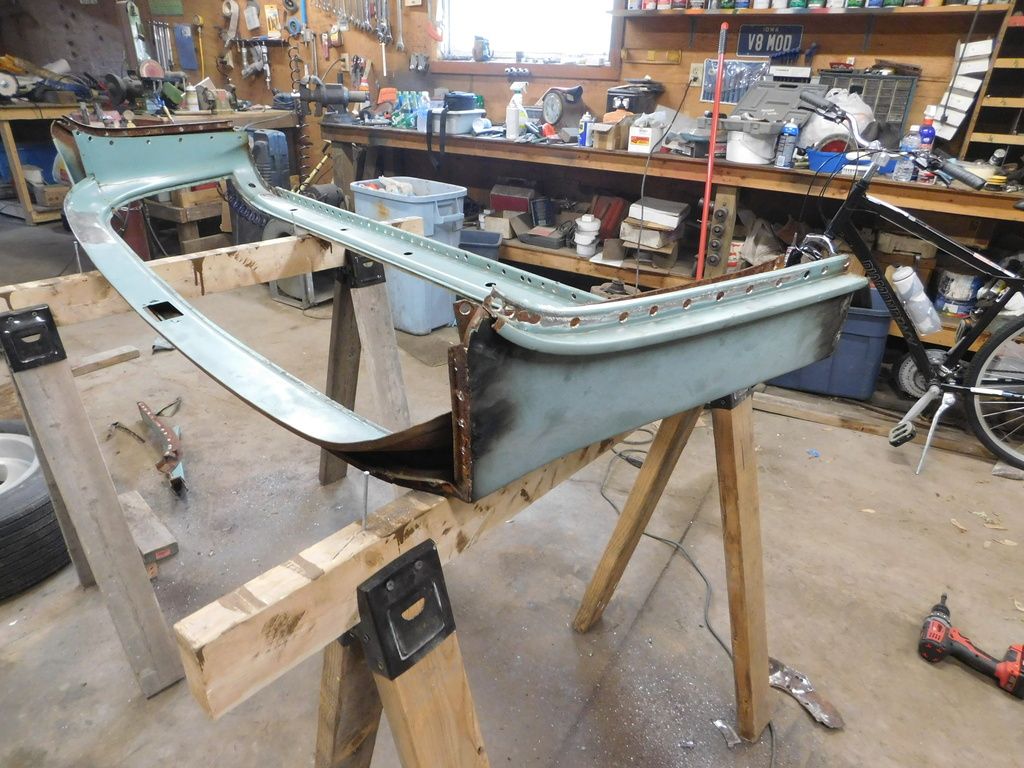
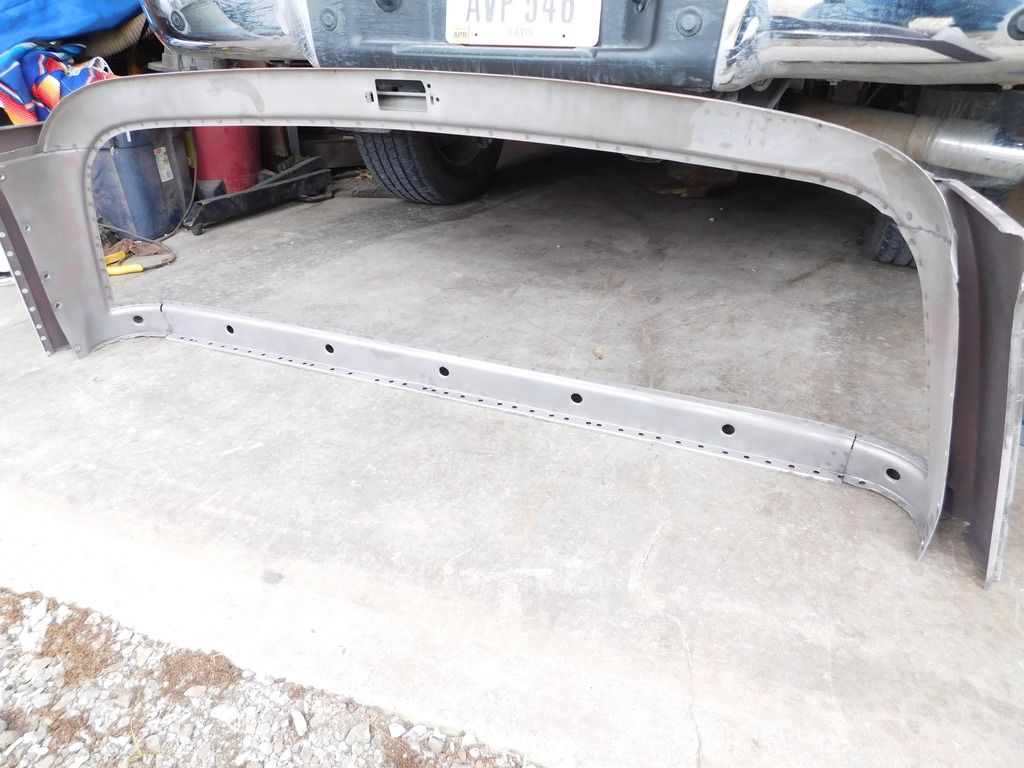
The seams on the back corner of the box where the box sides and end cap meet are never quite right. Mine had been filled with seam sealer at least twice that I could tell. Also notice that the top edge of the end cap isn't even level with the top rail of the box itself.
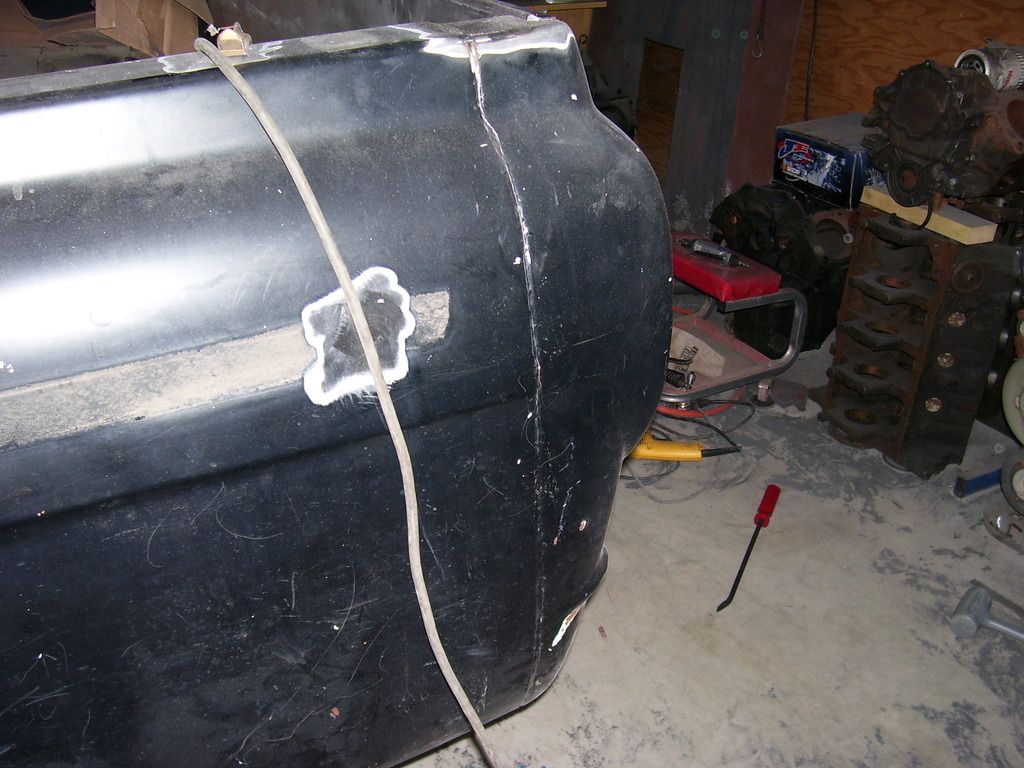
Decided to clean it all out. First ran my "paint eater" disk across the area then took a small screwdriver and dug the remainder out. There was rust starting behind it but it all came clean after some sanding, wire brushing and cussing.
Also had a fairly deep dent that was puttied over in the past. Almost 3/4" deep and 4" tall by 2" wide. There was a smaller dent above it and another on the hinge "bump". Decided to pull all those before going any further in case I needed more than just a pull to get them out. All came out very nicely. The dent puller is coming in handy!
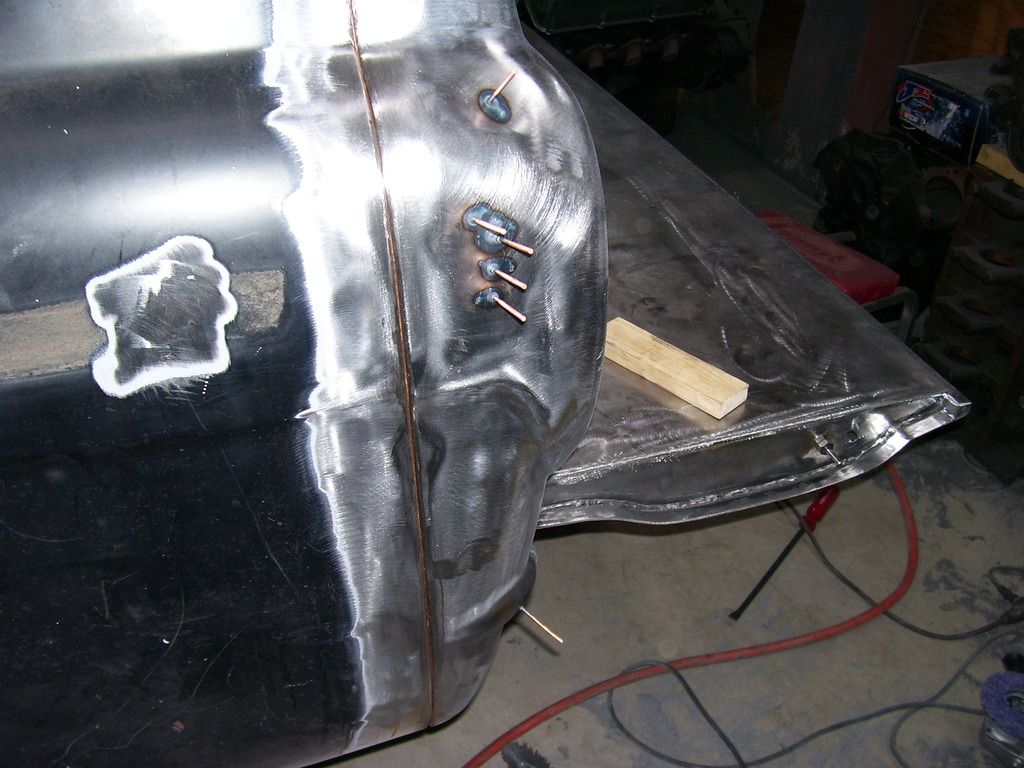
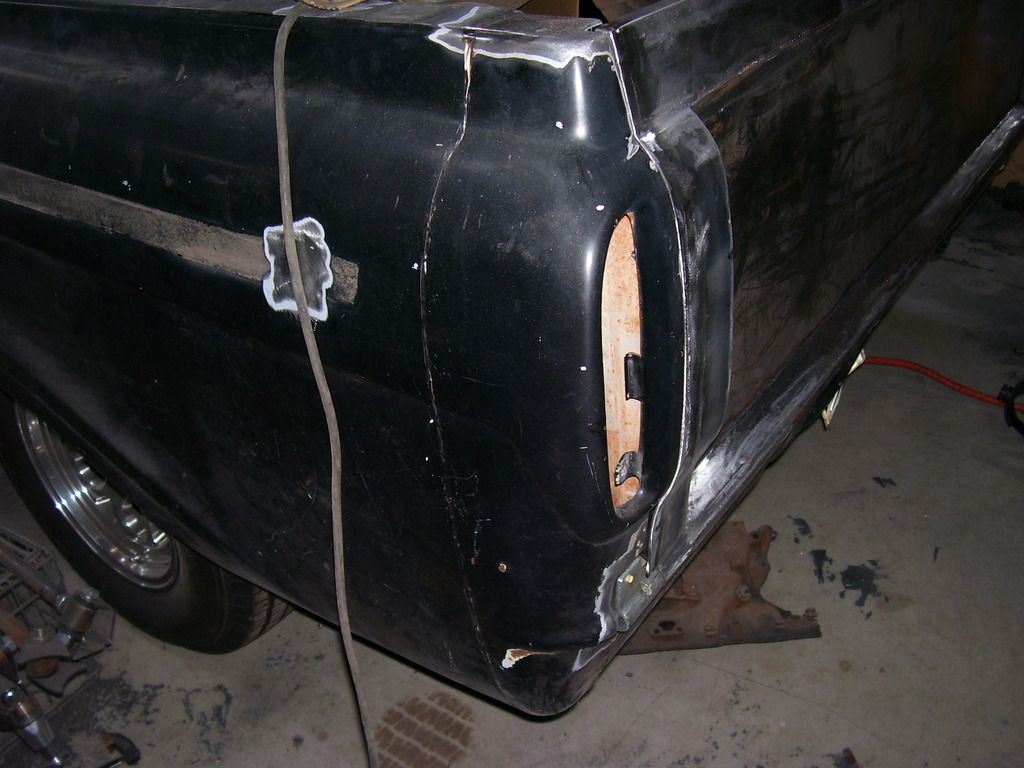
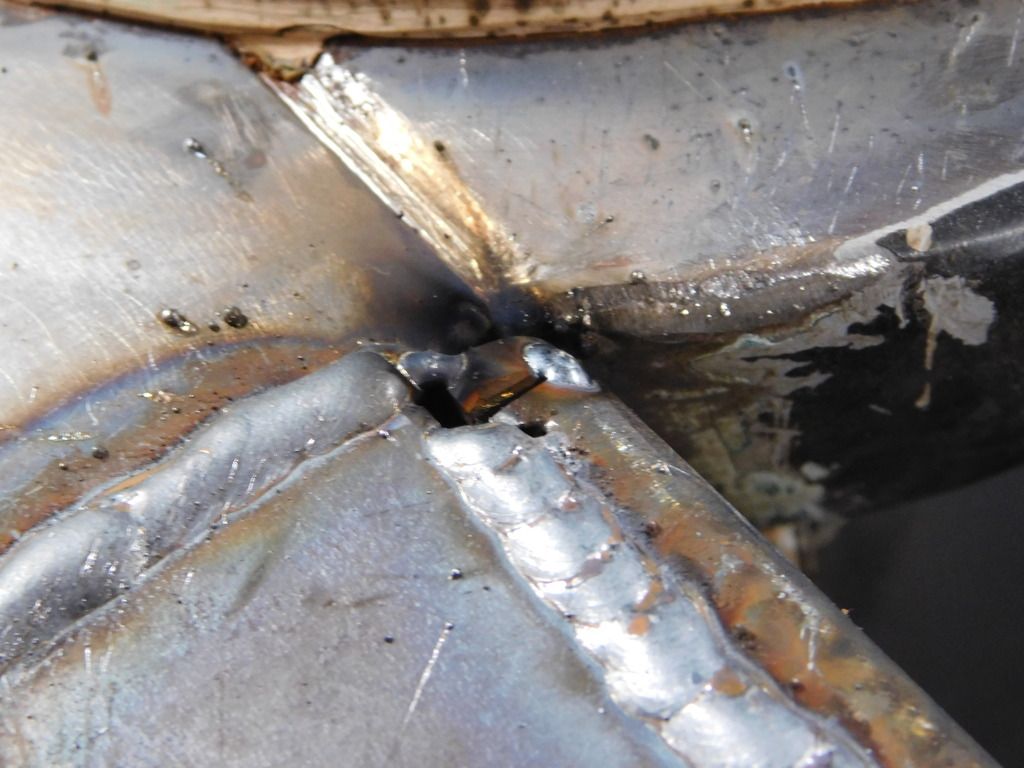
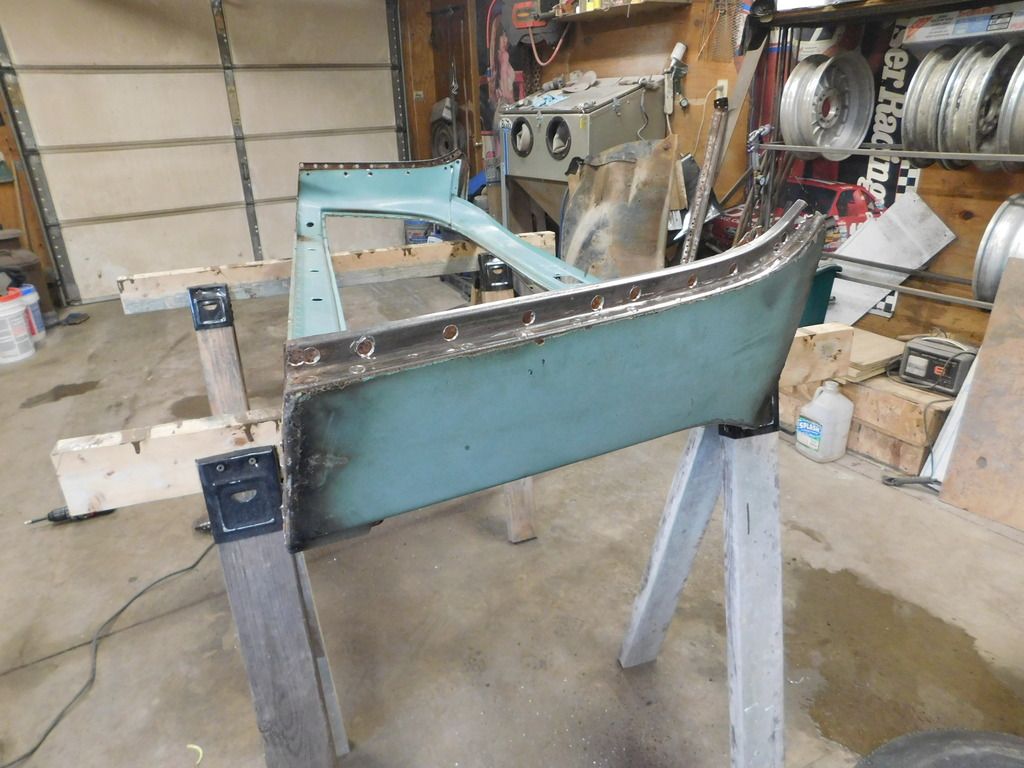
Next was to weld the seam closed and grind it back smooth. While welding I kept working the area to get the 2 to match as closely as possible. I found that the end cap is a slightly different shape than the box end. You really don't notice it much with the seam sealer in there but once everything was cleaned up it became very apparent. I hammered the seam flat as I welded. Both the end cap and the box end have a very gradual bend inward to make the area they pinch welded to put all this together at the factory. That roll gave them a larger surface to stick seam sealer to and blend it together better. With it out it can be a mess in places. Mine was slightly over 1/4" from matching in a couple spots. The top was also about 3/16" low from matching the box. When I filled the stake pocket hole I use 1/4" steel and left it up so it matched the top edge of the box, not the end cap. In one small area, I had to split the end cap and pull it out so I could get the surfaces to match. The third picture has a gob of weld about 3" down from the top edge of the box, this area needed the split to line up even half way close. I then welded the top of the end cap to add material and ground the area back smooth so the tops matched, as they should have from the factory. Just another of those things nobody would ever notice but (almost) lets me keep my sanity.
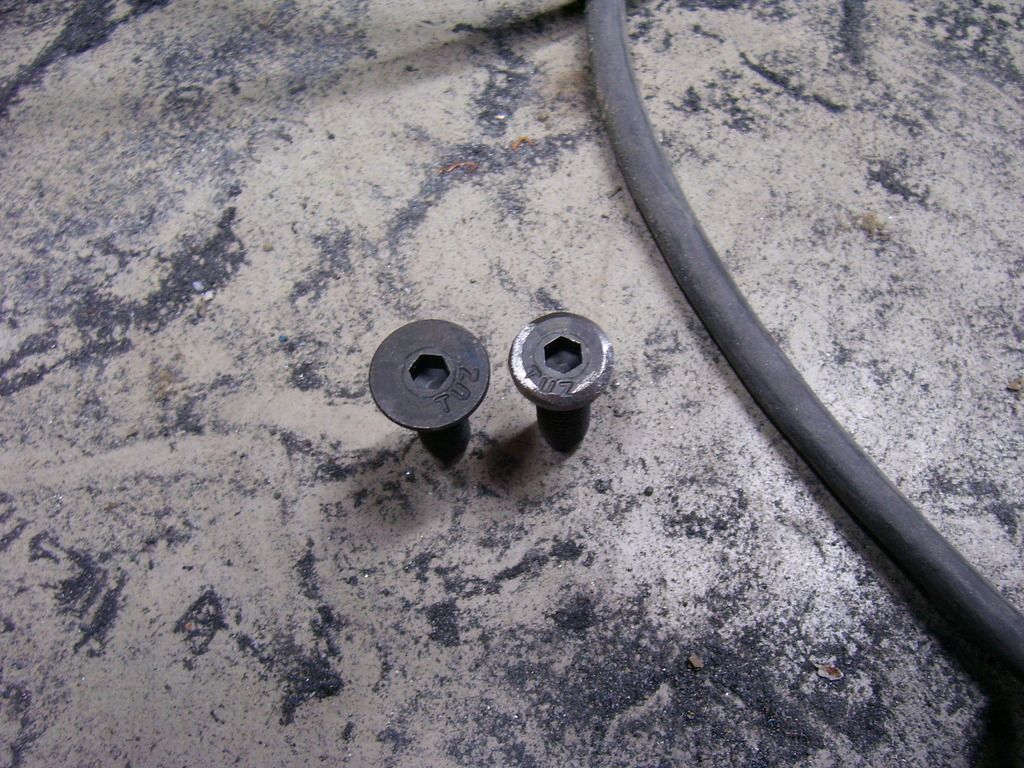
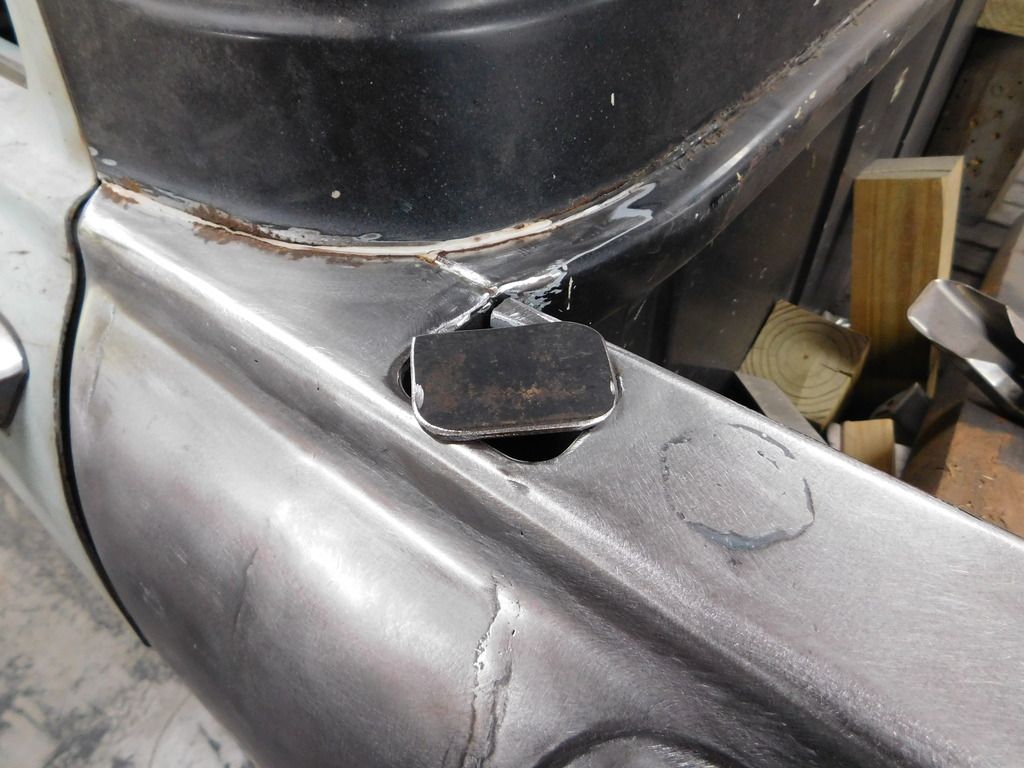
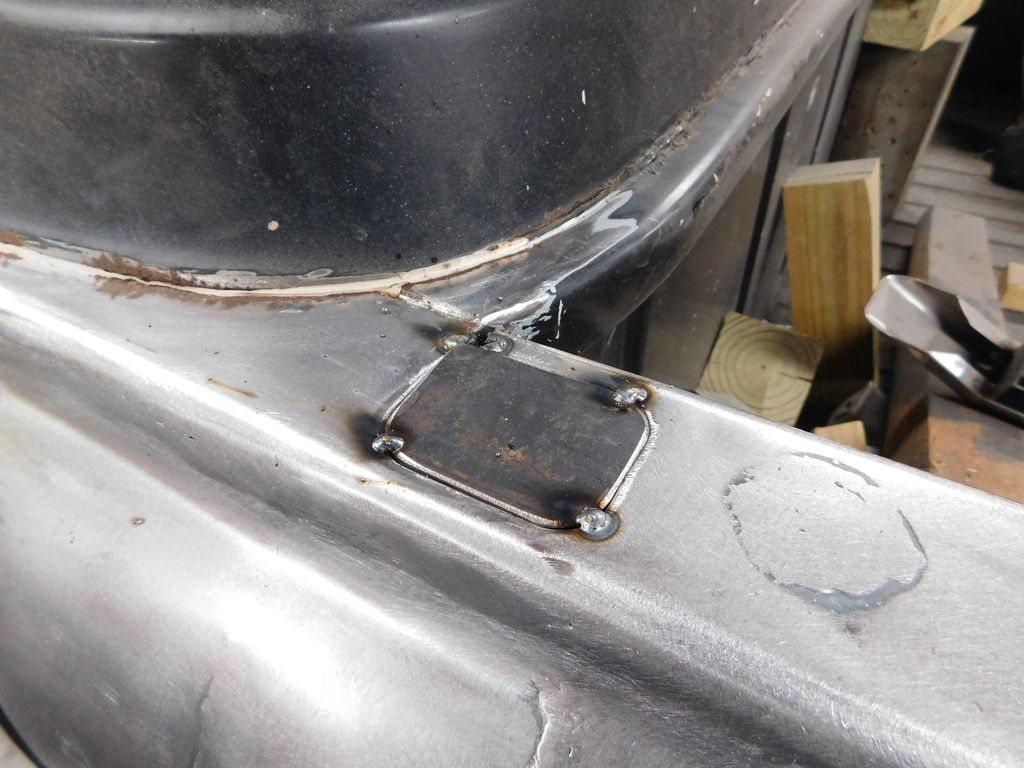
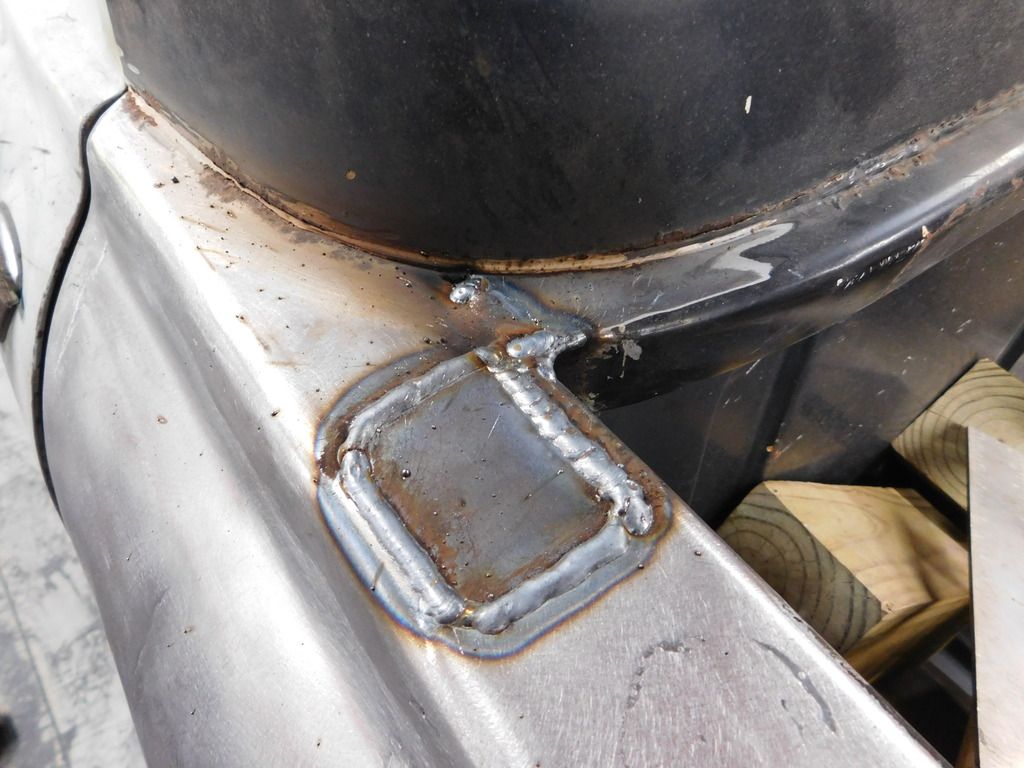
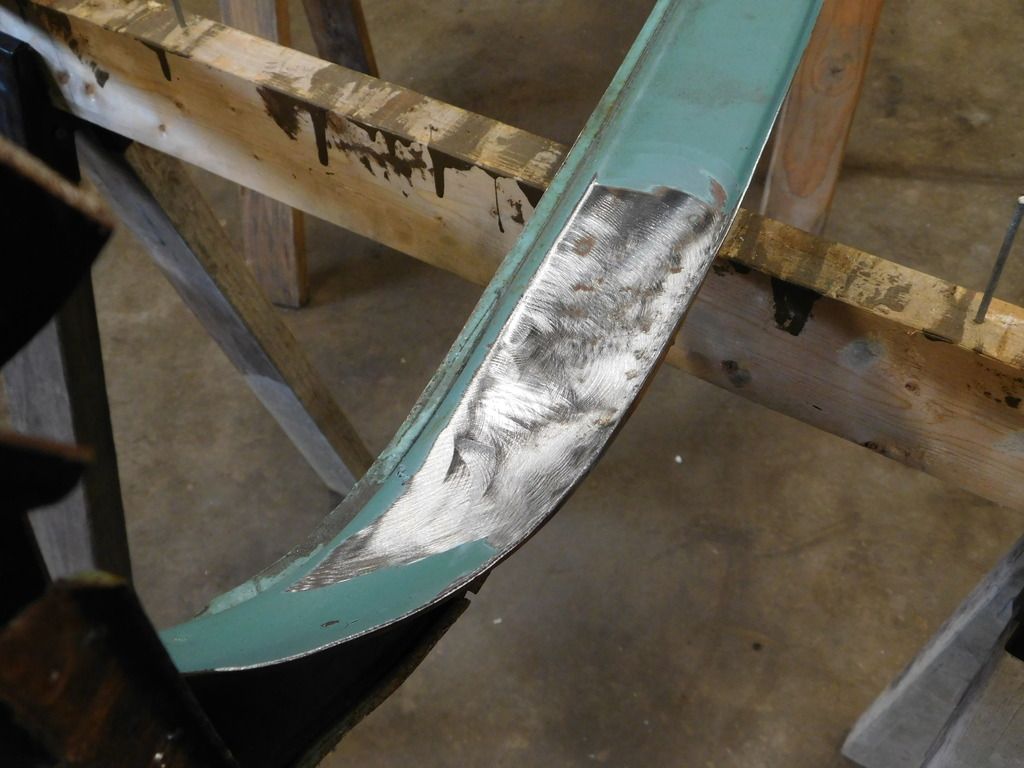
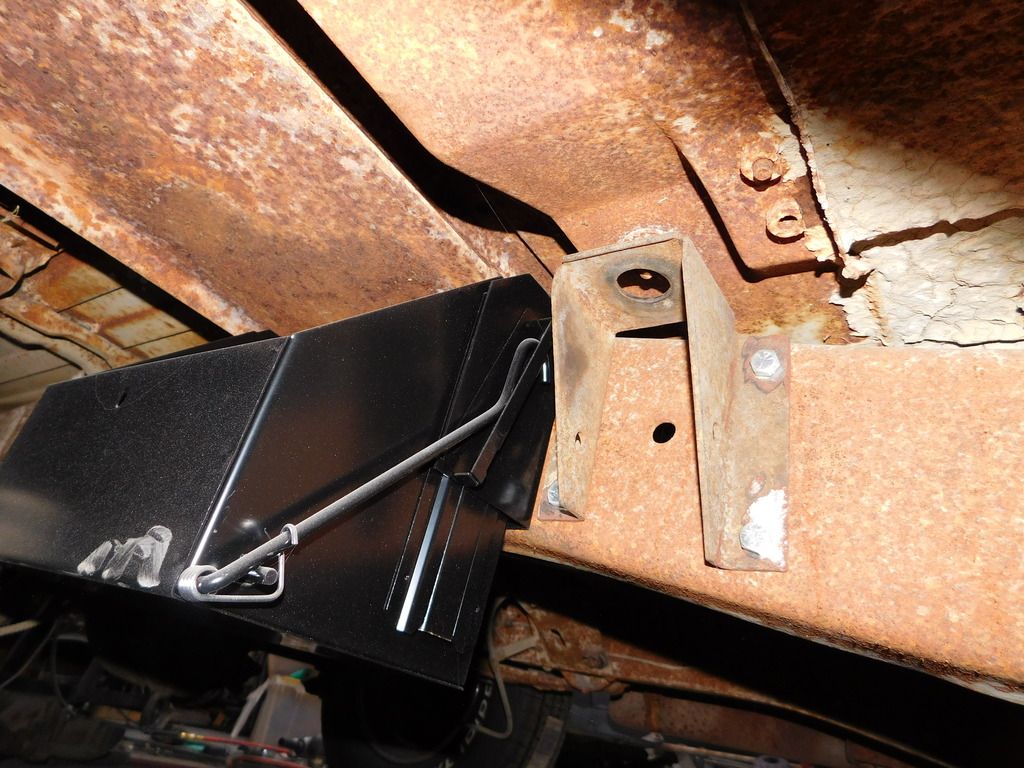
I modified the attachment points for the hinge. I used flat head Allen bolts instead of regular bolts. I used a 3/4" x 45 degree countersink to set them into the hinge. I also reduced the diameter of the bolt head and tapered the face of the bolt at 45 degrees. When it's all in place, I will weld the bolts to the hinges and grind everything back so there are no attachment points visible. There is just enough room to get your hand in the taillight hole to put a nut on the backside. My caged nuts were torn loose so I didn't have to deal with removing them first.
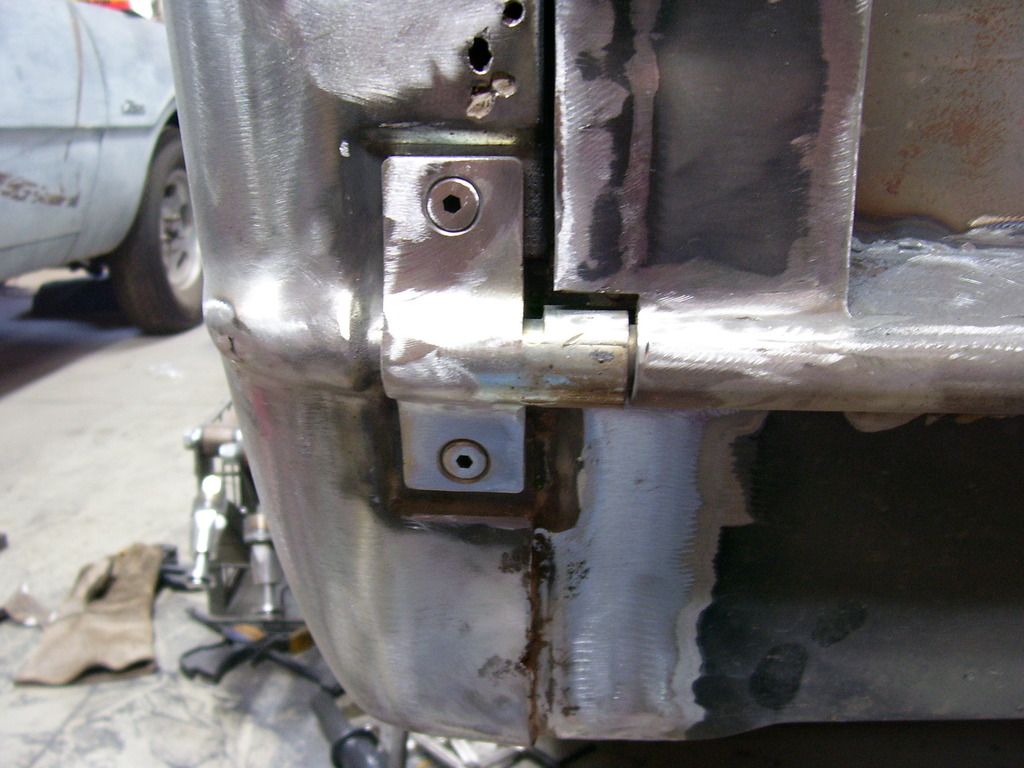
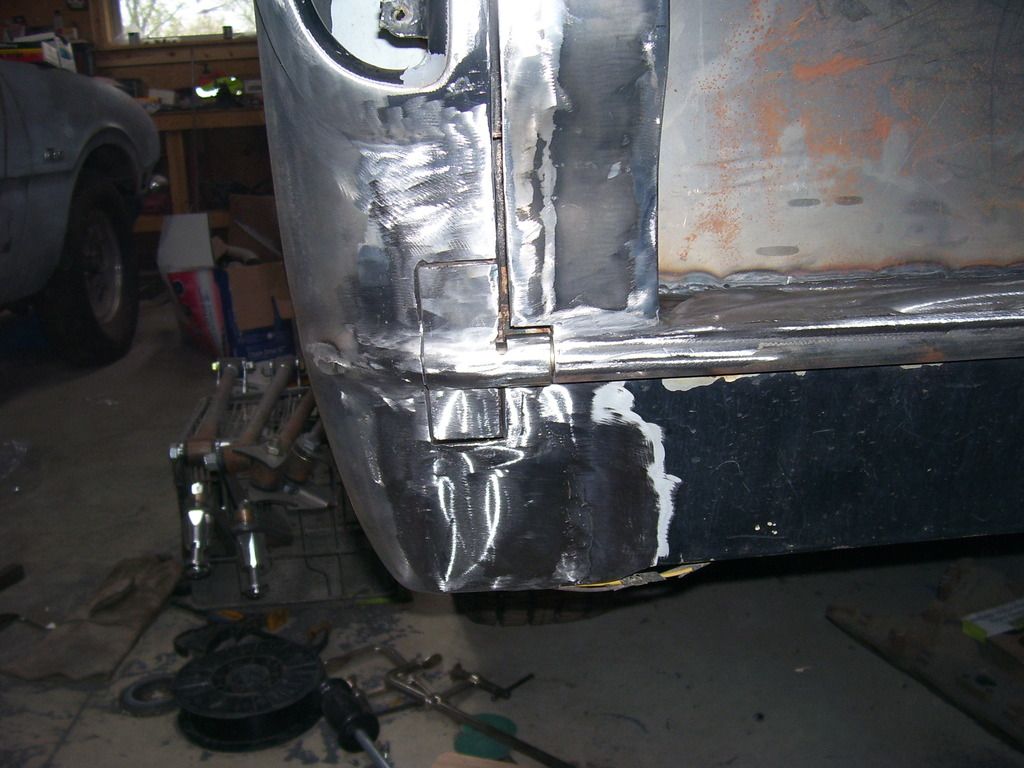
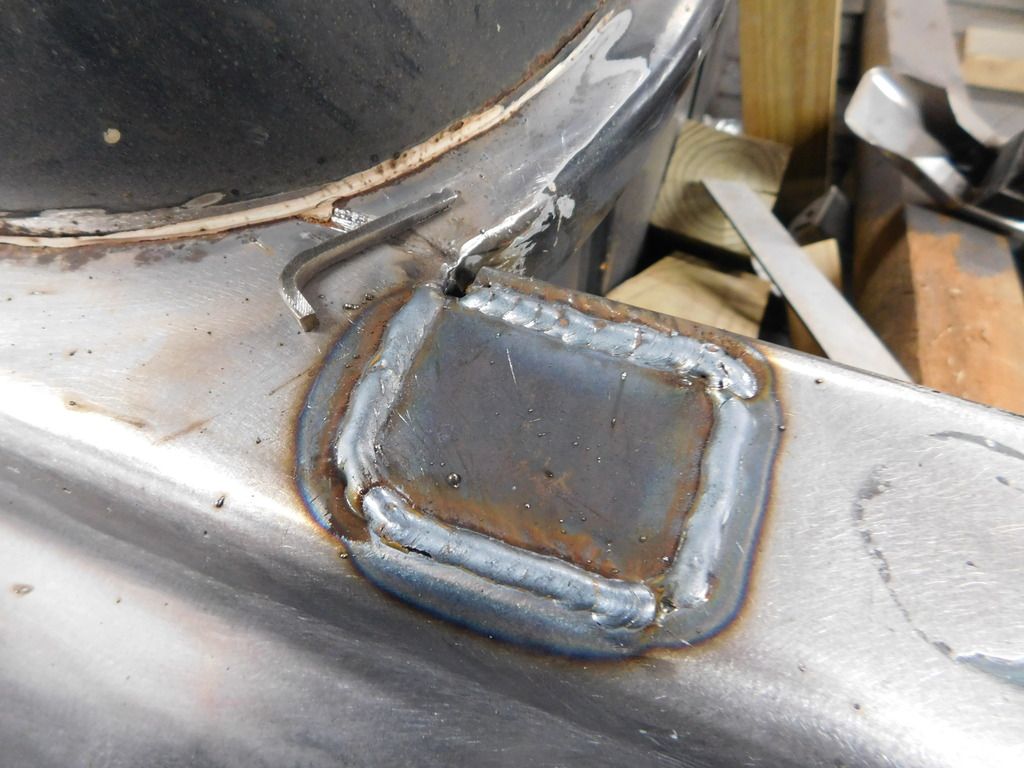
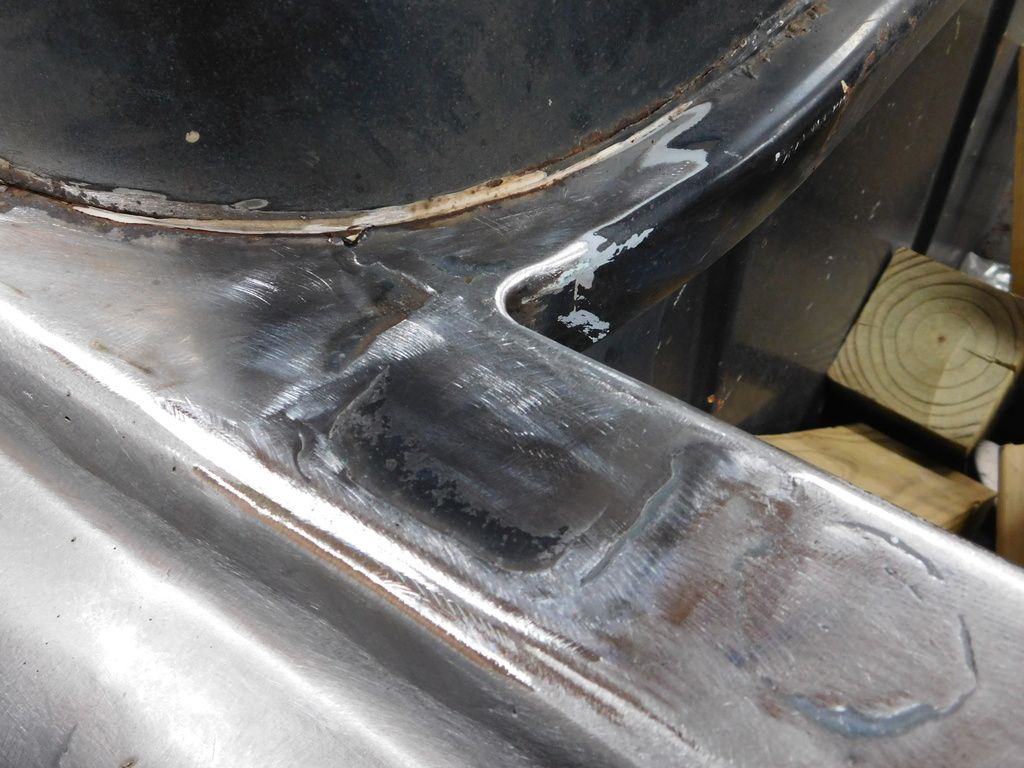
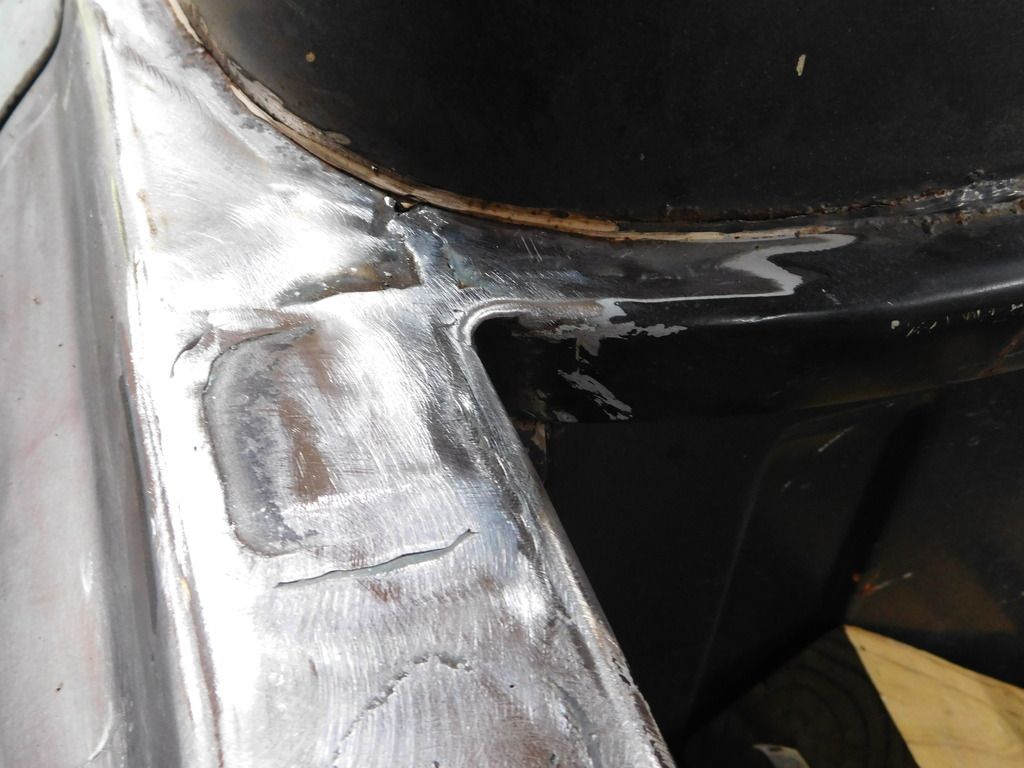
In the previous picture, you can see the small rust holes above and below the hinge. Look at the distance from the edge of the hinge to the sheetmetal beside it and how poorly they match contours. At this point, I have already ground the hinge to match the body contours as much as possible. I cut the rust out and stared putting in new metal. I raised the new metal and made it come much closer to the actual hinge. By time it's done, the hinge will be sitting in a small pocket and be flush with the surrounding metal. I also got rid of the seam that is pinch welded below the hinge.
At this point I ran out of mig wire! Tomorrow is another day.
SPark


Decided to clean it all out. First ran my "paint eater" disk across the area then took a small screwdriver and dug the remainder out. There was rust starting behind it but it all came clean after some sanding, wire brushing and cussing.


Also had a fairly deep dent that was puttied over in the past. Almost 3/4" deep and 4" tall by 2" wide. There was a smaller dent above it and another on the hinge "bump". Decided to pull all those before going any further in case I needed more than just a pull to get them out. All came out very nicely. The dent puller is coming in handy!

Next was to weld the seam closed and grind it back smooth. While welding I kept working the area to get the 2 to match as closely as possible. I found that the end cap is a slightly different shape than the box end. You really don't notice it much with the seam sealer in there but once everything was cleaned up it became very apparent. I hammered the seam flat as I welded. Both the end cap and the box end have a very gradual bend inward to make the area they pinch welded to put all this together at the factory. That roll gave them a larger surface to stick seam sealer to and blend it together better. With it out it can be a mess in places. Mine was slightly over 1/4" from matching in a couple spots. The top was also about 3/16" low from matching the box. When I filled the stake pocket hole I use 1/4" steel and left it up so it matched the top edge of the box, not the end cap. In one small area, I had to split the end cap and pull it out so I could get the surfaces to match. The third picture has a gob of weld about 3" down from the top edge of the box, this area needed the split to line up even half way close. I then welded the top of the end cap to add material and ground the area back smooth so the tops matched, as they should have from the factory. Just another of those things nobody would ever notice but (almost) lets me keep my sanity.


I modified the attachment points for the hinge. I used flat head Allen bolts instead of regular bolts. I used a 3/4" x 45 degree countersink to set them into the hinge. I also reduced the diameter of the bolt head and tapered the face of the bolt at 45 degrees. When it's all in place, I will weld the bolts to the hinges and grind everything back so there are no attachment points visible. There is just enough room to get your hand in the taillight hole to put a nut on the backside. My caged nuts were torn loose so I didn't have to deal with removing them first.


In the previous picture, you can see the small rust holes above and below the hinge. Look at the distance from the edge of the hinge to the sheetmetal beside it and how poorly they match contours. At this point, I have already ground the hinge to match the body contours as much as possible. I cut the rust out and stared putting in new metal. I raised the new metal and made it come much closer to the actual hinge. By time it's done, the hinge will be sitting in a small pocket and be flush with the surrounding metal. I also got rid of the seam that is pinch welded below the hinge.


At this point I ran out of mig wire! Tomorrow is another day.
SPark
1932 Ford 5 window coupe. 302/C4
1962 8V-390/C6 Unibody Short Bed Soon to be Big Window - The Lincoln that never was
2013 F150 Super Crew Eco Boost 4x4
2015 Ford Edge for the little lady, because she said so!
2007 Mustang GT, 4.6-3V/5 Speed. Only 8680 miles on the clock.
More toys, I need more toys!!!
1962 8V-390/C6 Unibody Short Bed Soon to be Big Window - The Lincoln that never was
2013 F150 Super Crew Eco Boost 4x4
2015 Ford Edge for the little lady, because she said so!
2007 Mustang GT, 4.6-3V/5 Speed. Only 8680 miles on the clock.
More toys, I need more toys!!!
Re: '62 Unibody
Time to burn some more wire!
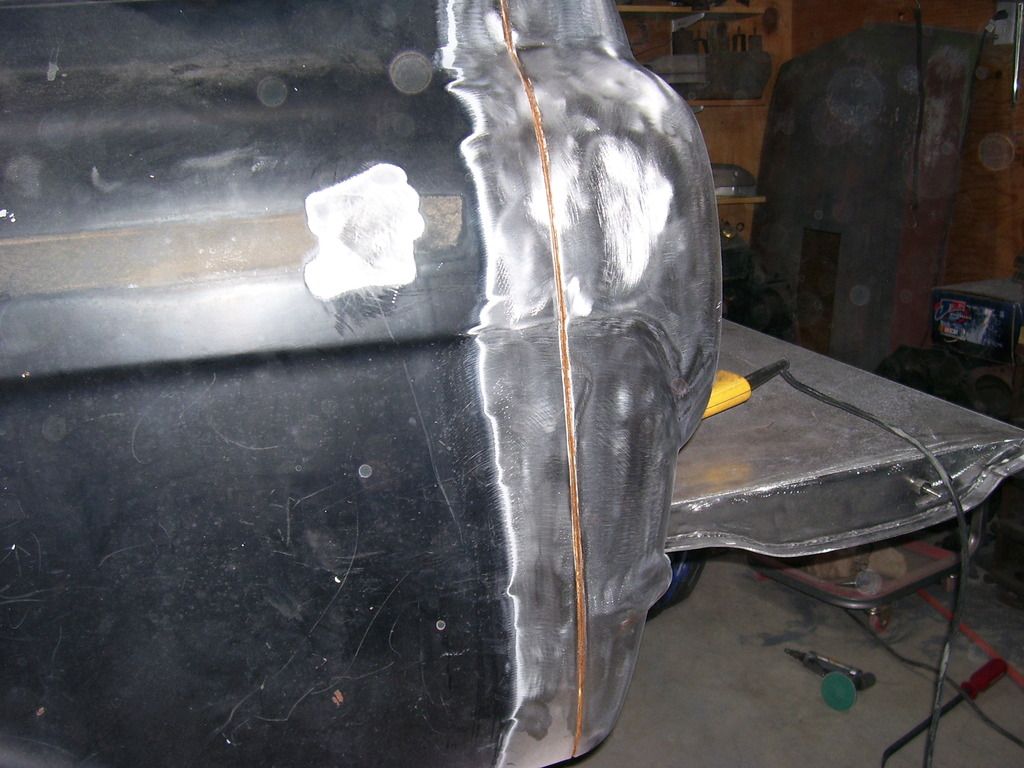
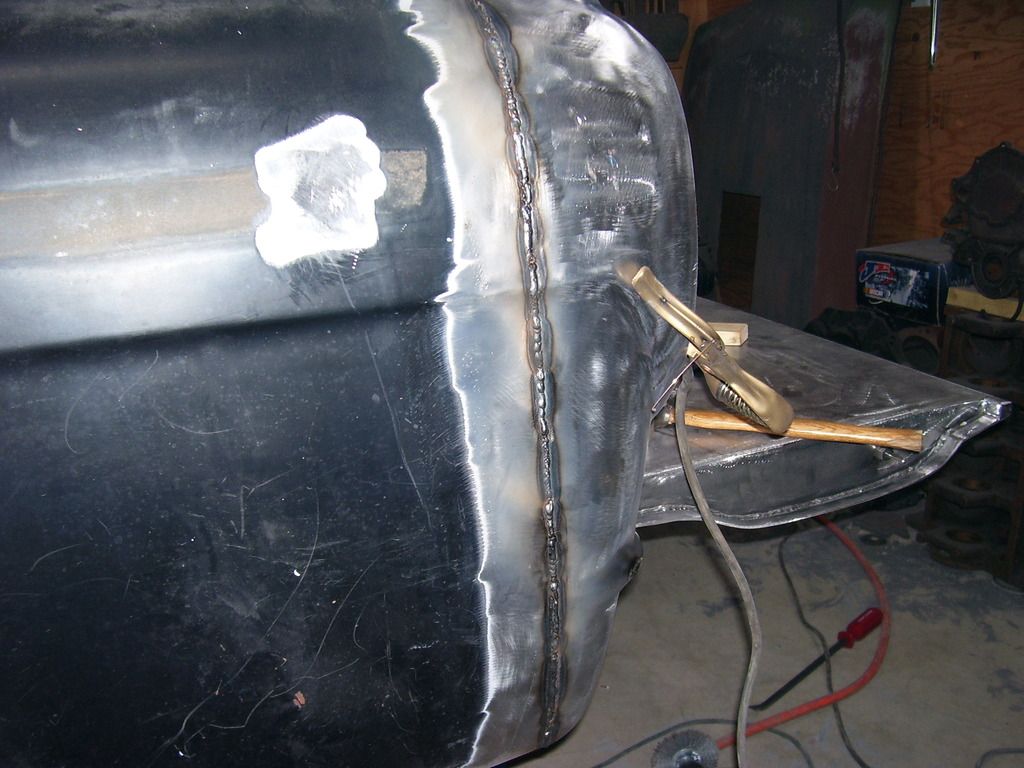
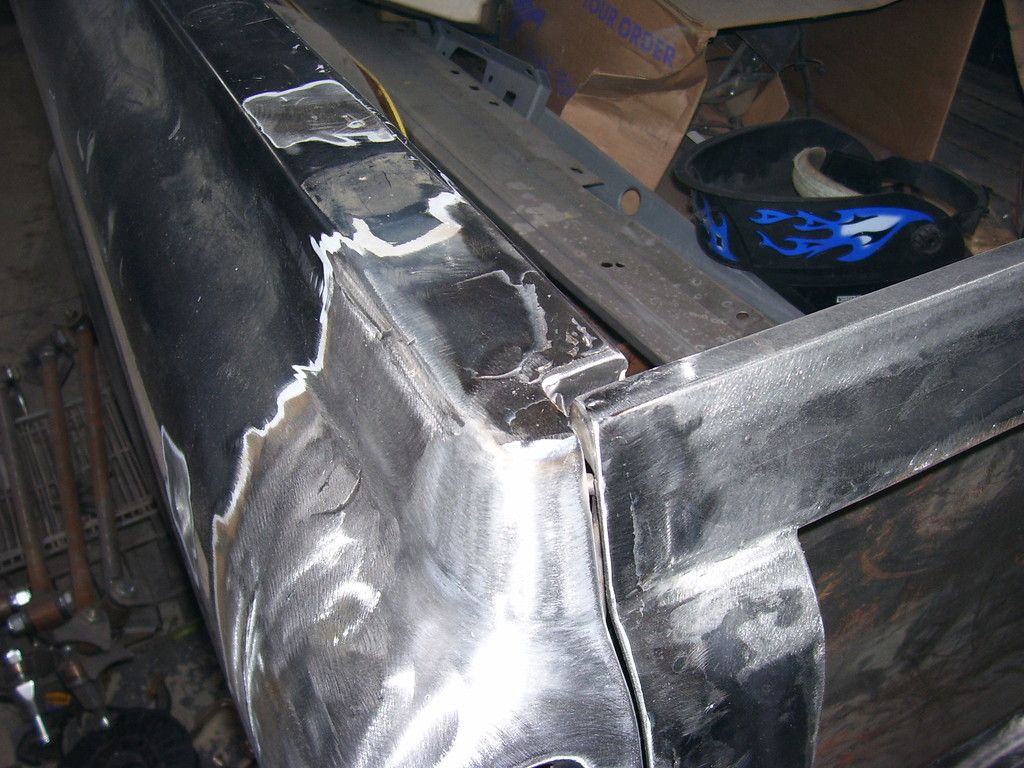
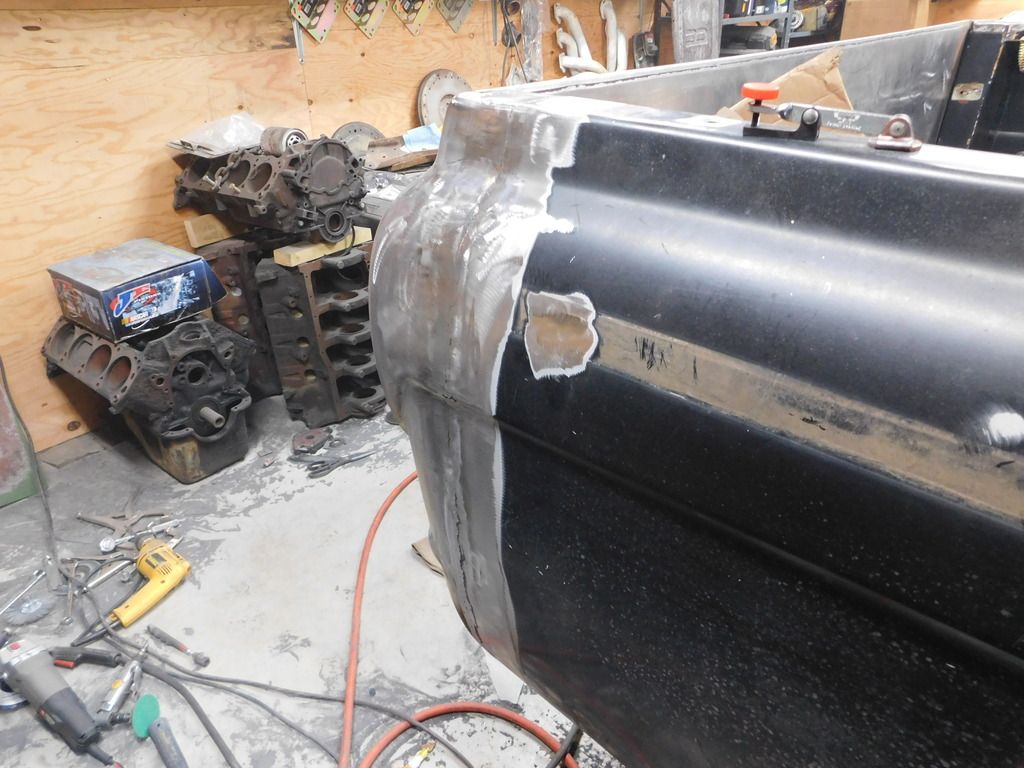
Finished welding the patch panels in place and ground them back.
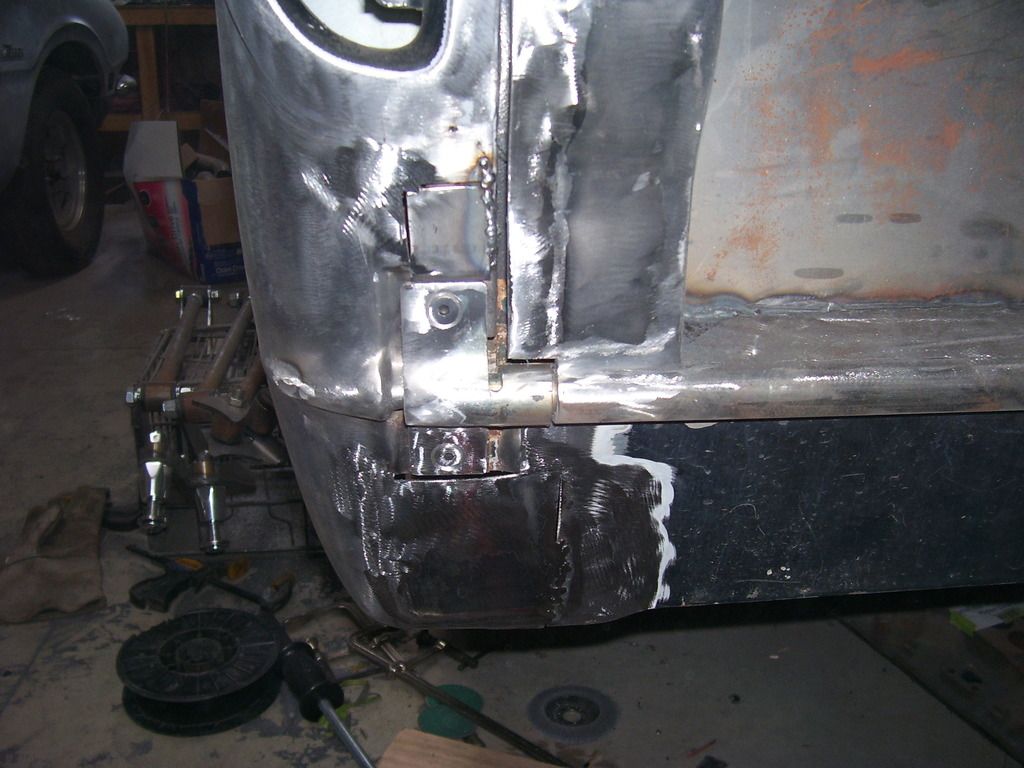
When I built the gate, I matched the contour of the box end cap from the top to just below the taillight. From the bottom of the taillight I didn't pull the edge of the gate back to match the end cap/hinge area. I knew I was going to modify the hinge and close in all the gaps where the hinge mounts so I wanted to be able to add material in that area and still be able to match the gate contours. I built that gate so it was 1/8" out from the body. Now I could add a piece of 1/8" bar stock to the top mounting area of the hinge (after welding the bolts in place) I also filled all the gaps around the hinge to tighten everything up. Between adding bar stock, additional weld beads and the bent sheetmetal pieces I got all the gaps filled and the hinge now sits in a little pocket.
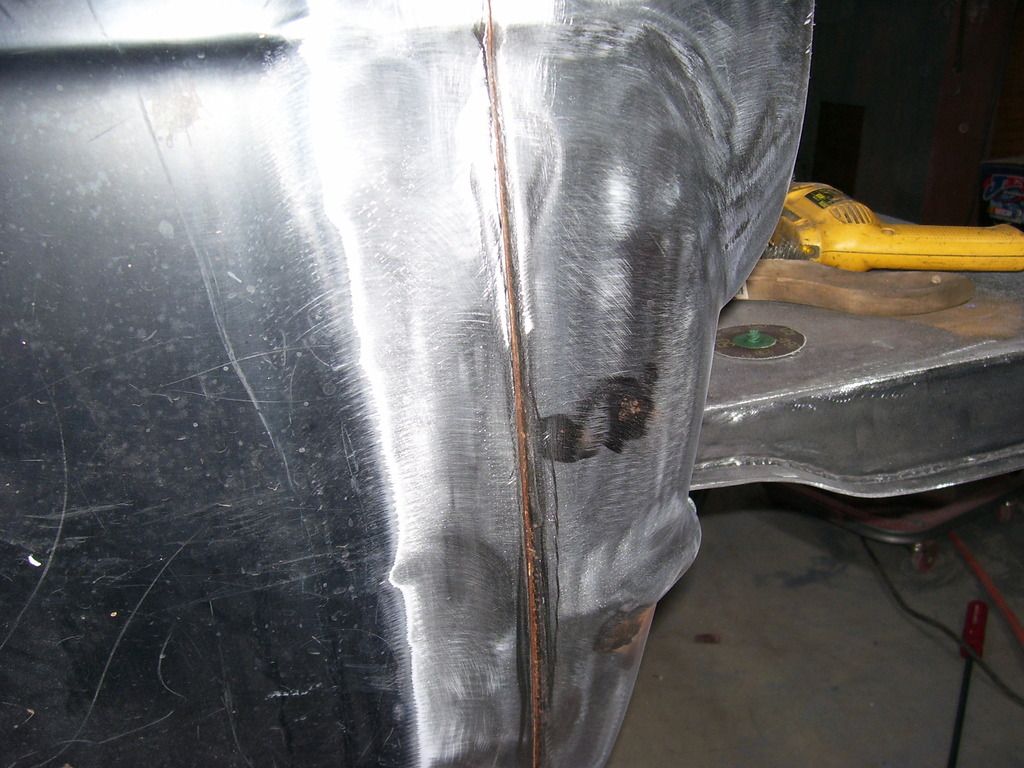
Outer edge before and after filling in and blending metal:
Inner edge before and after filling in and blending metal:
Straight behind hinge, before and after. Notice I actually widened the inner edge of the upper hinge mounting area to match the gap between the tailgate and the end cap. After looking at these pictures I think it also needs to have the slot in the stock hinge welded in to make the hinge appear more solid. Great, now I have to do more grinding!

This gap will actually get a bit smaller when final body work is done. I still have a bit of welding to do beside the hinge down inside the pocket and then once it's ground, filled and sanded it will tighten up a bit more.
Finished the stake pocket plug, rebuilt the inner edge of the top of the box/end cap area where it was dented and worked a bit more on the side seam. Everything on the LR corner is now ready for mud!
Another 8 to 10 hours and the right side should match!
SPark
Finished welding the patch panels in place and ground them back.
When I built the gate, I matched the contour of the box end cap from the top to just below the taillight. From the bottom of the taillight I didn't pull the edge of the gate back to match the end cap/hinge area. I knew I was going to modify the hinge and close in all the gaps where the hinge mounts so I wanted to be able to add material in that area and still be able to match the gate contours. I built that gate so it was 1/8" out from the body. Now I could add a piece of 1/8" bar stock to the top mounting area of the hinge (after welding the bolts in place) I also filled all the gaps around the hinge to tighten everything up. Between adding bar stock, additional weld beads and the bent sheetmetal pieces I got all the gaps filled and the hinge now sits in a little pocket.
Outer edge before and after filling in and blending metal:


Inner edge before and after filling in and blending metal:


Straight behind hinge, before and after. Notice I actually widened the inner edge of the upper hinge mounting area to match the gap between the tailgate and the end cap. After looking at these pictures I think it also needs to have the slot in the stock hinge welded in to make the hinge appear more solid. Great, now I have to do more grinding!


This gap will actually get a bit smaller when final body work is done. I still have a bit of welding to do beside the hinge down inside the pocket and then once it's ground, filled and sanded it will tighten up a bit more.
Finished the stake pocket plug, rebuilt the inner edge of the top of the box/end cap area where it was dented and worked a bit more on the side seam. Everything on the LR corner is now ready for mud!


Another 8 to 10 hours and the right side should match!
SPark
1932 Ford 5 window coupe. 302/C4
1962 8V-390/C6 Unibody Short Bed Soon to be Big Window - The Lincoln that never was
2013 F150 Super Crew Eco Boost 4x4
2015 Ford Edge for the little lady, because she said so!
2007 Mustang GT, 4.6-3V/5 Speed. Only 8680 miles on the clock.
More toys, I need more toys!!!
1962 8V-390/C6 Unibody Short Bed Soon to be Big Window - The Lincoln that never was
2013 F150 Super Crew Eco Boost 4x4
2015 Ford Edge for the little lady, because she said so!
2007 Mustang GT, 4.6-3V/5 Speed. Only 8680 miles on the clock.
More toys, I need more toys!!!
Re: '62 Unibody
Its to bad you can't get anything done 
-
Alan Mclennan

- Posts: 9324
- Joined: October 14, 2006, 6:16 pm
- Location: In the shed... Cranebrook NSW

Re: '62 Unibody
And not a toe insight! 
Honey, If I say I`ll fix something I will, there`s no need to remind me every 6 months!!
66 f100 tabletop swb 351 Clevo C6 "Beryl"
Slick Stock 3 KCMO
Slick Stock 4 Altoona
Slick Stock 5 KCMO
Slick Stock 6 Altoona
Slick Stock 7 Salina KS
Slick Stock 8..............................
66 f100 tabletop swb 351 Clevo C6 "Beryl"
Slick Stock 3 KCMO
Slick Stock 4 Altoona
Slick Stock 5 KCMO
Slick Stock 6 Altoona
Slick Stock 7 Salina KS
Slick Stock 8..............................
Re: '62 Unibody
Trust me, Alan. You don't want to see my toes.
SPark
SPark
1932 Ford 5 window coupe. 302/C4
1962 8V-390/C6 Unibody Short Bed Soon to be Big Window - The Lincoln that never was
2013 F150 Super Crew Eco Boost 4x4
2015 Ford Edge for the little lady, because she said so!
2007 Mustang GT, 4.6-3V/5 Speed. Only 8680 miles on the clock.
More toys, I need more toys!!!
1962 8V-390/C6 Unibody Short Bed Soon to be Big Window - The Lincoln that never was
2013 F150 Super Crew Eco Boost 4x4
2015 Ford Edge for the little lady, because she said so!
2007 Mustang GT, 4.6-3V/5 Speed. Only 8680 miles on the clock.
More toys, I need more toys!!!

Re: '62 Unibody
Great work Steve. That thing just gets smoother every time you touch it.
Can't wait to see what other tricks you have up your sleeve with this truck. TR
Can't wait to see what other tricks you have up your sleeve with this truck. TR
Re: '62 Unibody
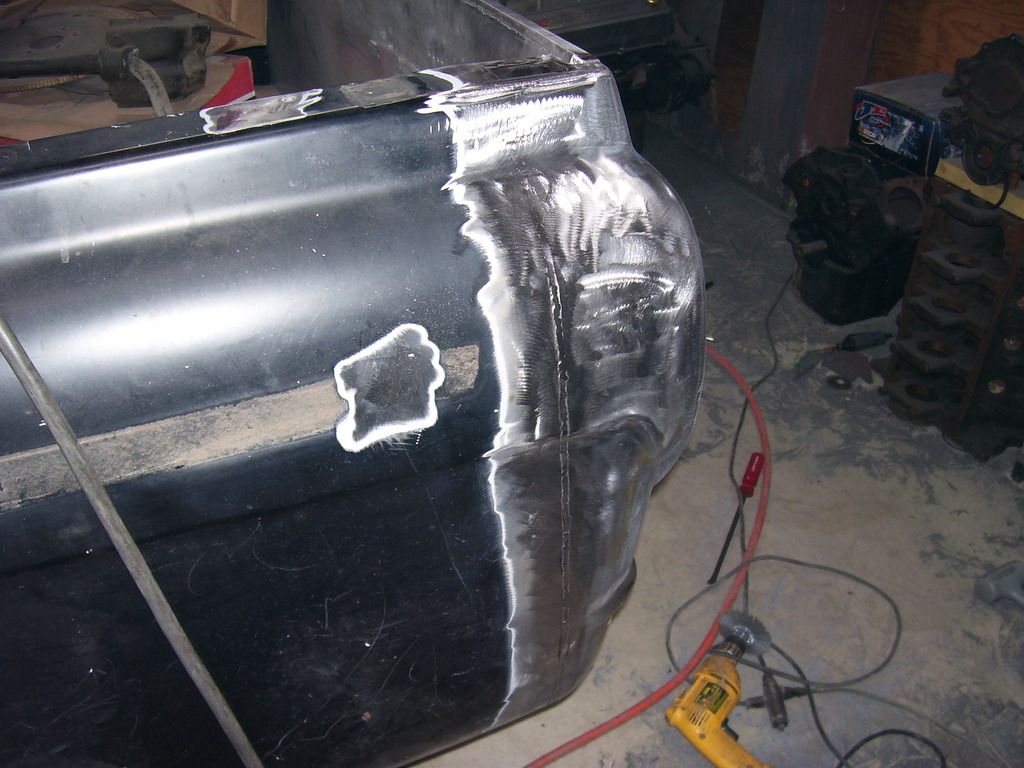
Got the right tailgate hinge modified (bolts welded to it so it can all be blended together and started the rough grinding of the shape to match the corner of the box better), right side seam between the box and end cap welded up (this end cap is even further off than the left side) and the top corners built up and ground back down to match the contour of the top of the gate and the top corner of the end caps. A little progress but too many other things happening this week.
Also got my portable AC for the Hobby Hell room so I can now work until it's too hot and go in there to relax a bit. If it works good, might get another, larger one, for the 22x26 room I'm working in now. Could just put an exhaust port in each room and move it around that way. Hmmmm. Really, these things seem to work great, we'll see how it holds up to a little dust.
Hopefully after this weekend I can get back to working on it every day, just had too many other things to do this week.
SPark
1932 Ford 5 window coupe. 302/C4
1962 8V-390/C6 Unibody Short Bed Soon to be Big Window - The Lincoln that never was
2013 F150 Super Crew Eco Boost 4x4
2015 Ford Edge for the little lady, because she said so!
2007 Mustang GT, 4.6-3V/5 Speed. Only 8680 miles on the clock.
More toys, I need more toys!!!
1962 8V-390/C6 Unibody Short Bed Soon to be Big Window - The Lincoln that never was
2013 F150 Super Crew Eco Boost 4x4
2015 Ford Edge for the little lady, because she said so!
2007 Mustang GT, 4.6-3V/5 Speed. Only 8680 miles on the clock.
More toys, I need more toys!!!
Re: '62 Unibody
Finally got back to doing something.
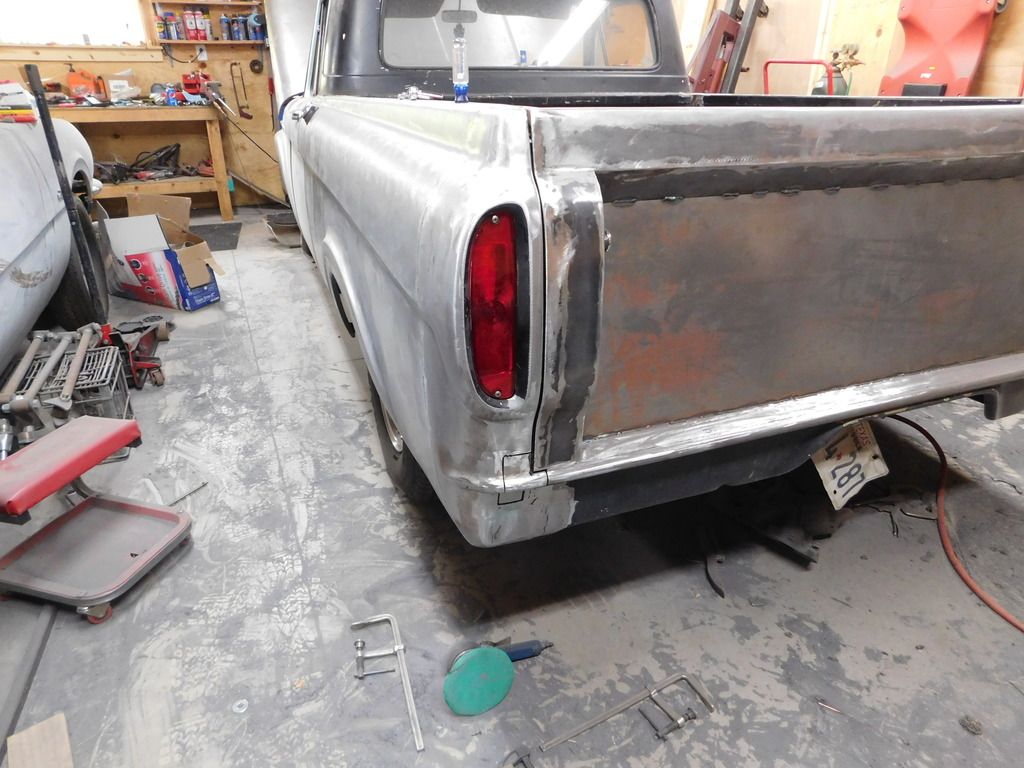
Finished welding the right bed cap onto the end of the bedside. These things really don't fit very well. I am really amazed at how bad they are and I never noticed it until I dug the seam sealer and removed the paint from it. Both sides were awful.
Blended the top rear corners of the end cap to the same contours as the tailgate. All I used to do this is the mig welder and a grinder. I build up the sheetmetal and grind it to shape. These will take a bit of putty to smooth them out but nothing like the mismatch that was there before. It is the same with my stock tailgate, something else we probably don't pay much attention to with paint.
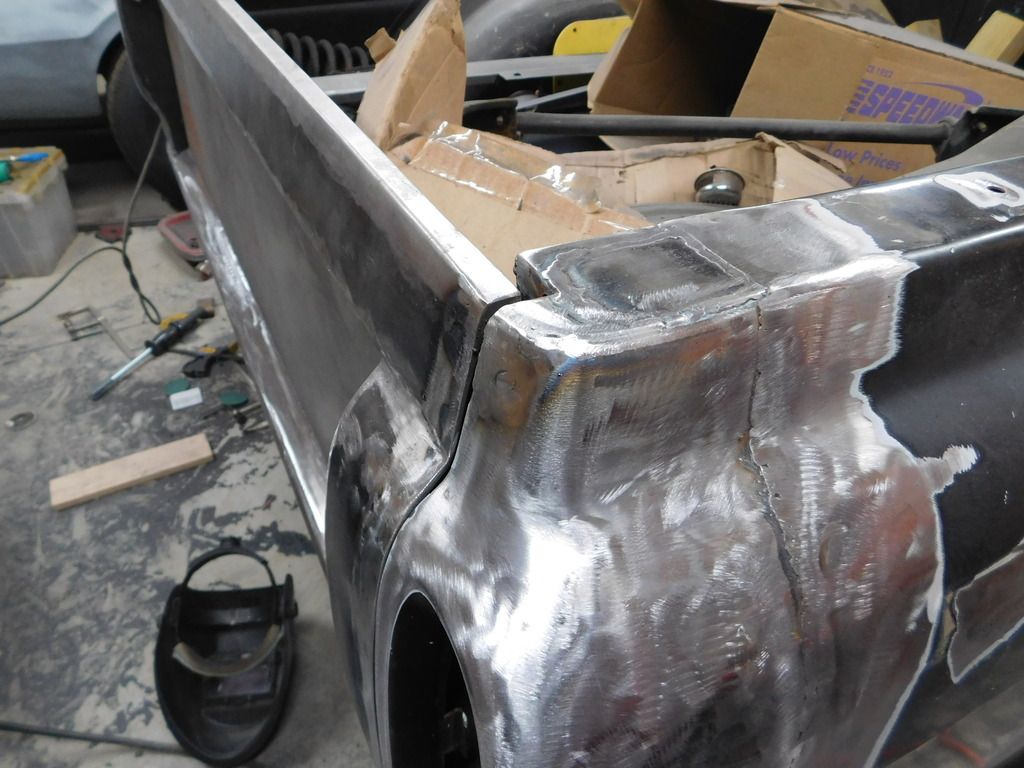

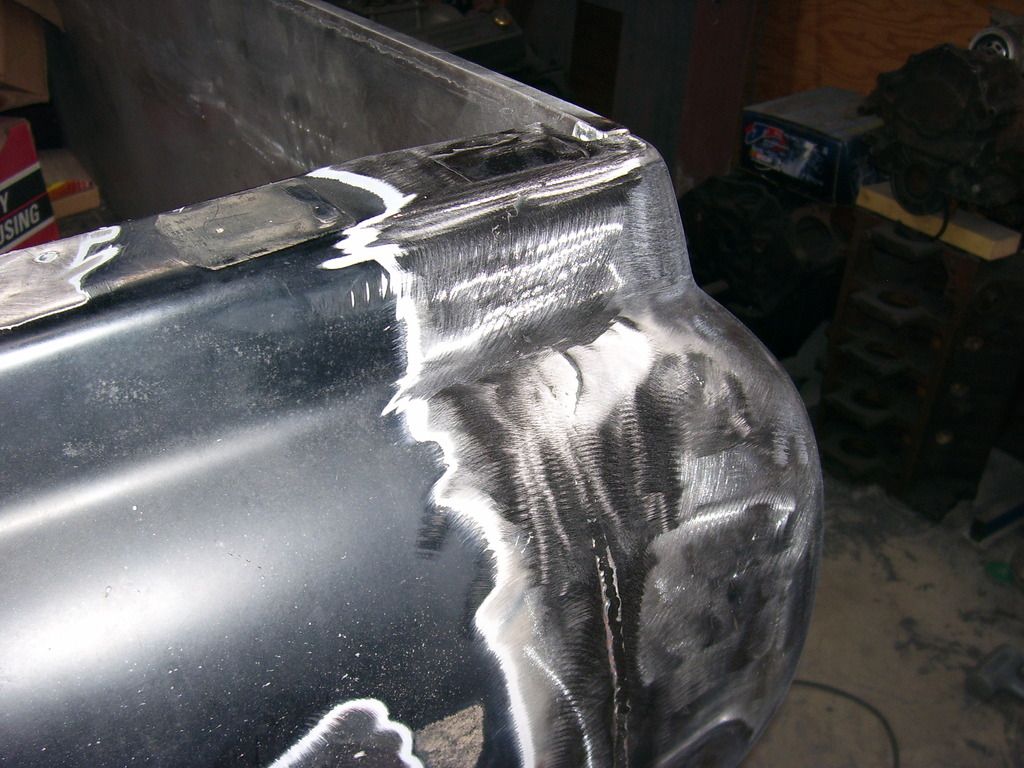
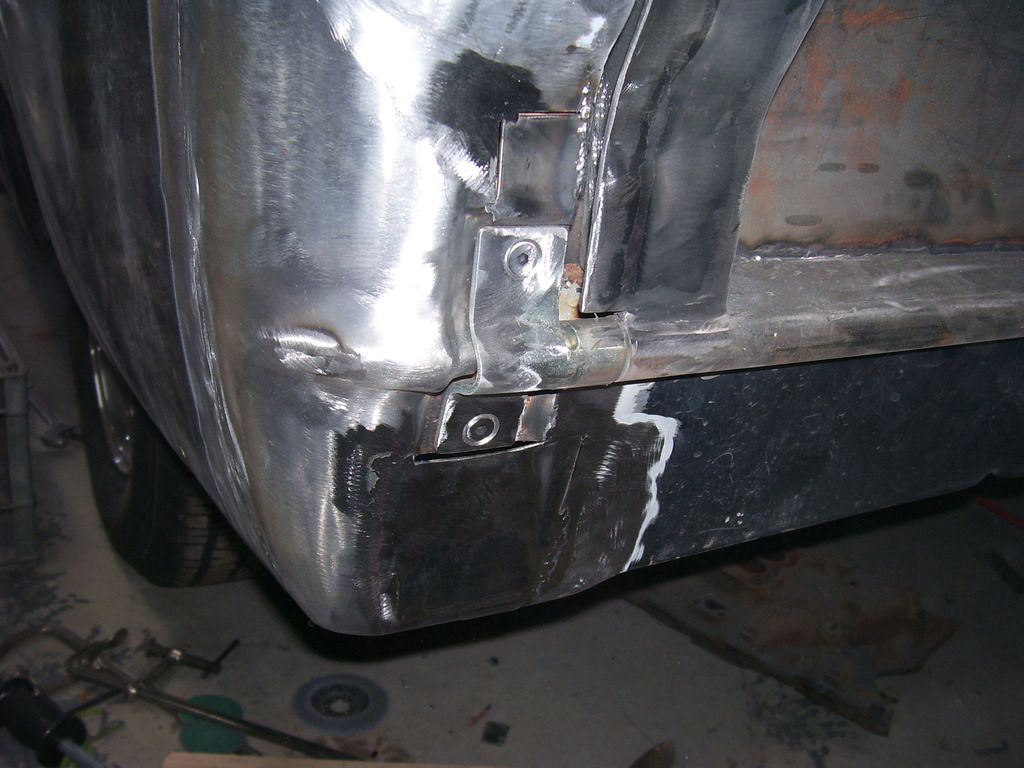
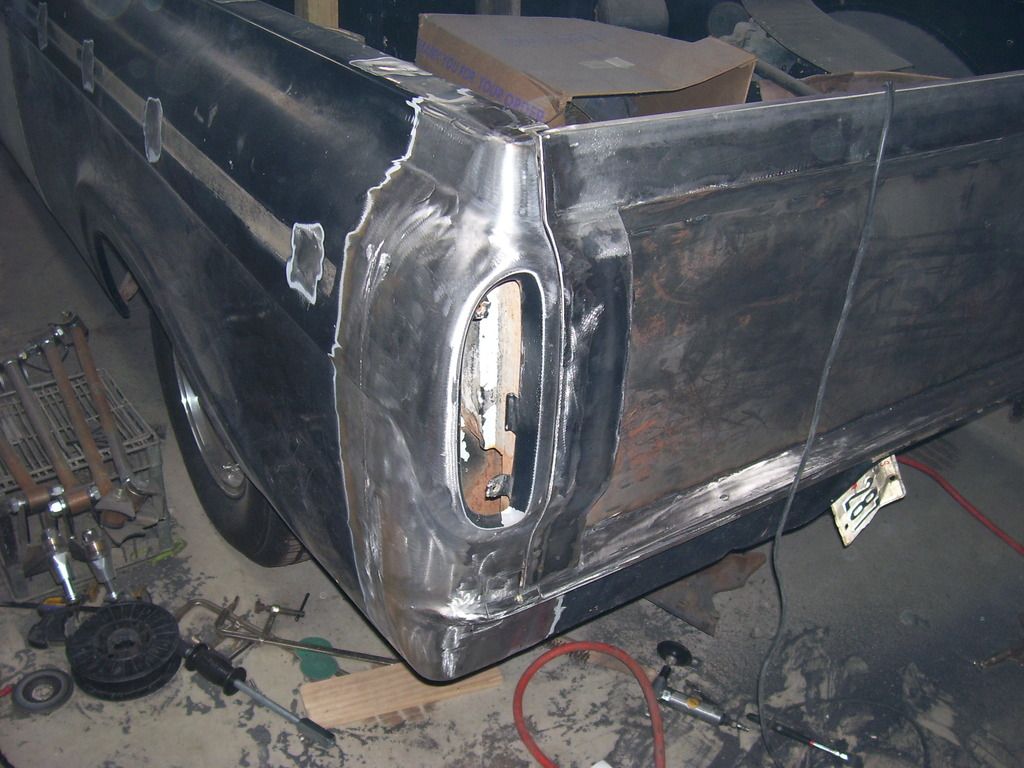
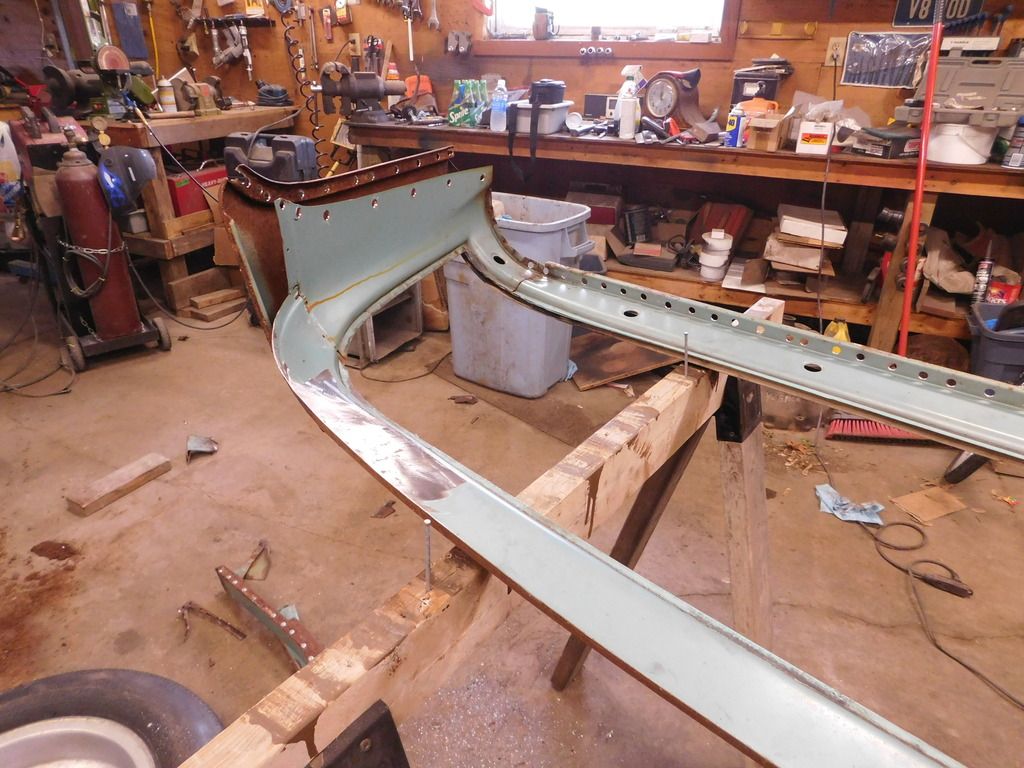
Finished the rough work for the right hinge blend.
To give you a rough idea of what was actually done to the hinges. I started by welding the mounting bolts in as described earlier. Once that was done I did the following:
A. Welded a 16ga, 1.5"x1.75" over the mounting bolts (after they were smoothed back to original level.
B. Did the rust repair below the hinge and blended the end cap and rear gravel pan together, eliminating the seam.
C. Did the rust repair above the hinge. Once that was replaced I added a 1/8"x1.25"x2.5" strap from the edge of the hinge to an area below the taillight. It helps the whole area blend to the taillight bump better and smooths things up.
D. Added weld to the entire back side of the end cap between the hinge opening and the side of the cap to better blend the area. This weld runs from 3/16" thick to just a wet puddle of a bead. Takes a long time to build it up in the deeper areas.
E. This whole area was also built up with weld but it was only round 1/8" deep at the worst spot.
F. Filled the whole crowned area of the "hinge bump" on the end cap. Again, some if this is almost 1/4" thick weld and out at the outer ends it's just a wet puddle to blend things together.
G. These are 3/16"x1/4" "L" shaped pieces that are welded on all sides of the hinge to the surrounding sheetmetal to blend the hinge and close up the gaps between the hinge and the body. Along the sides (the area highlighted) I actually used 1/8"x1/4" bar stock and bent it to match the profile I wanted before welding it in place. figured it was a lot easier to shape a piece of bar stock to the hinge bump shape than a piece of "L" shaped sheetmetal.
H. Filled the slot in the hinge where the pin is pressed in. Just looks nicer.
It will all take a bit of mud but nothing more than a skim coat.
At this point, I consider the tailgate project finished....until it comes back off and I can get at a few spots on the bottom and finish the hinge pockets once the hinges are removed. Considering chrome for the hinges to break things up on the rear a bit.
Later,
SPark
Finished welding the right bed cap onto the end of the bedside. These things really don't fit very well. I am really amazed at how bad they are and I never noticed it until I dug the seam sealer and removed the paint from it. Both sides were awful.

Blended the top rear corners of the end cap to the same contours as the tailgate. All I used to do this is the mig welder and a grinder. I build up the sheetmetal and grind it to shape. These will take a bit of putty to smooth them out but nothing like the mismatch that was there before. It is the same with my stock tailgate, something else we probably don't pay much attention to with paint.


Finished the rough work for the right hinge blend.

To give you a rough idea of what was actually done to the hinges. I started by welding the mounting bolts in as described earlier. Once that was done I did the following:
A. Welded a 16ga, 1.5"x1.75" over the mounting bolts (after they were smoothed back to original level.
B. Did the rust repair below the hinge and blended the end cap and rear gravel pan together, eliminating the seam.
C. Did the rust repair above the hinge. Once that was replaced I added a 1/8"x1.25"x2.5" strap from the edge of the hinge to an area below the taillight. It helps the whole area blend to the taillight bump better and smooths things up.
D. Added weld to the entire back side of the end cap between the hinge opening and the side of the cap to better blend the area. This weld runs from 3/16" thick to just a wet puddle of a bead. Takes a long time to build it up in the deeper areas.
E. This whole area was also built up with weld but it was only round 1/8" deep at the worst spot.
F. Filled the whole crowned area of the "hinge bump" on the end cap. Again, some if this is almost 1/4" thick weld and out at the outer ends it's just a wet puddle to blend things together.
G. These are 3/16"x1/4" "L" shaped pieces that are welded on all sides of the hinge to the surrounding sheetmetal to blend the hinge and close up the gaps between the hinge and the body. Along the sides (the area highlighted) I actually used 1/8"x1/4" bar stock and bent it to match the profile I wanted before welding it in place. figured it was a lot easier to shape a piece of bar stock to the hinge bump shape than a piece of "L" shaped sheetmetal.
H. Filled the slot in the hinge where the pin is pressed in. Just looks nicer.
It will all take a bit of mud but nothing more than a skim coat.

At this point, I consider the tailgate project finished....until it comes back off and I can get at a few spots on the bottom and finish the hinge pockets once the hinges are removed. Considering chrome for the hinges to break things up on the rear a bit.


Later,
SPark
1932 Ford 5 window coupe. 302/C4
1962 8V-390/C6 Unibody Short Bed Soon to be Big Window - The Lincoln that never was
2013 F150 Super Crew Eco Boost 4x4
2015 Ford Edge for the little lady, because she said so!
2007 Mustang GT, 4.6-3V/5 Speed. Only 8680 miles on the clock.
More toys, I need more toys!!!
1962 8V-390/C6 Unibody Short Bed Soon to be Big Window - The Lincoln that never was
2013 F150 Super Crew Eco Boost 4x4
2015 Ford Edge for the little lady, because she said so!
2007 Mustang GT, 4.6-3V/5 Speed. Only 8680 miles on the clock.
More toys, I need more toys!!!
Re: '62 Unibody
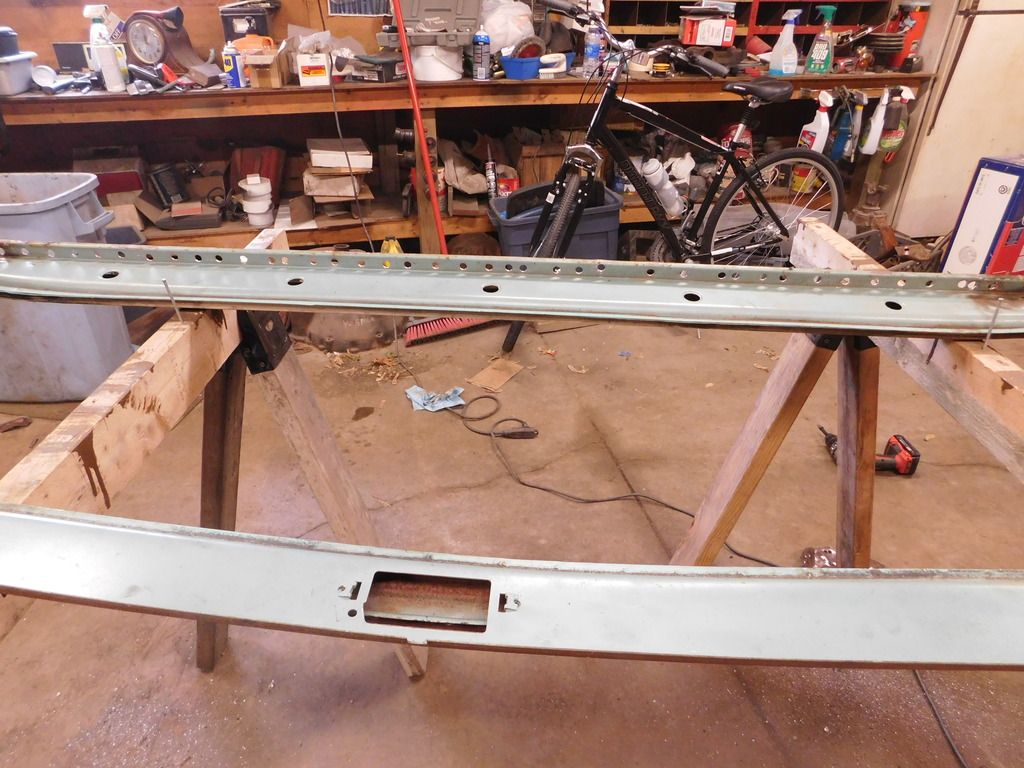
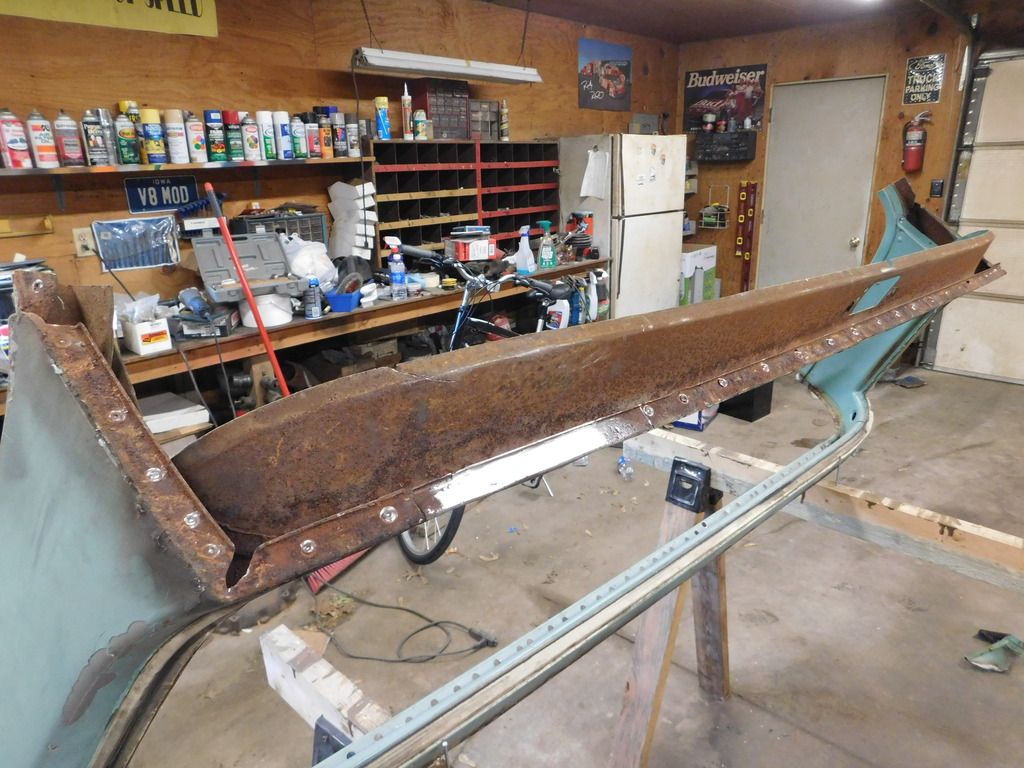
Decided to see if the box sides were as solid as they looked. Took a Wagner Painteater and in about 15 minutes all the paint was stripped from the left box side. Found 2 little bolt holes (probably a wraparound back bumper mount) and 2 holes in the top rail for an old toolbox at some point in it's life. All 4 holes were just puttied in. Popped them out and plug welded them back in. Couple minutes of grinding and the left box side is ready for a skim coat.
No issues around the torque box area. No damage around the wheelwell. Just a small crease in front of the wheel opening that you can barely feel. Not much more that a deep paint scratch.
Really glad to see the body is as solid as we thought it was. All that is left to hand strip is the right box side. Going to get the interior and inside the box media blasted. Will do that after I get the big window cab section in. Figure stripping the box sides, roof skin and door outers will save me a few hundred in media blasting fees. The Painteater works fast and easy or I wouldn't do it this way.
Few pics of the left box side.

Also did a little trading last weekend. Quick trip to Omaha to trade a 1 piece windshield kit for a 1937 Ford for a nice original grill for a '37. I had a dented original that was missing a few teeth, an aftermarket that doesn't really fit that well and is known to take a ton of work to fit correctly. I now have a nice straight original '37 grill for my sedan.
Damaged original. There are guys that will fix this.

Aftermarket $625 POS. Decent but a lot of work needed. Not as nice as the $2200 (yes, that's right) aftermarket that is available. Not for me.

This is an original 1937. Hard to imagine one of these surviving for 78 years!

The guy also had a nice pair of chrome bumpers still in the paper wrappers. He said they were over 25 years old and didn't remember where he had them chromed. I tried to buy the so we unwrapped them for the first time. They were fantastic! Perfect inside and out. He got cold feet and refused to price them to me. Think I'll call him in a couple weeks and see if he's had a change of heart.
Quick trip to Minneapolis, MN in the morning to pick up a few items for a friend then back to stripping paint Wednesday. Hopefully it's as nice as the left side is.
Spark
No issues around the torque box area. No damage around the wheelwell. Just a small crease in front of the wheel opening that you can barely feel. Not much more that a deep paint scratch.
Really glad to see the body is as solid as we thought it was. All that is left to hand strip is the right box side. Going to get the interior and inside the box media blasted. Will do that after I get the big window cab section in. Figure stripping the box sides, roof skin and door outers will save me a few hundred in media blasting fees. The Painteater works fast and easy or I wouldn't do it this way.
Few pics of the left box side.


Also did a little trading last weekend. Quick trip to Omaha to trade a 1 piece windshield kit for a 1937 Ford for a nice original grill for a '37. I had a dented original that was missing a few teeth, an aftermarket that doesn't really fit that well and is known to take a ton of work to fit correctly. I now have a nice straight original '37 grill for my sedan.
Damaged original. There are guys that will fix this.

Aftermarket $625 POS. Decent but a lot of work needed. Not as nice as the $2200 (yes, that's right) aftermarket that is available. Not for me.

This is an original 1937. Hard to imagine one of these surviving for 78 years!

The guy also had a nice pair of chrome bumpers still in the paper wrappers. He said they were over 25 years old and didn't remember where he had them chromed. I tried to buy the so we unwrapped them for the first time. They were fantastic! Perfect inside and out. He got cold feet and refused to price them to me. Think I'll call him in a couple weeks and see if he's had a change of heart.
Quick trip to Minneapolis, MN in the morning to pick up a few items for a friend then back to stripping paint Wednesday. Hopefully it's as nice as the left side is.
Spark
1932 Ford 5 window coupe. 302/C4
1962 8V-390/C6 Unibody Short Bed Soon to be Big Window - The Lincoln that never was
2013 F150 Super Crew Eco Boost 4x4
2015 Ford Edge for the little lady, because she said so!
2007 Mustang GT, 4.6-3V/5 Speed. Only 8680 miles on the clock.
More toys, I need more toys!!!
1962 8V-390/C6 Unibody Short Bed Soon to be Big Window - The Lincoln that never was
2013 F150 Super Crew Eco Boost 4x4
2015 Ford Edge for the little lady, because she said so!
2007 Mustang GT, 4.6-3V/5 Speed. Only 8680 miles on the clock.
More toys, I need more toys!!!
Re: '62 Unibody
Filled the last of the stake pockets today! My method is to use a thicker steel (I used 1/8" thick instead of sheetmetal). That way I can concentrate the heat on the steel and pull it to the sheetmetal for a good weld without burning thru the sheetmetal.
Notice the little "L" shaped piece lying to the left of the welded in plug in the picture just above? That "L" is the filler for the gap between the inside/top edge of the box and the cab. Just tack it in, make it fit the inside edge of the box and weld it in, too. I also added some filler material at the side of box/back of cab junction to shape that area. You'll also see the joint between the back of the cab panel and top of the box side has had the seam sealer dug out and that area was welded in, too.
A little grinding and the stake pockets are gone, the box/cab have a nicer transition and I got rid of the seam on the back of the cab "ledge" behind the window panel (I'll finish the area under the back of the cab panel when I do the big window conversion).
I've messed with hood hinges/hood shape for 2 full days. My patience is now gone! When I put the hood on the floor, it measures 1/4" wider than the cowl area it butts up against. When I mount it on the hinges, it is 3/4" narrower than the cowl area. I've decided the hinges are changing the shape of the hood. I've had it on and off so many times, I've worn out the cage nut in the firewall! I now have 3 stripped out cage nuts to fix. Sent a message to Kevin and may become another in the long line that have switched to his kit.
Have a great day!
SPark


Notice the little "L" shaped piece lying to the left of the welded in plug in the picture just above? That "L" is the filler for the gap between the inside/top edge of the box and the cab. Just tack it in, make it fit the inside edge of the box and weld it in, too. I also added some filler material at the side of box/back of cab junction to shape that area. You'll also see the joint between the back of the cab panel and top of the box side has had the seam sealer dug out and that area was welded in, too.


A little grinding and the stake pockets are gone, the box/cab have a nicer transition and I got rid of the seam on the back of the cab "ledge" behind the window panel (I'll finish the area under the back of the cab panel when I do the big window conversion).


I've messed with hood hinges/hood shape for 2 full days. My patience is now gone! When I put the hood on the floor, it measures 1/4" wider than the cowl area it butts up against. When I mount it on the hinges, it is 3/4" narrower than the cowl area. I've decided the hinges are changing the shape of the hood. I've had it on and off so many times, I've worn out the cage nut in the firewall! I now have 3 stripped out cage nuts to fix. Sent a message to Kevin and may become another in the long line that have switched to his kit.
Have a great day!
SPark
1932 Ford 5 window coupe. 302/C4
1962 8V-390/C6 Unibody Short Bed Soon to be Big Window - The Lincoln that never was
2013 F150 Super Crew Eco Boost 4x4
2015 Ford Edge for the little lady, because she said so!
2007 Mustang GT, 4.6-3V/5 Speed. Only 8680 miles on the clock.
More toys, I need more toys!!!
1962 8V-390/C6 Unibody Short Bed Soon to be Big Window - The Lincoln that never was
2013 F150 Super Crew Eco Boost 4x4
2015 Ford Edge for the little lady, because she said so!
2007 Mustang GT, 4.6-3V/5 Speed. Only 8680 miles on the clock.
More toys, I need more toys!!!
Re: '62 Unibody
That kit solved my hood spring issues dang fast 

Re: '62 Unibody
I would like to ask about this hood kit you speak of, where can I find it, also this build is beautiful and the attention to detail second to none being a retired bodyman of 35 years I have seen alot and very few this nice, I have a 62 wrong bed and I will be using the same Dakota kit from Industrial Chassis. Keep up the good work I will be paying attention. Do you have this thread going on any other sites by any chance, I ask this because in some places you can get notification of progress.
Re: '62 Unibody
This is the only place I have this build thread going.
Here's Kevin's build with his kit installed. Scroll down to the 6th post on page 8.
viewtopic.php?f=32&t=10877&start=140
Payment goes out Tuesday for my hood kit from Kevin (Kstones63), he designed and built these kits. He can answer any of your questions on them. Several members have them and I've stared at them for years, it's time to get off the fence for me.
Thanks for the kind comments,
SPark
1932 Ford 5 window coupe. 302/C4
1962 8V-390/C6 Unibody Short Bed Soon to be Big Window - The Lincoln that never was
2013 F150 Super Crew Eco Boost 4x4
2015 Ford Edge for the little lady, because she said so!
2007 Mustang GT, 4.6-3V/5 Speed. Only 8680 miles on the clock.
More toys, I need more toys!!!
1962 8V-390/C6 Unibody Short Bed Soon to be Big Window - The Lincoln that never was
2013 F150 Super Crew Eco Boost 4x4
2015 Ford Edge for the little lady, because she said so!
2007 Mustang GT, 4.6-3V/5 Speed. Only 8680 miles on the clock.
More toys, I need more toys!!!
Re: '62 Unibody
The day has come that all, yes, all of the spot welds and extra sheet metal have ben removed from the big window section. Never thought I would ever get them all drilled out.
The biggest differences is I switched from a cheapo Harbor Freight spot weld cutter to a nice Blair Spot Weld Cutter. They look very similar but there is a night and day difference. The HF Specials did a decent job for the money, and would work fine if you had a few welds to cut. If you are going to cut this many welds (nearly 200 on each section if I counted right), you need a quality cutter. Some of this metal is 4 layers thick and the HF Spec struggles with it really bad. They also dull very fast and I would use up a cutter about every 20 holes max. I only had probably 50 holes cut and had a whole pile of double sided HF cutters lying on the bench all used up. 1 whole package of the HF pieces broke teeth off on the first cut. I cleaned the remaining 150 +/- welds in less than 2 hours with 2 cutters, and the second cutter is still on the drill. No comparison. Cost a bit more up front to buy but the Blairs will be drilling holes long after the HF is in the scrap bucket.
http://shop.blairequipment.com/SearchRe ... aQodNgYAvw
End of non-paid commercial endorsement.
Had a section of the inner portion of the back window section that was damaged when the tree fell on it at some point in it's life. Got that area re-shapped and the slot (a place we cut into it by accident when removing it from the truck, oops) welded closed, dressed down and ready for final mud.
Once that was repaired, I tackled all the remaining spot welds. I wanted to make the inner and outer repairs from the tree damage before cutting away all the surrounding sheetmetal. Figured the old metal would give some support, and it did help.

The guys on the assembly line put in a good days work with the spot welders! They earned their pay that day. You may notice in some of the pictures that one side still has the rain gutter extension (that runs down the back of the door on a big window truck) still in place while the opposite side has been removed. All the spot welds down one side were easy to get at but on the other side they were so far back they fell under the edge of the rain gutter and I couldn't get the spot weld cutter in there. Only option was to remove the rain gutter. Just 10 or so more welds to replace.
Next is to change my steering shaft. Never liked it and think I have a better answer for it. Should have parts later this week and once I get that part re-done, I will remove the seats and steering column then attack the back window section of the cab. Also going to order a few spare weld cutters (Amazon has the best prices for Blair stuff I have found so far) so I won't be held up in case I break one (thanks for mentioning that in chat the other night, Ken).
Later,
SPark
The biggest differences is I switched from a cheapo Harbor Freight spot weld cutter to a nice Blair Spot Weld Cutter. They look very similar but there is a night and day difference. The HF Specials did a decent job for the money, and would work fine if you had a few welds to cut. If you are going to cut this many welds (nearly 200 on each section if I counted right), you need a quality cutter. Some of this metal is 4 layers thick and the HF Spec struggles with it really bad. They also dull very fast and I would use up a cutter about every 20 holes max. I only had probably 50 holes cut and had a whole pile of double sided HF cutters lying on the bench all used up. 1 whole package of the HF pieces broke teeth off on the first cut. I cleaned the remaining 150 +/- welds in less than 2 hours with 2 cutters, and the second cutter is still on the drill. No comparison. Cost a bit more up front to buy but the Blairs will be drilling holes long after the HF is in the scrap bucket.
http://shop.blairequipment.com/SearchRe ... aQodNgYAvw
End of non-paid commercial endorsement.
Had a section of the inner portion of the back window section that was damaged when the tree fell on it at some point in it's life. Got that area re-shapped and the slot (a place we cut into it by accident when removing it from the truck, oops) welded closed, dressed down and ready for final mud.


Once that was repaired, I tackled all the remaining spot welds. I wanted to make the inner and outer repairs from the tree damage before cutting away all the surrounding sheetmetal. Figured the old metal would give some support, and it did help.


The guys on the assembly line put in a good days work with the spot welders! They earned their pay that day. You may notice in some of the pictures that one side still has the rain gutter extension (that runs down the back of the door on a big window truck) still in place while the opposite side has been removed. All the spot welds down one side were easy to get at but on the other side they were so far back they fell under the edge of the rain gutter and I couldn't get the spot weld cutter in there. Only option was to remove the rain gutter. Just 10 or so more welds to replace.
Next is to change my steering shaft. Never liked it and think I have a better answer for it. Should have parts later this week and once I get that part re-done, I will remove the seats and steering column then attack the back window section of the cab. Also going to order a few spare weld cutters (Amazon has the best prices for Blair stuff I have found so far) so I won't be held up in case I break one (thanks for mentioning that in chat the other night, Ken).
Later,
SPark
1932 Ford 5 window coupe. 302/C4
1962 8V-390/C6 Unibody Short Bed Soon to be Big Window - The Lincoln that never was
2013 F150 Super Crew Eco Boost 4x4
2015 Ford Edge for the little lady, because she said so!
2007 Mustang GT, 4.6-3V/5 Speed. Only 8680 miles on the clock.
More toys, I need more toys!!!
1962 8V-390/C6 Unibody Short Bed Soon to be Big Window - The Lincoln that never was
2013 F150 Super Crew Eco Boost 4x4
2015 Ford Edge for the little lady, because she said so!
2007 Mustang GT, 4.6-3V/5 Speed. Only 8680 miles on the clock.
More toys, I need more toys!!!
Re: '62 Unibody
Steve those Blair spotweld cutters look like they are worth the extra money
if they help you get the job done a whole lot easier. By the looks of it you have
gotten a lot done in a short amount of time. I hated to part with that big window
frame and glass for my 57, but I just knew a project like that would not be a good
one for me. Yours is looking great. TR
if they help you get the job done a whole lot easier. By the looks of it you have
gotten a lot done in a short amount of time. I hated to part with that big window
frame and glass for my 57, but I just knew a project like that would not be a good
one for me. Yours is looking great. TR
Re: '62 Unibody
Got the hood hinge kit ordered from Kevin today!
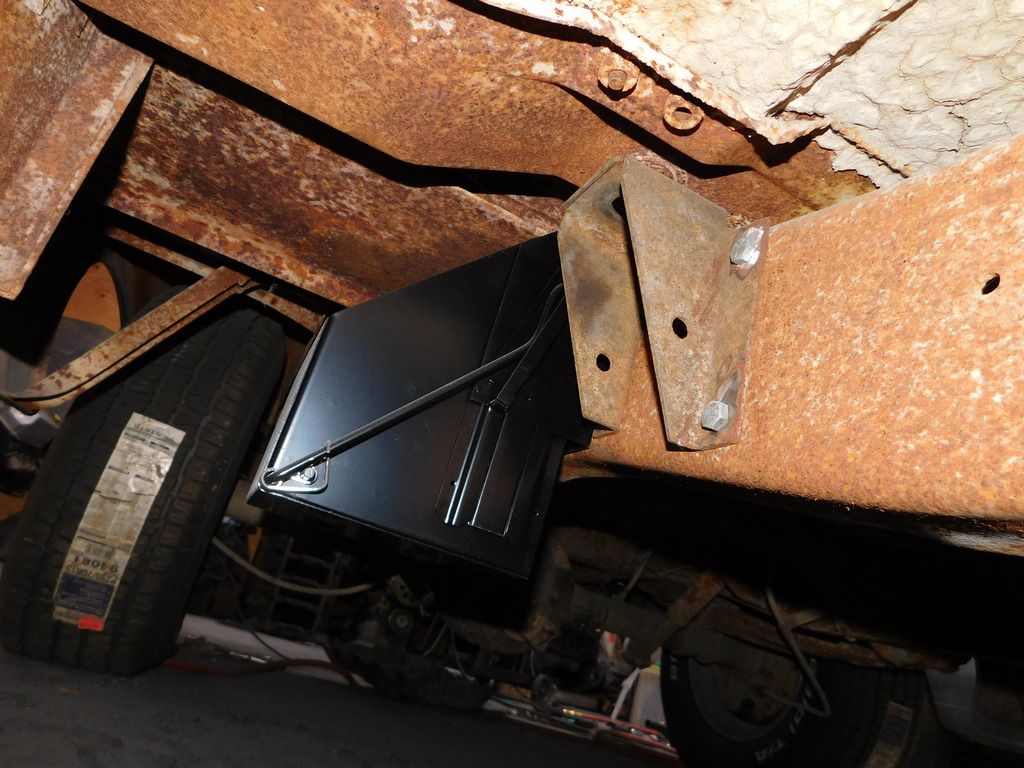
Also got the drop down battery box mounted on the right frame rail the other day, forgot to include that.
Got a few pieces coming from Speedway and a few products coming from Eastwood. Gotta keep moving forward!
Also got the drop down battery box mounted on the right frame rail the other day, forgot to include that.


Got a few pieces coming from Speedway and a few products coming from Eastwood. Gotta keep moving forward!
1932 Ford 5 window coupe. 302/C4
1962 8V-390/C6 Unibody Short Bed Soon to be Big Window - The Lincoln that never was
2013 F150 Super Crew Eco Boost 4x4
2015 Ford Edge for the little lady, because she said so!
2007 Mustang GT, 4.6-3V/5 Speed. Only 8680 miles on the clock.
More toys, I need more toys!!!
1962 8V-390/C6 Unibody Short Bed Soon to be Big Window - The Lincoln that never was
2013 F150 Super Crew Eco Boost 4x4
2015 Ford Edge for the little lady, because she said so!
2007 Mustang GT, 4.6-3V/5 Speed. Only 8680 miles on the clock.
More toys, I need more toys!!!
Re: '62 Unibody Still Plugging Along
Got the back of cab section, and the right inner fender I created, back from the blaster's place today! Everything looks great, no surprises. Little cleanup work and I'll try putting the cab section in.
Also removed my old steering shaft with the double front joint in it and the support bearing, ordered a new single u-joint for the box connection and started re-working the steering shaft. Since I'm not using the Lincoln 430 with it's stock exhaust manifolds, I can make the shaft run in a different area and clean things up a bit. Of course that will require a different floor plate, modifying the drop bracket under the dash and different motor mount stands, too. That's OK, I didn't like the Mustang mounts after I got them tacked in place(horizontal thru bolt) and have a set of truck motor mounts already (no idea why but I have a spare set) that use the single stud. Once the motor mounts are re-done and the steering shaft is back where it belongs, I'll strip the interior and do the back of cab section. Once that cab section is in, the rolling chassis will go to the blaster to do the inside of the box, inside the cab, roof, door jambs and firewall. Then things can get serious and we can really start modifying things.
Got my Eastwood shipment of weld thru primer and engine paint (neat color and a salute to my past). Got my Amazon shipment of 6 spare Blair spotweld cutter bits (if you have them you won't need them and if you don't have them you will). Got the Sweet steering u-joint from Speedway along with the tonneau cover hinges and latches I want to incorporate on the build.
Got one daughter moved to their new home last week. Since they occupied my days with moving, I occupied my nights with ordering parts, that'll teach 'em. The other daughter sold the house they were living in and bought their second house last weekend so it sounds like I get a few weeks to work on toys before moving starts again. Got a clean bill of health from the doc on my heart today and even got some meds reduced! Says it will give me more energy and I need that pretty bad right now.
Hopefully pics to follow and work to restart tomorrow.
SPark
1932 Ford 5 window coupe. 302/C4
1962 8V-390/C6 Unibody Short Bed Soon to be Big Window - The Lincoln that never was
2013 F150 Super Crew Eco Boost 4x4
2015 Ford Edge for the little lady, because she said so!
2007 Mustang GT, 4.6-3V/5 Speed. Only 8680 miles on the clock.
More toys, I need more toys!!!
1962 8V-390/C6 Unibody Short Bed Soon to be Big Window - The Lincoln that never was
2013 F150 Super Crew Eco Boost 4x4
2015 Ford Edge for the little lady, because she said so!
2007 Mustang GT, 4.6-3V/5 Speed. Only 8680 miles on the clock.
More toys, I need more toys!!!
Re: '62 Unibody Still Plugging Along
Glad to hear the good news from your doctor Steve.
That would make anyone feel great. TR
That would make anyone feel great. TR
Re: '62 Unibody Still Plugging Along
Back cab section ready to go in.

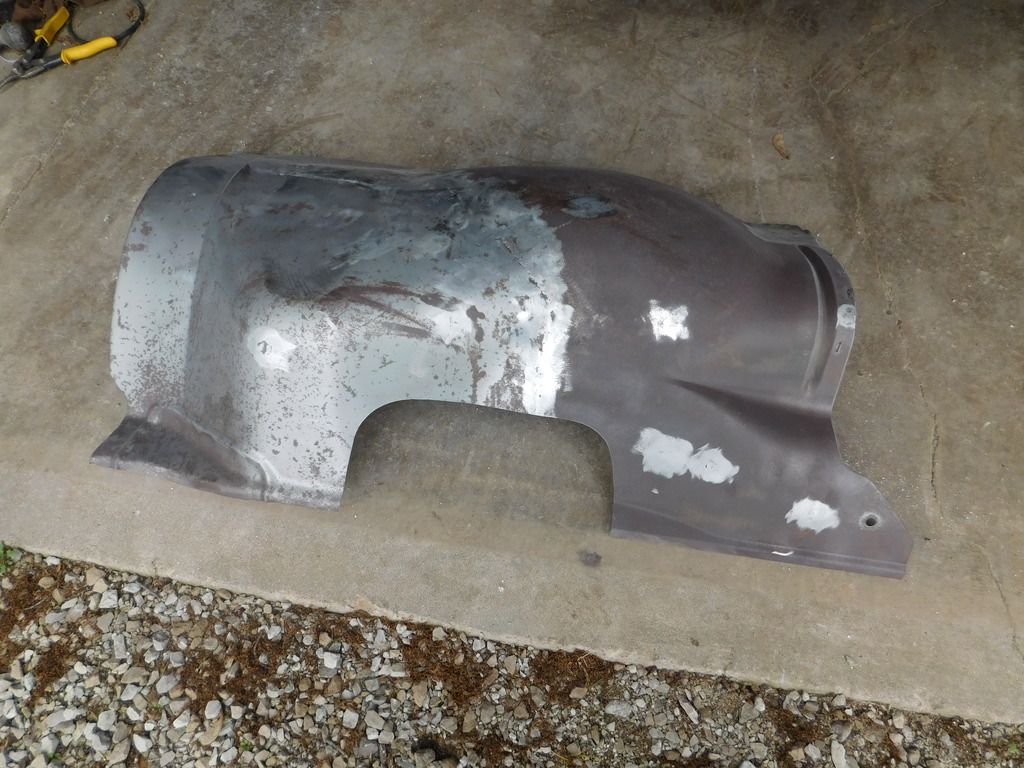
Right inner fender created from normal front half and big truck/4x4 back half.

Got both back taillights and both front parking lights smoothed off. No more lettering on any of them. One parking light had lettering and the other didn't. Sometimes this stuff makes no sense.
According to UPS I should have the reverse hood kit from Kevin tomorrow!
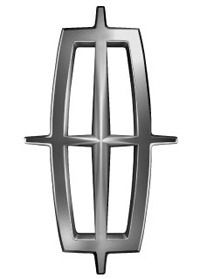
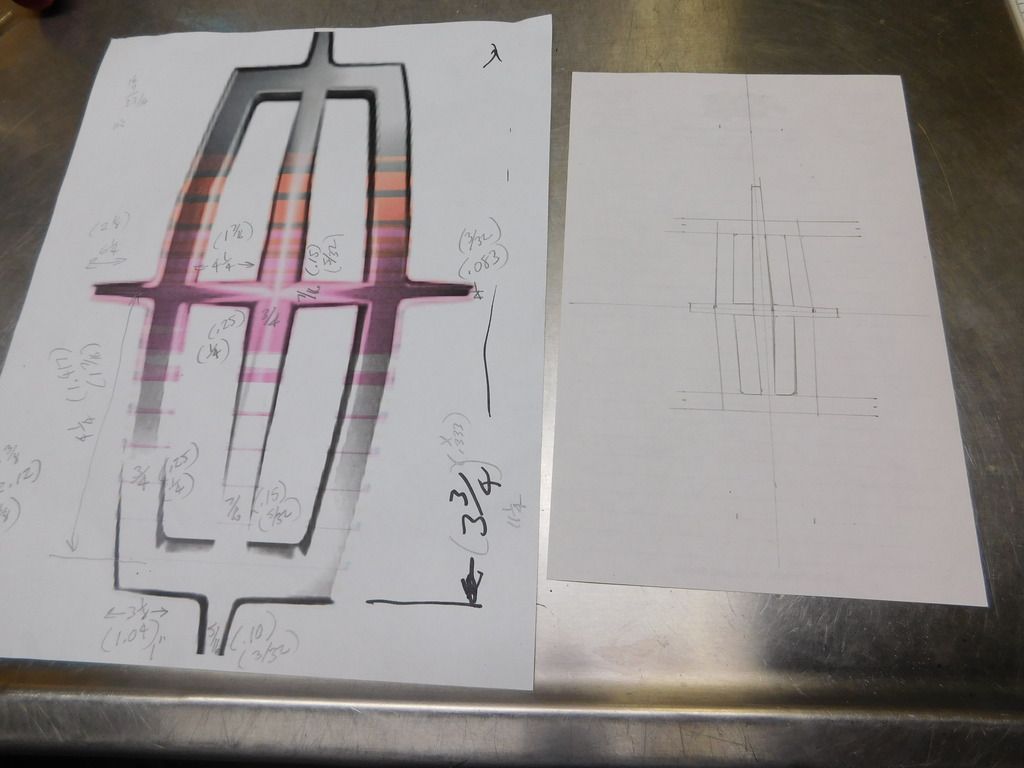
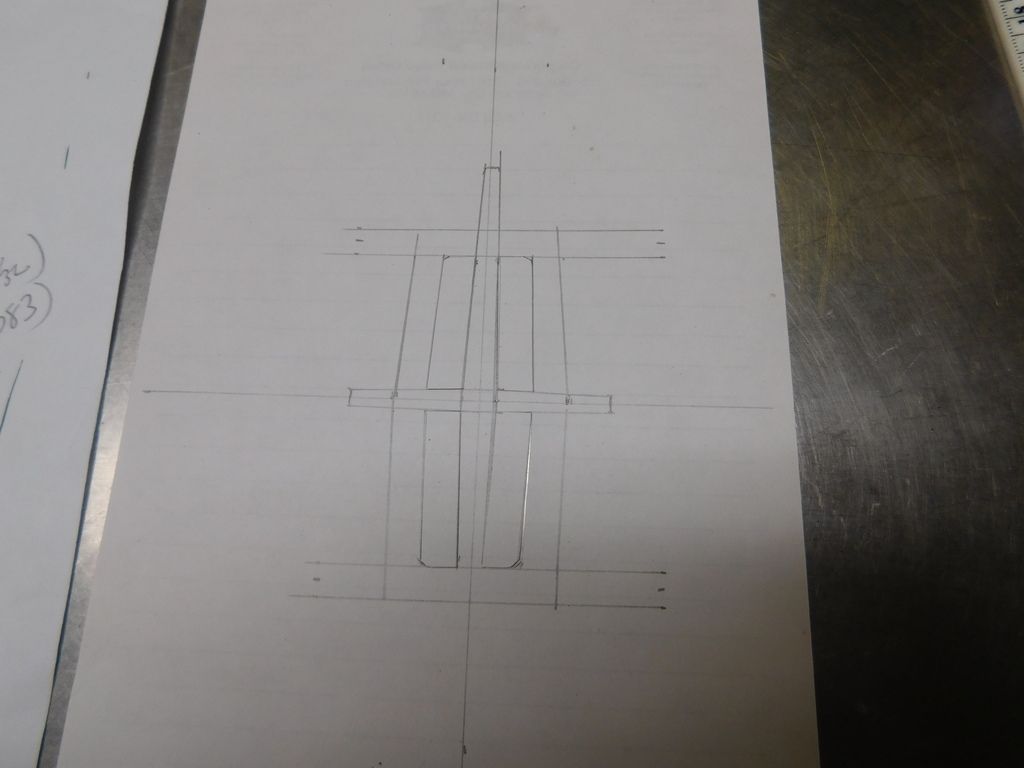
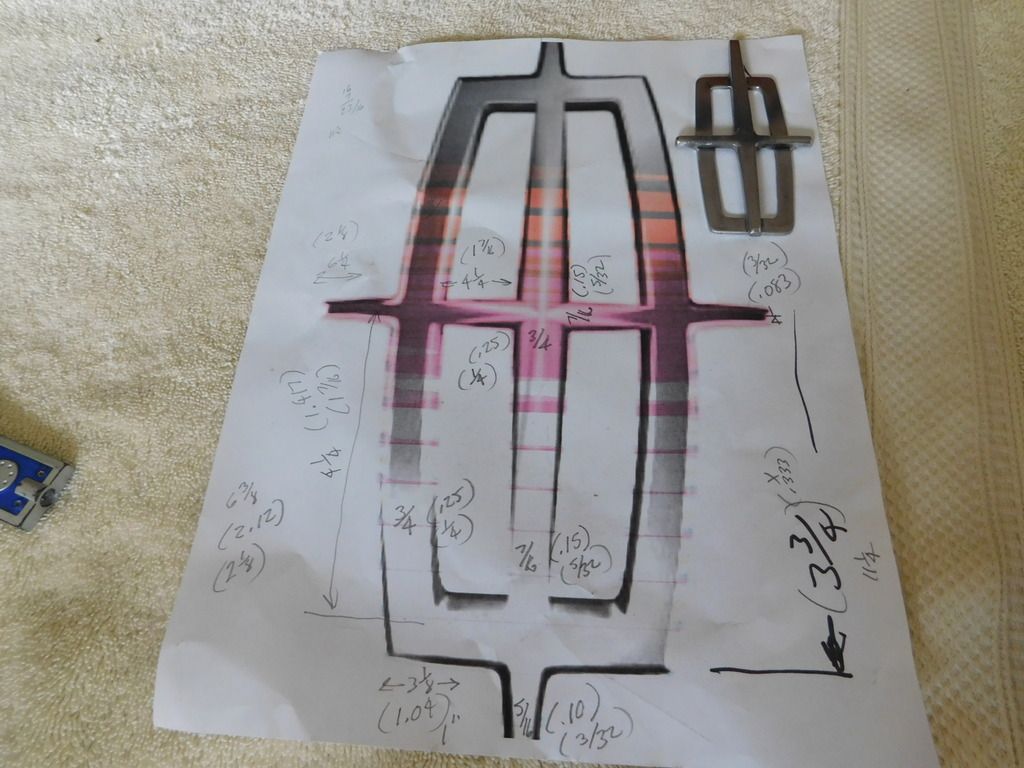
Created a Lincoln emblem to fit the opening I want to use in the grill. It still needs some sanding and shaping but it fits perfectly. Started with an image off the internet, scaled it to size and cut it from steel. I made it in 2 pieces because I wanted some relief in the surface.
The internet image
The sketch reduced to my size
The rough finished product.

Headed to Oklahoma Saturday to get a good grill from Gary (Truckrat) that I can have chromed after a couple of small modifications. I have a couple others but one is a rough aluminum grill that needs a bit of hammer work and welding tabs back on and the other is steel and has a bit of rust thru that worked fine for mock-up and design but I don't feel I can repair well enough to get chrome put on after modifying it.
SPark


Right inner fender created from normal front half and big truck/4x4 back half.


Got both back taillights and both front parking lights smoothed off. No more lettering on any of them. One parking light had lettering and the other didn't. Sometimes this stuff makes no sense.

According to UPS I should have the reverse hood kit from Kevin tomorrow!
Created a Lincoln emblem to fit the opening I want to use in the grill. It still needs some sanding and shaping but it fits perfectly. Started with an image off the internet, scaled it to size and cut it from steel. I made it in 2 pieces because I wanted some relief in the surface.
The internet image

The sketch reduced to my size


The rough finished product.


Headed to Oklahoma Saturday to get a good grill from Gary (Truckrat) that I can have chromed after a couple of small modifications. I have a couple others but one is a rough aluminum grill that needs a bit of hammer work and welding tabs back on and the other is steel and has a bit of rust thru that worked fine for mock-up and design but I don't feel I can repair well enough to get chrome put on after modifying it.
SPark
1932 Ford 5 window coupe. 302/C4
1962 8V-390/C6 Unibody Short Bed Soon to be Big Window - The Lincoln that never was
2013 F150 Super Crew Eco Boost 4x4
2015 Ford Edge for the little lady, because she said so!
2007 Mustang GT, 4.6-3V/5 Speed. Only 8680 miles on the clock.
More toys, I need more toys!!!
1962 8V-390/C6 Unibody Short Bed Soon to be Big Window - The Lincoln that never was
2013 F150 Super Crew Eco Boost 4x4
2015 Ford Edge for the little lady, because she said so!
2007 Mustang GT, 4.6-3V/5 Speed. Only 8680 miles on the clock.
More toys, I need more toys!!!