
'62 Unibody LSR
-
SixtySix Ford

- Posts: 58
- Joined: September 7, 2010, 11:37 pm
- Location: Denver Co.

-
BIGREDTODD
- Posts: 46
- Joined: November 1, 2010, 6:41 pm
- Location: RIVERBANK, CA
SixtySix Ford wrote:Great lookin build!!! keep up the good work! How low are you wanting to go over all? are you going to bag it at anytime?
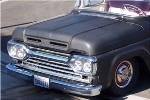
No bags. Have to maintain original type suspension...and, not that I have anything against bags, but I like a low "static" ride height that looks bitchin' all the time more than sitting on the ground when parked and looking awkward driving around. Hope I didn't step on any toes
...planning on air shocks in the rear to dial in the final rake, but the front will be as low as function & feasability will allow. As it looks now, about 6-7" lower is where we will end up when it's all said and done.
Last edited by BIGREDTODD on December 6, 2010, 12:32 pm, edited 1 time in total.
UNIVERSAL = IT WILL FIT ANYTHING ELSE
-
SixtySix Ford
- Posts: 58
- Joined: September 7, 2010, 11:37 pm
- Location: Denver Co.
-
BIGREDTODD
- Posts: 46
- Joined: November 1, 2010, 6:41 pm
- Location: RIVERBANK, CA


-
rickairmedic
- Posts: 1394
- Joined: July 19, 2006, 9:27 pm
- Location: Louisville,Ky
-
Mild Mitch
- Posts: 9
- Joined: September 8, 2010, 12:53 pm
- Location: Redding, CA
I've been watching your build with great interest. Looks GREAT!
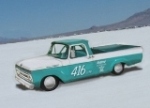
I race Bonneville as well, in Roadsters. I look forward to meeting you and your truck in person one day soon.
What tires are you using. LSR, or Drag Front runners?
And what sizes? Just curious really.
Keep up the great fab work, I look forward to each update.
Mitch
I race Bonneville as well, in Roadsters. I look forward to meeting you and your truck in person one day soon.
What tires are you using. LSR, or Drag Front runners?
And what sizes? Just curious really.
Keep up the great fab work, I look forward to each update.
Mitch
Mild Mitch
Mitchell Motor Works
Anderson, California
1962 F250 Uni
2000 F100 Lightning
1951 F5 car hauler project
1931 Ford Roadster
Mitchell Motor Works
Anderson, California
1962 F250 Uni
2000 F100 Lightning
1951 F5 car hauler project
1931 Ford Roadster
-
stronger66ratfink
- Posts: 1131
- Joined: March 1, 2007, 4:02 pm
- Location: Friendswood, Texas
-
BIGREDTODD
- Posts: 46
- Joined: November 1, 2010, 6:41 pm
- Location: RIVERBANK, CA
Thanks Mitch...I'm a newby to the hole thing really having only been to Elmo with the "Brick" team once, but Tim has attended & driven Elmo & B'ville. I'm looking forward to participating as much as I can and meeting a lot of new folks...
The tires are front runners, 26 x 4.5 front & 28 x 4.5 rear on custom made rims from Early Wheel Company.
Should be getting some time in on the Uni this weekend again. Spent last weekend cleaning up shop and bringing in some new equipment, which is always a challenge. When I say "shop" I really mean my home garage
UNIVERSAL = IT WILL FIT ANYTHING ELSE
-
BIGREDTODD
- Posts: 46
- Joined: November 1, 2010, 6:41 pm
- Location: RIVERBANK, CA
stronger66ratfink wrote:I often wished I'd of taken metal shop also in school,
some nice work going on there and Those wheels and tires are going to make it look baad ass..
Pretty expensive overflow bench you've got there next to the uni!
56?
I wish they still taught vocational arts at the high school level around here. If they did, I would change careers and teach. Don't get me started on that though...
I went to Wyoming Tech (in Laramie) in '98-99 for refinishing and street rod/chassis fab. Expensive way to find out you just want to keep it as a hobby
Thanks for the kind words.
I get a lot of comments on the work bench...and yes, it's a '56 with 75k miles on it--from my Great Uncle, who bought it in '57 from his racing partner....[/i][/b]
UNIVERSAL = IT WILL FIT ANYTHING ELSE
-
BIGREDTODD
- Posts: 46
- Joined: November 1, 2010, 6:41 pm
- Location: RIVERBANK, CA
Tied up a few loose ends up front this afternoon. Just in case everyone thinks this has been uneventful and exactly as planned, please see exhibit "A" below.
The cause of this issue was moving the box up, essentially "hinging" at the column mount on the dash. It changed the alignment of the pitman arm just enough to make the turning circles (left/right) asymmetrical. Perhaps not important for a competition vehicle that needs to go straight, but I wouldn't feel good knowing that I sent something out like that. I've known about this for awhile but am finally addressing the fix. The output shaft of the steering box isn't splined all the way around as I had first thought. Had it been fully splined, I would have been able to index the pitman arm as needed. A one-position mount for the pitman arm required sectioning the drag link. Not a big deal, just a process. Before anyone asks, There are no concerns with strength from doing this. Were this receiving a rotational force rather than a simple push/pull, I would have sleeved the connection for added strength as I've done successfully with steering shafts in the past. I use a 220V Lincoln PowerMig 200, and would not attempt welding this thick stock with a 110V MIG welder. That's just me. Enough chatter, on to the work.
The output shaft of the box. Note partially splined shaft:

So I cleaned up the (solid) drag link, and created an index mark down the longitudinal axis so they would be joined in exactly the same plane:

I mocked up the two ends after removing the required amount, and clamped them to a pices of angle iron to hold them perfectly in-plane. I should note that before doing any of this, I put the steering wheel in a straight position, and measured the front wheel locations to assure that everything was as straight & true as possible):

While still clamped together, I removed the assembly, double checked that the index marks were aligned and burned them together.

Somehow, I forgot to take any pictures of the pre-ground welds on the drag link. You'll just have to trust me. After the first grind, I filled a couple small low spots, and sanded smooth followed by a wire wheel. Here it is in place once again, as if nothing ever happened 

Even while only tacked in place, the steering box mount shows no signs of deflection. It will be rock solid when fully welded. Tomorrow's installment will revert back to the rear end. I will be adding approximately 2 1/2" to the height of the shackles to get the last of the drop I'm looking for.

Todd
The cause of this issue was moving the box up, essentially "hinging" at the column mount on the dash. It changed the alignment of the pitman arm just enough to make the turning circles (left/right) asymmetrical. Perhaps not important for a competition vehicle that needs to go straight, but I wouldn't feel good knowing that I sent something out like that. I've known about this for awhile but am finally addressing the fix. The output shaft of the steering box isn't splined all the way around as I had first thought. Had it been fully splined, I would have been able to index the pitman arm as needed. A one-position mount for the pitman arm required sectioning the drag link. Not a big deal, just a process. Before anyone asks, There are no concerns with strength from doing this. Were this receiving a rotational force rather than a simple push/pull, I would have sleeved the connection for added strength as I've done successfully with steering shafts in the past. I use a 220V Lincoln PowerMig 200, and would not attempt welding this thick stock with a 110V MIG welder. That's just me. Enough chatter, on to the work.
The output shaft of the box. Note partially splined shaft:
So I cleaned up the (solid) drag link, and created an index mark down the longitudinal axis so they would be joined in exactly the same plane:
I mocked up the two ends after removing the required amount, and clamped them to a pices of angle iron to hold them perfectly in-plane. I should note that before doing any of this, I put the steering wheel in a straight position, and measured the front wheel locations to assure that everything was as straight & true as possible):
While still clamped together, I removed the assembly, double checked that the index marks were aligned and burned them together.
Somehow, I forgot to take any pictures of the pre-ground welds on the drag link. You'll just have to trust me.
Even while only tacked in place, the steering box mount shows no signs of deflection. It will be rock solid when fully welded. Tomorrow's installment will revert back to the rear end. I will be adding approximately 2 1/2" to the height of the shackles to get the last of the drop I'm looking for.
Todd
UNIVERSAL = IT WILL FIT ANYTHING ELSE
69supercj wrote:Awesome thread, just bought me a '62 uni a few weeks ago, same color in fact. Also thinking about making the trek to the salt this next year. Are you guys planning on going for speedweeks and if so, can you tell me the dates?
We do plan on being there, if we get the thing done.
Speedweek is Aug 13 '11
http://www.scta-bni.org/events.html
-
BIGREDTODD
- Posts: 46
- Joined: November 1, 2010, 6:41 pm
- Location: RIVERBANK, CA
Time to lengthen the shackles, to get the last bit of drop in back. To be clear, I didn't flip the rear end.
Before lengthening the shackles we have about 4" +/- from c/l to c/l of holes:

Cut line:

Extended shackle tacked together (left) next to original. Extended with 3/16" stock. Will be fully welded and ground, and back side will be boxed, & welded.

6 1/2" from c/l to c/l of holes, thus lowering the rear the last 2 1/2" I was looking for.

Both shackles extended, and tacked:

Boxing plates tacked on the back of the shackles:

...and fully welded front/back. I generally like to grind welds for cosmetic reasons, but there's really no reason on itemslike this that will never be seen:


Here's the extended shackle reinstalled. If it looks tight on top with the bed floor, and to the rear with the bed x-member, it's really not. There's about 3/4-1" on top, and more to the x-member. with only 2-3" of travel, the shackle will only move back about 1/2". It moves forward when the spring droop (when the truck is jacked up):


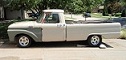
And here is where we sit now. About 6 1/2" lower in front, and 5 1/2" in back. Have some room to go up on either end with the addition of leafs, but I think this looks pretty good. A drastic improvement. And a little tech tip: the open lifter valley on a Y-block is the perfect size to securely hold a jug of Fast Orange hand cleaner

Before lengthening the shackles we have about 4" +/- from c/l to c/l of holes:
Cut line:
Extended shackle tacked together (left) next to original. Extended with 3/16" stock. Will be fully welded and ground, and back side will be boxed, & welded.
6 1/2" from c/l to c/l of holes, thus lowering the rear the last 2 1/2" I was looking for.
Both shackles extended, and tacked:
Boxing plates tacked on the back of the shackles:
...and fully welded front/back. I generally like to grind welds for cosmetic reasons, but there's really no reason on itemslike this that will never be seen:
Here's the extended shackle reinstalled. If it looks tight on top with the bed floor, and to the rear with the bed x-member, it's really not. There's about 3/4-1" on top, and more to the x-member. with only 2-3" of travel, the shackle will only move back about 1/2". It moves forward when the spring droop (when the truck is jacked up):
And here is where we sit now. About 6 1/2" lower in front, and 5 1/2" in back. Have some room to go up on either end with the addition of leafs, but I think this looks pretty good. A drastic improvement. And a little tech tip: the open lifter valley on a Y-block is the perfect size to securely hold a jug of Fast Orange hand cleaner
UNIVERSAL = IT WILL FIT ANYTHING ELSE
-
BIGREDTODD
- Posts: 46
- Joined: November 1, 2010, 6:41 pm
- Location: RIVERBANK, CA
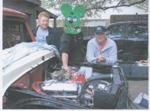
Tim & Kathy came up today, Kathy kept Corinne company while Tim & I played out in the garage. We just had to mock up the racing wheels/tires to see how it was going to sit & look. Pretty bitchin' in my humble opinion (Tim seems pretty OK with it) 


The afternoon ended with the truck up on stands, as Tim took the axles back to rebuild:

He did deliver a fresh & clean T-5 / bell housing so I could get started on the tranny mounts, and finish boxing the frame:

More to come...time for a quiet & relaxing evening with my lovely wife
The afternoon ended with the truck up on stands, as Tim took the axles back to rebuild:
He did deliver a fresh & clean T-5 / bell housing so I could get started on the tranny mounts, and finish boxing the frame:
More to come...time for a quiet & relaxing evening with my lovely wife
UNIVERSAL = IT WILL FIT ANYTHING ELSE
You going to convert to disc brakes? I understand also on the salt you have more room to slow it down too though and maybe isn't necessary? Or is it not allowed in the rules?
Mine took an afternoon.
http://fordtruk.com/forums/viewtopic.php?t=2647
Mine took an afternoon.
http://fordtruk.com/forums/viewtopic.php?t=2647
1964 F 100 - I am going to do "something" with it.......
viewtopic.php?f=32&t=15942
1987 Mustang LX Convertible, 2.3 Auto - cruiser.
1994 F 150 XLT 2WD
~ Yes - I adopted another cat..............
Cam L Milan,
You'll be missed my friend.
viewtopic.php?f=32&t=15942
1987 Mustang LX Convertible, 2.3 Auto - cruiser.
1994 F 150 XLT 2WD
~ Yes - I adopted another cat..............
Cam L Milan,
You'll be missed my friend.
-
BIGREDTODD
- Posts: 46
- Joined: November 1, 2010, 6:41 pm
- Location: RIVERBANK, CA
Greg D wrote:You going to convert to disc brakes? I understand also on the salt you have more room to slow it down too though and maybe isn't necessary? Or is it not allowed in the rules?
Mine took an afternoon.
http://fordtruk.com/forums/viewtopic.php?t=2647
Nope...manual drums all around for now, though I imagine that may change with future top secret plans for the truck...and if memory serves, a 'chute is required at El Mirage at either the 150 or 175 mph level.
UNIVERSAL = IT WILL FIT ANYTHING ELSE
-
ezernut9mm

- Posts: 9141
- Joined: July 21, 2006, 9:37 pm
- Location: KCMO

very impressive build. i like the front axle boxes you made for the flip.
always
"i believe i've achieved satisfaction".-bubbles
"should i be gettin" baked for this boys?"-bubbles
i could no longer keep "r.i.p.ing" all of our fallen brothers and sisters, so i say here, slick loads of love and much respect to all you beautiful people.
"i believe i've achieved satisfaction".-bubbles
"should i be gettin" baked for this boys?"-bubbles
i could no longer keep "r.i.p.ing" all of our fallen brothers and sisters, so i say here, slick loads of love and much respect to all you beautiful people.
-
BIGREDTODD
- Posts: 46
- Joined: November 1, 2010, 6:41 pm
- Location: RIVERBANK, CA
As I pondered what was to come next, I was thinking it was about time for an update...

Knowing that I needed more access, and also knowing that I didn't want to separate a stuck Y-block while the truck was on jack stands, I just yanked the whole thing out.

I recorded the installed angle, so I can make sure the mount for the new T-5 will place everything correctly. This will allow much easier access to the firewall and frame for final welding, etc.

Placement marked for notches, and 6" long notch sections cut out:


Typical notch fitment. I prefer to use a fillet weld on things like this, so I left approximately 1/2" of the notch exposed. A bit more on the inside of the frame to allow for bump-stop installation.

Both notches all welded in...

Knowing that I needed more access, and also knowing that I didn't want to separate a stuck Y-block while the truck was on jack stands, I just yanked the whole thing out.
I recorded the installed angle, so I can make sure the mount for the new T-5 will place everything correctly. This will allow much easier access to the firewall and frame for final welding, etc.
Placement marked for notches, and 6" long notch sections cut out:
Typical notch fitment. I prefer to use a fillet weld on things like this, so I left approximately 1/2" of the notch exposed. A bit more on the inside of the frame to allow for bump-stop installation.
Both notches all welded in...
UNIVERSAL = IT WILL FIT ANYTHING ELSE