
I need some metal fab info
I need some metal fab info
I've got a problem. I'm working on the step, kick and rocker section on my 63 which is rusted out. I'm on the pass. side right now. I have the new sheetmetal parts including the new pillar (hinge)replacement parts. That I have figured out I think. But what I cant find anywhere is how to make the opposite side out of metal that is rusted out that slopes down to the step plate. It's rusted out. I dont even know what you call it, and you cant buy that part to cut out and replace. I've started to make it, and it might not be bad with alot of work that I'm willing to do. My problem is I cant find anything to compare it to. I know I cant be alone here on this, and someone has had to do it before. I can find any other repair on here but not that. does anyone have pics, templates or just able to tell me I'm screwed. I'm not a fabricator but I'm going to be when this is all said and done. Any input would be of some help. Again, If I opened the pass. side door, the hinge pillar on the bottom right slopes down to the step plate. this is on the bottom left that slopes down to the step plate. Thanks...Dan


-
Power by Ford
- Posts: 192
- Joined: August 22, 2008, 9:07 pm
- Location: Atlanta Ga
OHHH!! i see, the back side... it is not made that I know of so your best bet would be to get with someone like Iceman and see if he can get you some good used ones... keep this post going and someone will for sure have some you can get.... sorry for the misunderstanding... but as bad as my cab was those corners were in good shape???? boy, my cab being better than someone elses never happens... 
 good luck on the hunt....
not sure if this is the area your asking about but this is what i did. i actually screwed up a little when i did that piece by the step and had to go back in and cut it up a bit. ended up making a templete out of cardboard and doing it 2 peice like "power by ford" said. you can see where i welded in the second piece onto the bottom of the exterior corner of the new lower hinge pillar or whatever it's called in the finished pillar pic. turned out ok but i'm glad it's in a no one will ever see it place.
if the pics are to big sorry i'll delete my post. seems like i always screw up posting pics.


if the pics are to big sorry i'll delete my post. seems like i always screw up posting pics.

i'll take any compliment i can get foodstick so i'll assume your refering to my rust bucket (anthony's truck is a contender also). smart thing would have probably been to replace the cab but then, to me, it wouldn't be "original". been fun and learned alot since i'm pretty much a novice. and nice to see one saved from the crusher.foodstick wrote:I thought I was an optimist !
Good job saving one !
got to thinking maybe the question about where the pillar meets the step refered to the rear of the door opening? don't know but here's what i got if it helps. isn't done yet so doesn't look very good. as a matter of fact pbly won't look very good when it is done but better than what i started with.


Pics of my problem
http://imageevent.com/danray63/dans63f100projectrestore
Thanks for the response everyone, but this is what I'm talking about. I think I can make the pieces , cut out the old and weld in the new. I dont see any other way. I am pretty picky about how it is going to look. and I have to end up with straight rockers, step and kick. I know I'll have to put the door on and off several times to check. I'ts gonna be fun. Any other input is welcome, Thanks again...Dan
Thanks for the response everyone, but this is what I'm talking about. I think I can make the pieces , cut out the old and weld in the new. I dont see any other way. I am pretty picky about how it is going to look. and I have to end up with straight rockers, step and kick. I know I'll have to put the door on and off several times to check. I'ts gonna be fun. Any other input is welcome, Thanks again...Dan
sgettin, Thats what I'm talking about. Hey yours dont look bad. I have to cut out my cancer which wraps aroung to the front part. I'm going to try to make it step like the old one was. I'll have to weld in some little pieces. I had to make a templet out of the drivers side with thick paper, then form it the other way. I dont have much left to work with on the pass. side and I have to make this piece before I can cut out the old.
looks like your doing a good job danyray, should turn out nice. did mine one piece at a time also so i would know where to line up the home made parts. something else that helps is i think i downloaded pictures of every truck that showed up on the forum, good for reference. lots of help here and on fte.
kind of glad my truck was so rough to start with. don't have to worry about screwing it up it's me or the crusher.
good luck.
kind of glad my truck was so rough to start with. don't have to worry about screwing it up it's me or the crusher.
good luck.
-
DanSanDiego2000

- Posts: 275
- Joined: August 14, 2006, 8:59 pm
- Location: San Diego
Dan,
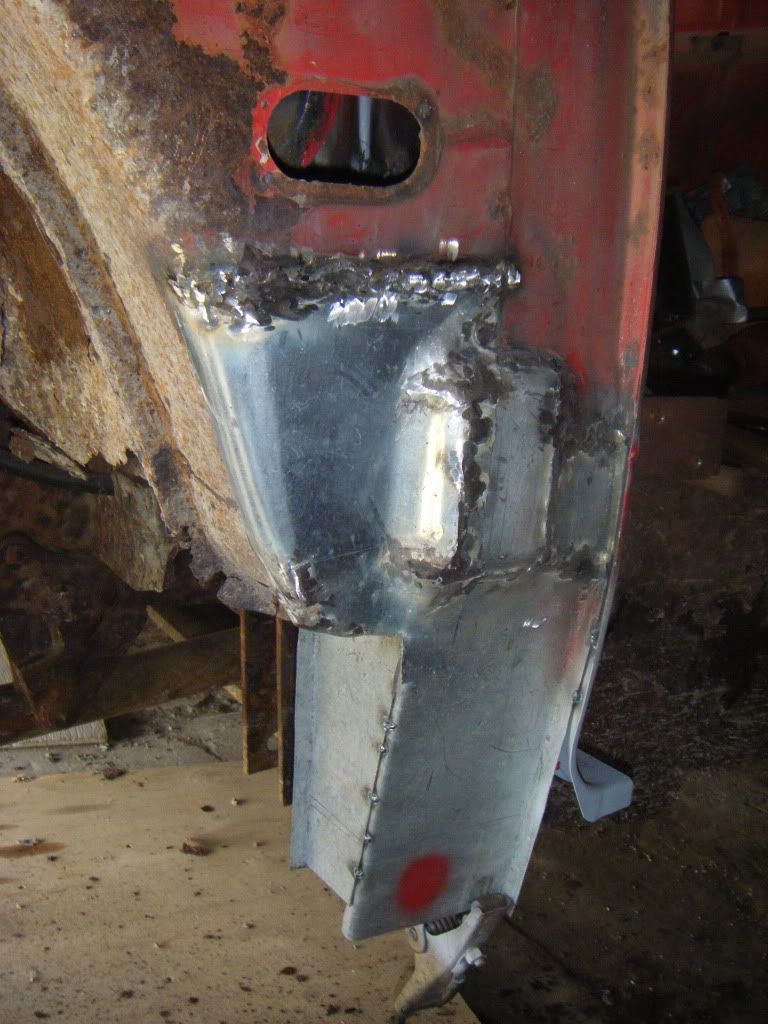
That air plenum is part of the ducting that runs from your cowl to your interior fresh air vents.
Dirt and leaves from the windshield/cowl area collect in there, and rot it out. There are drain holes in the bottom of that area to drain water away, but they are designed small to only allow water, and as soon as they plug with a leave, the dust collects like mud. If the hole is too big, the charge of fresh, dense and cool air that is supposed to get to your vents would go out that bottom drain hole, instead.
[albumimg]7231[/albumimg]
This is the damage I had to the driver side air chamber/plenum on mine. Sorry, I don't have any 'after' photos, but from what you describe, you want yours to be almost perfect, and showing you my 'after' might not suffice.
[albumimg]7230[/albumimg]
Because this area was not going to be seen later, and I did not want to hunt down a truck at the scrap yard:
1. I took a half sheet of paper, and 'molded' it over the area to be repaired.
2. As I shaped the paper around the compound curves, I folded and creased the paper, creating seams along where a bend might have occurred in the original metal stamping.
3. When I had the shape I wanted, I cut out the areas of the pattern that had been folded into flaps, and cut it away.
4. My pattern resembled a misshapen flower with irregular shaped leaves. (you know, now that I think about it, the pattern was a bit like your open hand, outstretched fingers. You can't make a cup out of your flat hand, but bringing your fingers together, and cupping your hand into a bowl, gives you a shape much like the repair piece you need.... now you just have to do it in steel).
5. I transferred the pattern onto metal, shaped the repair piece to close the gaps between the 'petals' of the flower shaped repair, and welded the seams shut.
6. Now that the repair piece was cut and welded into the correct overall shape, I ground the welds, and proceeded to hammer, shape and smooth the repair piece. I put it on the anvil, and massaged to piece to eliminate all the FLAT sides, and create the rounded, cup shape of the original.
By the time it was welded in place, ground off, textured and painted, I was very happy with the repair, and the appearance.
Dan
If you need the drivers door striker post, I have a good Arizona piece. Mine goes from the step up above the height of the beltline. If you are interested let me know.
Kevin
Kevin
kstones63
_______________________________________
63 F100
29 Ford Sedan Delivery
99 F250 PSD, 4x4, CC
95 F350 Flatbed Dually Diesel
_______________________________________
63 F100
29 Ford Sedan Delivery
99 F250 PSD, 4x4, CC
95 F350 Flatbed Dually Diesel