
Ok guys I have been on this site for many years and often spend many hour watching your work. I thought I would share the progress from the past 20 years or so. My folks bought me a 65 f100 swb in the early 90's for my first truck. Truth be told I really wanted a 65 chevy. Back then the internet was not as available as is today, not to mention on the farm in SC Kansas. So locating how to articles, parts, and forums did not exist. I am mostly self tought however fab skills are better than bailing wire and duct tape.
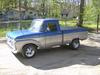
I have not located any pic of the truck in its original state but will continue to look. This work was complete in the early to mid 90 as I went through high school. It was green and seems like the cab was white at the time. I hated the color, so priority # 1 was to sand it down and get some primer on. My fathers direction was mecanical issue, but I knew better. The truck was relatively rust free except for the bed. The floor was virtually non existent, but I found a near perfect replacement in the newspaper adds for I think $200. Floor pans were gone so I took an old hood, cut it up and with a hammer and a burlap sack filled with wheat started bounding away. The motor was pulled, sent off for machining. I purchased a how too book and pieced her back together to mostly stock specification and a mild cam. a carter 650 topped it off with a dress up kit. Dream beams were added up front and a lowering spring added to the rear. I think it was around a 4" static drop. New carpet, headliner, tank cover, and seat cover were replaced in town. The paint is charcoal peral metallic base coat/clear coat. I also had no experience with body and paint. My father is very knowledgable with the painting aspect and mechanically can fix anything but did not have much time to help with all of the farm work we had going on, so I relied on how to articles in hot rod and other publications. This meant that all of the body work is not exactly how I would do it today. Here are some pics of what it looked like in 2007 after sitting in the shed for 10 years.
Being that I was married with a secure job. I thought it was time to make some upgrades and make an enjoyable daily driver. I had found the other site and the 5.0 HO swap into an f100 artilce that gave me some motivation. I located a 89 mustang GT that had been wrecked and was well on my way for the swap. I also found fatman fabs and order the crossmember for their stage II kit. First thing was to pull the motor from the truck and remove the existing dream beams. At Our fall parade I ran into a young teenager with a 65 f100 at the car show. After chatting with him and his dreams I offered those beams to him for his project. It took some time to convice him that I would give them to him and he picked them up later that day. I never heard from him again. I hope his project went faster than mine.
After a great start, life happened (two kids, new job, new house, grandfather passed so more farm work for me = project on hold) and the lifeless truck went back to the shed along with the scavenged parts fromt he mustang.
65 f100 upgrades round II
65 f100 upgrades round II
- Attachments
-
- 148170_520.jpg (56.63 KiB) Viewed 1796 times
-
- 148169_520.jpg (50.54 KiB) Viewed 1796 times
-
- 148168_520.jpg (42.79 KiB) Viewed 1796 times
65 f100 SWB
51 F1
52 F3
51 F1
52 F3
Re: 65 f100 upgrades round II
Here are some more pics from 2007
- Attachments
-
- 148175_520.jpg (61.63 KiB) Viewed 1793 times
-
- 148174_520.jpg (48.63 KiB) Viewed 1793 times
-
- 148171_520.jpg (42.2 KiB) Viewed 1793 times
65 f100 SWB
51 F1
52 F3
51 F1
52 F3
Re: 65 f100 upgrades round II
Now we are up to sept of 2011 and decided to pick up where I left off. I moved the truck to another shop and started on a plan. I am not real good at taking progress pics, but will try and do better as I finish before SS in KC. Here is what was placed on order:
Remainder of the kit:
Front Sway bar
2" drop spindles
A-arms
Hub
disc brakes and Calipers
power rack
MC and booster
Trans mount - because I lost the original in the move. The motor fit the original motor mounts and trans x-member, however the t5 is a bit longer than the 3 sp toploader, placing the shifter around 2" futher back than I wanted
Tubular motor mounts
Clutch cable kit - from modern driveline
Proportioning Vavle - Disc/drum
HP and LP fuel pumps
HP fuel line spring Locks
Accumulator/fuel filter
New core support mounts
wiring kit - RJM fuel injection
Smog delete pulley
Here is how it sat while I waited on the ups man
- Attachments
-
- IMG_0293.jpg (102.09 KiB) Viewed 1783 times
-
- IMG_0292.jpg (101.36 KiB) Viewed 1783 times
-
- IMG_0291.jpg (58.55 KiB) Viewed 1783 times
65 f100 SWB
51 F1
52 F3
51 F1
52 F3
Re: 65 f100 upgrades round II
Here are the pics with the x-member installed, frame boxed and c-notched for the power rack, tubular motor mounts installed and looks like I have the steering fabed up.
I used the original rag joint and took the shaft out of the original steering box and cut off the top 2" for the splines. I welded the shaft stub to a borgerson joint that made the transition from the rag joint complete. I only had to use 2 joints to keep the angles below 30 degrees. There is also a column from a 78 or 79 installed. I don't think it changed the set up though as that was a direct bolt up.
I used the original rag joint and took the shaft out of the original steering box and cut off the top 2" for the splines. I welded the shaft stub to a borgerson joint that made the transition from the rag joint complete. I only had to use 2 joints to keep the angles below 30 degrees. There is also a column from a 78 or 79 installed. I don't think it changed the set up though as that was a direct bolt up.
- Attachments
-
- IMG_0412.jpg (47.59 KiB) Viewed 1776 times
-
- IMG_0413.jpg (105.39 KiB) Viewed 1776 times
65 f100 SWB
51 F1
52 F3
51 F1
52 F3
Re: 65 f100 upgrades round II
Motor and trans back out to weld the x-member, mounts, and spring towers. Also fabed up the hangers for the trans mount. Since I lost the original trans mount, I purchased aftermarket. After staring at if for some time I decided I would use the mount from the mustang as it was going to take more effort to modify the one I purchased. I have some other truck the aftermarket member will work on, so no money lost. Also got the MC and booster mocked up and attached to the pedal. Sway bar installed
- Attachments
-
- IMG_0422.jpg (103.75 KiB) Viewed 1767 times
-
- IMG_0421.jpg (109.43 KiB) Viewed 1767 times
65 f100 SWB
51 F1
52 F3
51 F1
52 F3
Re: 65 f100 upgrades round II
Font suspension mostly complete. Still have the springs to put in when there is more weight
- Attachments
-
- IMG_0424.jpg (109.67 KiB) Viewed 1765 times
-
- IMG_0426.jpg (117.7 KiB) Viewed 1765 times
-
- IMG_0423.jpg (95.2 KiB) Viewed 1765 times
65 f100 SWB
51 F1
52 F3
51 F1
52 F3
-
unibody madness

- Posts: 2140
- Joined: December 4, 2008, 4:33 pm
- Location: Paradise,CALIFORNIA 95969

Re: 65 f100 upgrades round II
I think it is great that you keep pluging away at it.
If I may, track down a T-5 from an early chevy s-10 with a t-5, and swap out the tailshaft housing. Here is a link that will help you do the swap
viewtopic.php?f=1&t=12055&start=20
If you read the entire thread it will help make your swap real easy.
John
p.s. you can use the s-10 Tailshaft with electronic speedo but need the mechanical speedo bullet for the mech speedo to work.
Turk build thread at:
viewtopic.php?f=32&t=18944
It does not matter what you think, it only matters what you do about it!
viewtopic.php?f=32&t=18944
It does not matter what you think, it only matters what you do about it!
Re: 65 f100 upgrades round II
Here are the last pictures I have that are close to where I am today. Motor and Trans back in, front clip on. NO wireing at this point. These pics are from nov 2011.
- Attachments
-
- IMG_0077.jpg (142.67 KiB) Viewed 1751 times
-
- IMG_0076.jpg (137.57 KiB) Viewed 1751 times
-
- IMG_0072.jpg (92.6 KiB) Viewed 1751 times
65 f100 SWB
51 F1
52 F3
51 F1
52 F3
Re: 65 f100 upgrades round II
Few more pics from Nov
- Attachments
-
- IMG_0078.jpg (127.29 KiB) Viewed 1747 times
-
- IMG_0075.jpg (93.9 KiB) Viewed 1747 times
65 f100 SWB
51 F1
52 F3
51 F1
52 F3
Re: 65 f100 upgrades round II
Good progress!
(PS. Looks like there are to many rubber bushings on your shocks? did you put one on each side?)
(PS. Looks like there are to many rubber bushings on your shocks? did you put one on each side?)
Re: 65 f100 upgrades round II
The second one goes on the underside of the spring perch. At that point it was sitting on the shock spacer to mock up ride height. I put them there so my boys did't walk off with them.
65 f100 SWB
51 F1
52 F3
51 F1
52 F3
Re: 65 f100 upgrades round II
Roger that!Kaden65 wrote:The second one goes on the underside of the spring perch. At that point it was sitting on the shock spacer to mock up ride height. I put them there so my boys did't walk off with them.
Re: 65 f100 upgrades round II
Here is my progress in the last month and also some general info on some of the kits that helped.
Got the truck started just before the new year. It took me about an hour to trouble shoot after it wouldn't fire. The second hp fuel pump was pumping backwards. I thought the injectors were plugged because I could hear fuel running back into the fuel tank via the pressure regulator that returns back to the tank. I pulled the intake plemium and was going to start pulling injector but when I pulled the fuel fine off I expected a lot of pressure (I eliminated the schrader valve) and nothing. This seems confusing but because I used the collector/filter from bc broncos the return ties into filter prior to the second pump and then back to the tank so what I thought was return from the regulator was really just the lp pump recycling back to the tank. Flipped the pump around and she fired right up after sitting for the last 5 years.
I ordered wheels and tires jan 3rd and lead time was 4 to 6 weeks. Torque thrust II's 17x7 225's front and 18x8 255's rear. Also orderd standard height spindles as the 2" drop spindles may be too low. The bumper is 6" off the ground and I will have trouble getting the rear that low without getting into the bed with the down angle I am looking for. I set up the suspension for a 1.5 deg down angle on the body. Another way to think about it is i set the caster when I mounted the spring perch realative to the engine x member which set the ride height front to back.
I lowered the rear an inch or so last weekend by adding a longer spring shackle. I was going to wait to flip the hanger and box/c notch the rear until my new wheels and tires show up in a couple of weeks, but may be looking for something to do this weekend. I also finished wiring the column I swaped in about 10 years ago.
Clutch - I used a clutch cable kit from modern driveline. It is a bolt in bracket that uses a factory bolt where the column plate attaches the the firewall. They had made one other one per the customers specification. What I found is that it is about a 1' longer than necessary. Because I used the belhousing and T5 from the mustang the clutch fork is pulled from the front of the motor. Our mechanical linkage pushes the fork towards the rear to engage the clutch. I considered hydraulic but this was cheaper and much easier.
Throttle cable - I used a kit from BC broncos and is a bolt in bracket. It uses the original mounting as orginal on the firewall and connects to the pedal the same. The only change I had to make was flip the TPS on the throttle body. With this bracket the also sell a kit to add cruise control. Since this will be a daily driver I will addd it in the next couple of months.
Electrical- I originally budgetd very little funds for this but after making about half the modifications to the donor harness I ordered a harness from RJM fuel injection. I only get about 4 hours a weekend to work on the truck and that is when my boys take naps. It was as simple as rounting the wires and plugging in the oem connectors. There were two wires that went to the ignition (crank/start) and a third that went to the battery. The only thing that did not come with the kit was the connector and wire to charge the battery. I just used wire from the headlight harness on the donor mustang.
Here are pics I took tonight.
- Attachments
-
- IMG_0407.jpg (41.54 KiB) Viewed 1717 times
-
- IMG_0410.jpg (34.13 KiB) Viewed 1717 times
-
- IMG_0403.jpg (49.23 KiB) Viewed 1717 times
65 f100 SWB
51 F1
52 F3
51 F1
52 F3
Re: 65 f100 upgrades round II
Ok, pick up the wheels and tires today after work. Couldn't wait until tomorrow. Here are some pics, but looking for some opinions. I can either raise the front 2" or lower the rear. I may have to do both so it really a questions of how much I lower the rear. I have a set of stock height front spindles, there are 2" drop spindles on it right now. I am thinking of raising the front. The rear has de-arched springs and a longer shackle. The third pic is at ride height and the second has a jack holding it up 2". The first pics reallys shows the down angle it is sitting at right now, about 4 deg down. I didn't get the rear boxed and c'd last weekend becasue I was playing with a new toy, next post. Also a pic from the front.
- Attachments
-
- IMG_0470.jpg (33.72 KiB) Viewed 1572 times
-
- IMG_0473.jpg (29.6 KiB) Viewed 1572 times
-
- IMG_0467.jpg (34.5 KiB) Viewed 1572 times
65 f100 SWB
51 F1
52 F3
51 F1
52 F3
Re: 65 f100 upgrades round II
New toy and a few other pics.
- Attachments
-
- 100_2233.jpg (59.4 KiB) Viewed 1572 times
-
- IMG_0468.jpg (34.8 KiB) Viewed 1572 times
-
- IMG_0472.jpg (31.2 KiB) Viewed 1572 times
65 f100 SWB
51 F1
52 F3
51 F1
52 F3
-
rickairmedic
- Posts: 1394
- Joined: July 19, 2006, 9:27 pm
- Location: Louisville,Ky
Re: 65 f100 upgrades round II
Kaden the stance looks just about spot on to me . Maybe drop it another inch in the back but I personally wouldnt raise the front up  .
.
Rick
Rick
if it aint broke fix it till it is
-
Sweet6T6Ford
- Posts: 27
- Joined: September 19, 2011, 2:23 am
- Location: Harrison, Michigan
Re: 65 f100 upgrades round II
sweet looking ride, love the ride height! Mine is gonna sit a little lower when all is said and done, but ill be able to bring it back up and drop it down with airride. Awesome work, and impressive fabrication skills. Keep it up. Are those coys wheels?
Robert
http://s1231.photobucket.com/albums/ee512/uofmfresh/
"In the silence of the night if you listen quietly you can hear your neighbors chevy rusting"-- unknown
http://s1231.photobucket.com/albums/ee512/uofmfresh/
"In the silence of the night if you listen quietly you can hear your neighbors chevy rusting"-- unknown
Re: 65 f100 upgrades round II
Rick, they are American Racing Torque Thrust II's. Look pretty similar to the coys.
Had some time today, so bled the brakes again. Had to replace the rubber brake line in the rear as it had colapsed after sitting so long. I need to take another look at the rear brakes since the e-brake isn't working anymore. I decided to put the other spindles on and see what the ride height looked like. The rear is still too high so maybe I will work on that tomorrow.
Here is what it looks like with the front raised up 2".
keith
- Attachments
-
- IMG_0483.jpg (55.08 KiB) Viewed 1522 times
-
- IMG_0475.jpg (57.53 KiB) Viewed 1522 times
65 f100 SWB
51 F1
52 F3
51 F1
52 F3
-
rickairmedic
- Posts: 1394
- Joined: July 19, 2006, 9:27 pm
- Location: Louisville,Ky
Re: 65 f100 upgrades round II
Kaden I think if you flip the rear axle and put the drop spindles back in it will be just about right . I like em low . Flipping the rear axle should get you if my memory is right about 4-5" lower in the back.
Rick
Rick
if it aint broke fix it till it is
-
turtle1056
- Posts: 314
- Joined: November 2, 2006, 12:55 pm
Re: 65 f100 upgrades round II
cool project for sure...love it
64 F100 shorty, slammed hotrod 302 truck efi
65 M 100, gasser, blown sbc
94 monster Dodge diesel4x4
91 F350 700 hp cummins diesel
96 Sebring convertible
65 M 100, gasser, blown sbc
94 monster Dodge diesel4x4
91 F350 700 hp cummins diesel
96 Sebring convertible