
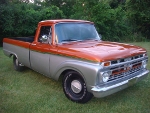
64 F100
-
ezernut9mm

- Posts: 9141
- Joined: July 21, 2006, 9:37 pm
- Location: KCMO

Re: 64 F100
man, that is some nice work! keep it up.
always
"i believe i've achieved satisfaction".-bubbles
"should i be gettin" baked for this boys?"-bubbles
i could no longer keep "r.i.p.ing" all of our fallen brothers and sisters, so i say here, slick loads of love and much respect to all you beautiful people.
"i believe i've achieved satisfaction".-bubbles
"should i be gettin" baked for this boys?"-bubbles
i could no longer keep "r.i.p.ing" all of our fallen brothers and sisters, so i say here, slick loads of love and much respect to all you beautiful people.
Re: 64 F100
I see we're working on the same thing MadMax...but you sure have allot more panel/rust to deal with then I have. I concur on the lower pillar panels not worth the money, especially in my case as I only needed the bottom 25% on the left side and believe my right side is still solid....live & learn.
Thanks ezernut! Went out to do a little welding and my bottle is empty
Guess I'll just grind some tonight...plenty of that to do.
Ken
Thanks ezernut! Went out to do a little welding and my bottle is empty
Guess I'll just grind some tonight...plenty of that to do.
Ken
Re: 64 F100
Ya my rust is a bit more of a challenge, but that's OK.
Yours is looking great. I am almost out of gas too.
Yours is looking great. I am almost out of gas too.
Re: 64 F100
Finished up my left cab pillar and floor earlier this week and started cutting on the right side.


Re: 64 F100
Well been at it all week in the evenings and all of today. Got the left side finished up with the Cab support and then knocked out the right side lower pillar panels, floor pan and Cab support. Right side went a lot smoother and faster considering my learning curve straighten out some after doing the left. Floor pans from CC were darn near perfect matches. Cab supports, as some of you know, are close but need tweaking, bending and modifications to work. Still, I think the cab supports were worth the money as making the supports from scratch would have been a lot more work/time.
Biggest modification with the Cab Support that must be done is the inner support between the Floor pan and cab support. Originals have a round cylinder (pipe) and saddle that the cab support bolts go through. This cylinder and saddle strengthen the gap between the floor pan and cab supports...repops do not come with these. Unfortunately I did not get pictures of all the parts I fabricated, but those who have done this, or are doing it, will know what I'm talking about.
Here is a picture of the "saddle" I fabricated. This is an early photo after forming the shape but prior to welding up. I just used 1" pipe for the gap between the saddle and cab support.

And I know you guy's like photos so here's photos of the rest of my progress. Sorry I don't have more during the process, but I get to cuttin' and weldin' and forget all about taking pictures:
Left cab support finished:

Right side lower Pillar:


Right side floor pan and cab support finished up:

Time to flip the cab back on it's bottom and work on the rear lower cab corners that are rusted.
More to come...
Ken
Biggest modification with the Cab Support that must be done is the inner support between the Floor pan and cab support. Originals have a round cylinder (pipe) and saddle that the cab support bolts go through. This cylinder and saddle strengthen the gap between the floor pan and cab supports...repops do not come with these. Unfortunately I did not get pictures of all the parts I fabricated, but those who have done this, or are doing it, will know what I'm talking about.
Here is a picture of the "saddle" I fabricated. This is an early photo after forming the shape but prior to welding up. I just used 1" pipe for the gap between the saddle and cab support.
And I know you guy's like photos so here's photos of the rest of my progress. Sorry I don't have more during the process, but I get to cuttin' and weldin' and forget all about taking pictures:
Left cab support finished:
Right side lower Pillar:
Right side floor pan and cab support finished up:
Time to flip the cab back on it's bottom and work on the rear lower cab corners that are rusted.
More to come...
Ken
Re: 64 F100
Looking good! Way to keep one step ahead of me!
I am going to use the dimpled plates that hold the gas tank in to make my recess in the floor.
I am going to use the dimpled plates that hold the gas tank in to make my recess in the floor.

Re: 64 F100
Man that is some great work.
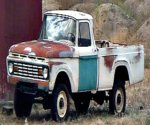
1963 F250 4x4x292
1965 F100 4x4x352
1998 F150 4x4x4.6
2001 Sport Track 4x4x4.0
In case you are wondering thats Ireland......Freedom is not Free!!!!!!!!
Heritage country Flag
1965 F100 4x4x352
1998 F150 4x4x4.6
2001 Sport Track 4x4x4.0
In case you are wondering thats Ireland......Freedom is not Free!!!!!!!!
Heritage country Flag
Re: 64 F100
Just wanted to say thanks for your detailed pics. My cab is in similar shape as yours and whenever I learn to weld will be using this thread as a guide.
Re: 64 F100
Madmax, thanks...not trying to set any records here, just enjoying working on the cab, I also considered using the Tank dimpled plates but I'm still undecided on tank relocation and didn't want to make that decision yet.
HiBoy63. Thanks for the kind words. I am enjoying it. Great work yourself on that old 4X4 parts truck!
64LL, I know I've referred to several build threads here to help make decisions on parts/suppliers and tech info. I'm an amateur welder/metal guy and certain my thread is the wrong one to use as a guide, but I'm glad to hear they're helping. It is rewarding to learn a new skill and use it.
HiBoy63. Thanks for the kind words. I am enjoying it. Great work yourself on that old 4X4 parts truck!
64LL, I know I've referred to several build threads here to help make decisions on parts/suppliers and tech info. I'm an amateur welder/metal guy and certain my thread is the wrong one to use as a guide, but I'm glad to hear they're helping. It is rewarding to learn a new skill and use it.
Re: 64 F100
I think that your welds are looking good. Your progress is coming along great. I remember being at that stage and it was a lot of work.
Where are you at in N.M. My son is in Albaquerque right now redoing a Pep Boys.
Kevin
Where are you at in N.M. My son is in Albaquerque right now redoing a Pep Boys.
Kevin
kstones63
_______________________________________
63 F100
29 Ford Sedan Delivery
99 F250 PSD, 4x4, CC
95 F350 Flatbed Dually Diesel
_______________________________________
63 F100
29 Ford Sedan Delivery
99 F250 PSD, 4x4, CC
95 F350 Flatbed Dually Diesel
Re: 64 F100
Don't sell yourself to short man. Everything looks good.ken462 wrote:... I'm an amateur welder/metal guy and certain my thread is the wrong one to use as a guide, but I'm glad to hear they're helping. It is rewarding to learn a new skill and use it.
 I see no problems with what you have done.
Just remember, these trucks are overbuilt and designed to work hard. After you are done it will have an easy life, so it doesn't have to be 100% correct and all. (not saying yours isn't or anything)
Keep up the good work!

Re: 64 F100
Thanks, It is a lot of work.kstones63 wrote:I think that your welds are looking good. Your progress is coming along great. I remember being at that stage and it was a lot of work.
Where are you at in N.M. My son is in Albaquerque right now redoing a Pep Boys.
Kevin
I'm in a smaller town, 3.5 hours south of Albuquerque, called Alamogordo. Lived in Phoenix for 7 years prior to here. Enjoyed the fishing and quail hunting in AZ but man, the big city and growing traffic are not my thing. Love the southwest and the weather is a little milder here at 4500 feet

Re: 64 F100
Thanks MadMax. Good thing it doesn't have to be 100% correct...cuz it won't be when I'm done learning on it.MadMaxetc wrote: Don't sell yourself to short man. Everything looks good.
Just remember, these trucks are overbuilt and designed to work hard. After you are done it will have an easy life, so it doesn't have to be 100% correct and all. (not saying yours isn't or anything)
Keep up the good work!
Finished up the rear cab corners today. I overlayed the repop panel and then cut with thin cutoff wheel and still they where a bear to align up. With the curves both around the cab corner and down to the bottom making it very challenging to get in the right spot. Good thing someone invented body filler...


Completed the left side as well but don't have photos handy. Here is the left side with the rust cut out:

-
unibody madness

- Posts: 2147
- Joined: December 4, 2008, 4:33 pm
- Location: Paradise,CALIFORNIA 95969

Re: 64 F100
Seems to me you are doing great! What are you coating the inside parts with before you seal it all up?
John
John
Turk build thread at:
http://slick60s.com/viewtopic.php?f=32&t=18944
It does not matter what you think, it only matters what you do about it!
http://slick60s.com/viewtopic.php?f=32&t=18944
It does not matter what you think, it only matters what you do about it!
Re: 64 F100
Thanks unibody madness,
Have not used anything during the assembly process. Small town and no one had Weld-through primer. I have POR-15 for the bottom and figured I'd use the cotton swabs & coat-hanger/bailing wire trick like Uncle skip and get the POR 15 inside everything. Instead of insuring all the small gaps and factory holes were sealed up, I left them and in some cases made them bigger to ensure 1) I could get in there to seal, and 2) for drainage after it's finished.
BTW, noticed you were making the inner cab support pieces that the repops don't come with...how did they turn out?
Ken
Have not used anything during the assembly process. Small town and no one had Weld-through primer. I have POR-15 for the bottom and figured I'd use the cotton swabs & coat-hanger/bailing wire trick like Uncle skip and get the POR 15 inside everything. Instead of insuring all the small gaps and factory holes were sealed up, I left them and in some cases made them bigger to ensure 1) I could get in there to seal, and 2) for drainage after it's finished.
BTW, noticed you were making the inner cab support pieces that the repops don't come with...how did they turn out?
Ken
-
unibody madness
- Posts: 2147
- Joined: December 4, 2008, 4:33 pm
- Location: Paradise,CALIFORNIA 95969
Re: 64 F100
Well Ken I gotta tell you they came out so,so. I have two panels made and two matching dimples to use as support,but I am really not sure I want to use them. I am waiting on Iceman to thaw out a little and hopefully he can send me cut out sections of the rear gas tank hold downs. they will be a better match and uniform thickness.ken462 wrote:BTW, noticed you were making the inner cab support pieces that the repops don't come with...how did they turn out?
Ken
The ones I made had to be a thicker material in order not to tear when forming.
I am really disapointed in the cab supports I received, they are not the correct length, width or angle for the driver side, and they are also missing the upward 3/8ths angle to match the floor pans. I know a lot of folks have used them but I can not bring myself to hack them in, I do not have the skills nessesary to do so. It would look like crap and I would never be happy with the way the floors look. The support I removed from the cab, has had the bad part cut out and I am going to duplicate that section and weld it back in.
Keeping things in the original shape will help me put it back together the way it was intended.
I will check the pieces I made against the original floor dimples when I get them, maybe I can repop them for future projects. I know these will not be the last I will be doing
Thanks for the interest
John
Turk build thread at:
http://slick60s.com/viewtopic.php?f=32&t=18944
It does not matter what you think, it only matters what you do about it!
http://slick60s.com/viewtopic.php?f=32&t=18944
It does not matter what you think, it only matters what you do about it!
Re: 64 F100
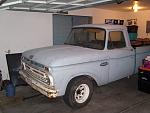
Finished the metal work on cab and decided to set it on the frame prior to sending it to the blaster to make sure I got the supports in the right place. I measured several times but still wanted to make sure everything lined up:

It fits
Decided to leave it on the frame and work a few other issues. Repaired both my inner fenders as the had rusted in the usual place where the bracket is:


And then a small rust spot on my front left fender:


Next was the engine. It's scheduled into the machine shop in a few weeks and I'm leaving town for work next week so I wanted to get it torn down and ready.


I was going to repair my radiator support but then found one in Arizona for $70...saved a little work there as I was looking at replacing most, if not all of the bottom of mine.
So, that's where I'm at, cab sch'd to the blasters in a few weeks and Engine sch'd into the machine shop. I reckon I'll just work on small items in the mean time.
It fits
Decided to leave it on the frame and work a few other issues. Repaired both my inner fenders as the had rusted in the usual place where the bracket is:
And then a small rust spot on my front left fender:
Next was the engine. It's scheduled into the machine shop in a few weeks and I'm leaving town for work next week so I wanted to get it torn down and ready.
I was going to repair my radiator support but then found one in Arizona for $70...saved a little work there as I was looking at replacing most, if not all of the bottom of mine.
So, that's where I'm at, cab sch'd to the blasters in a few weeks and Engine sch'd into the machine shop. I reckon I'll just work on small items in the mean time.
Re: 64 F100
Great job Ken.. I am also here in NM.. In Albuquerque though. I am working on my floor mounts now also. Too bad you're not a little closer, I could use some tips on welding as I have never used my MIG on auto yet. Very nice work man 
-
slickmainer
- Posts: 2555
- Joined: October 8, 2007, 6:41 pm
- Location: Auburn Maine
- Contact:
Re: 64 F100
what does a 292 run for rebuild costs? are they doing the whole thing (basically turn key) or just the machine work?
--Gregg--
you can't get there from here
you can't get there from here
-
unibody madness
- Posts: 2147
- Joined: December 4, 2008, 4:33 pm
- Location: Paradise,CALIFORNIA 95969
Re: 64 F100
Greg
It all depends on what needs to be done and what part of the country your in.
A complete rebuild cost me @ 2,300.00 a few years back and thats from intake to oil pan.
I did the detailing and paint when i got it back. On the other hand I bought one rebuilt on e-bay right after that for 700.00.
With friends in the business you could probably do much better thean that. A comparable Chvy is between 2/3 and 1/2 that cost I am told.
You can of course lose your mind and spend upwards of 5,000 for a race version
It all depends on what needs to be done and what part of the country your in.
A complete rebuild cost me @ 2,300.00 a few years back and thats from intake to oil pan.
I did the detailing and paint when i got it back. On the other hand I bought one rebuilt on e-bay right after that for 700.00.
With friends in the business you could probably do much better thean that. A comparable Chvy is between 2/3 and 1/2 that cost I am told.
You can of course lose your mind and spend upwards of 5,000 for a race version
Turk build thread at:
http://slick60s.com/viewtopic.php?f=32&t=18944
It does not matter what you think, it only matters what you do about it!
http://slick60s.com/viewtopic.php?f=32&t=18944
It does not matter what you think, it only matters what you do about it!