
That's real close to the way that I lifted my bed on and off the truck. It works really well.
At least you will be able to drive it to SlickStock.
Kevin
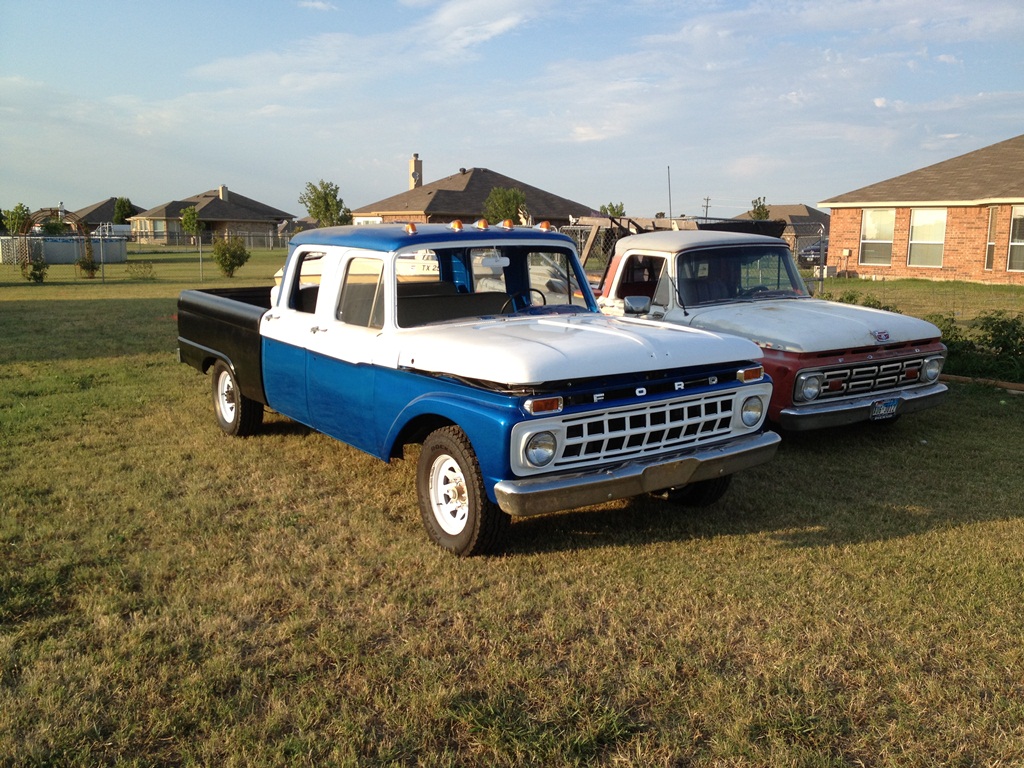
PFM's 65 Crew Cab F250
Re: PFM's 65 Crew Cab F250
kstones63
_______________________________________
63 F100
29 Ford Sedan Delivery
99 F250 PSD, 4x4, CC
95 F350 Flatbed Dually Diesel
_______________________________________
63 F100
29 Ford Sedan Delivery
99 F250 PSD, 4x4, CC
95 F350 Flatbed Dually Diesel
-
PFM-64f100
- Posts: 1270
- Joined: August 7, 2006, 6:37 pm
- Location: Haslet, Texas
- Contact:
Re: PFM's 65 Crew Cab F250
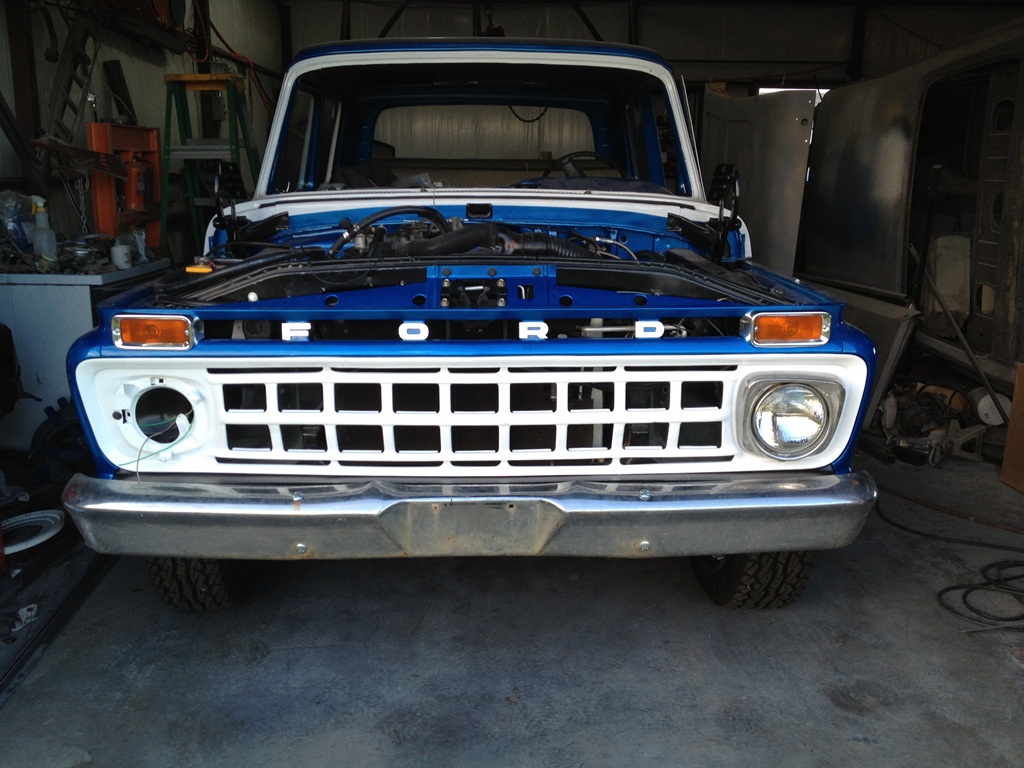
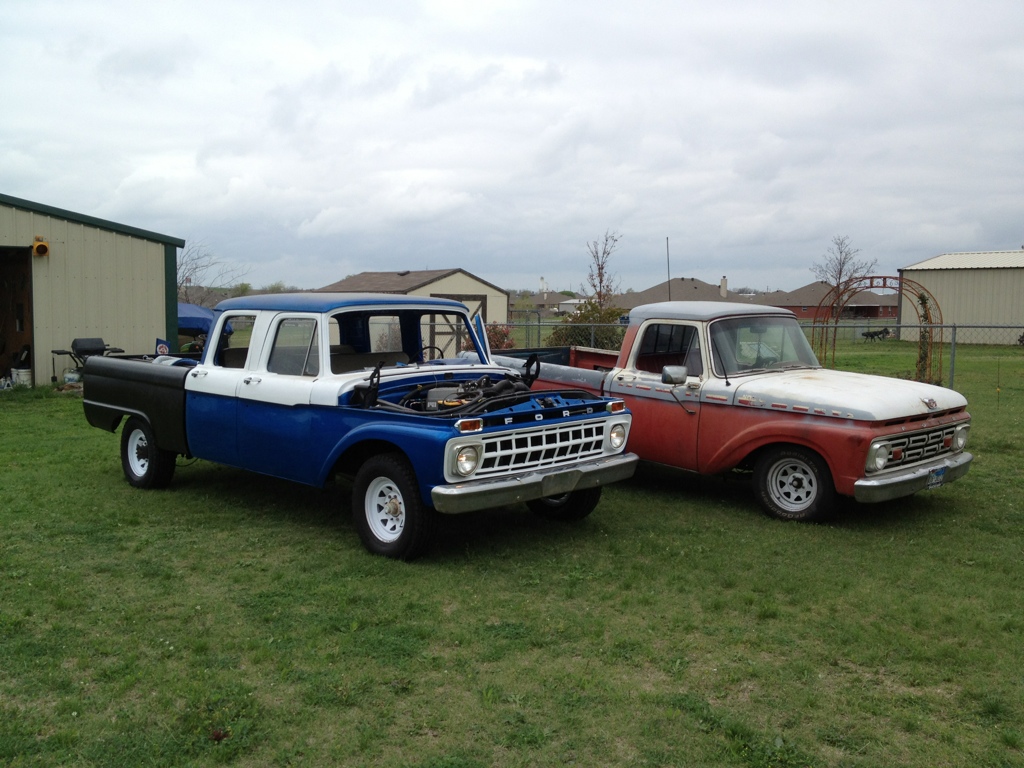
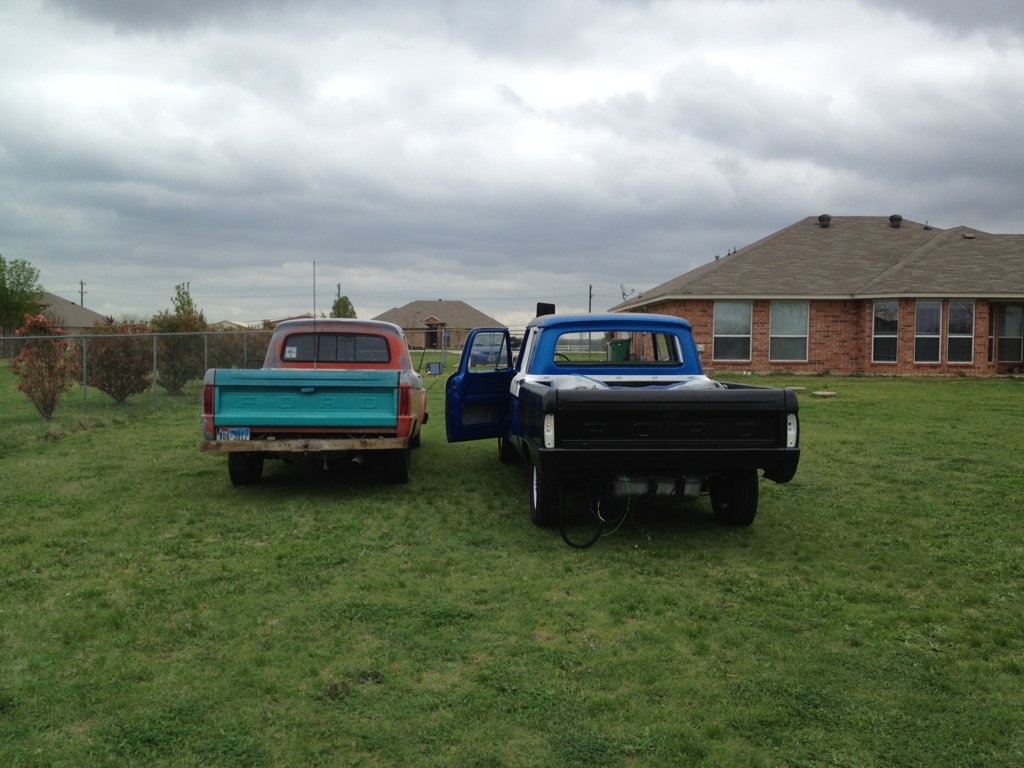
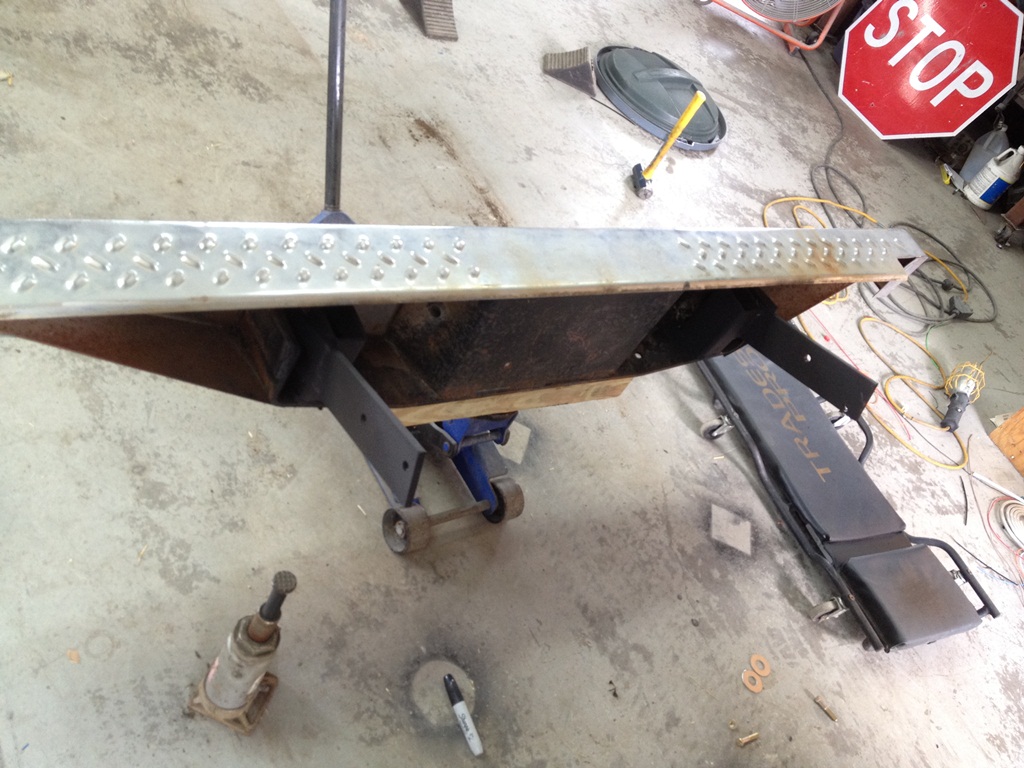
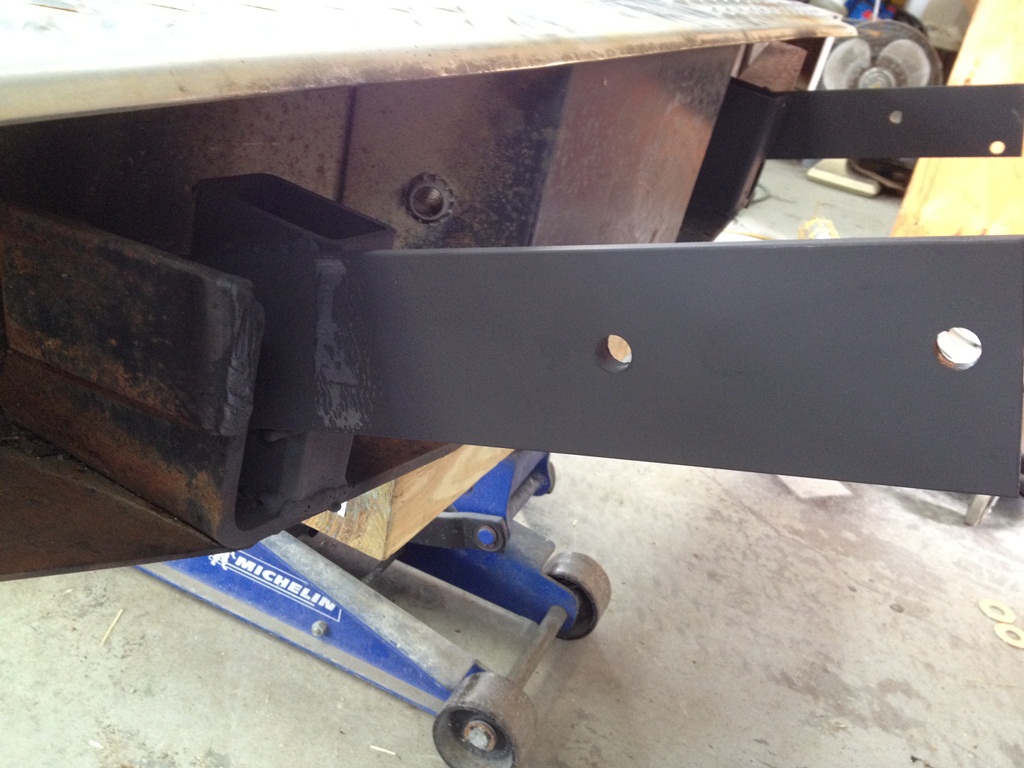
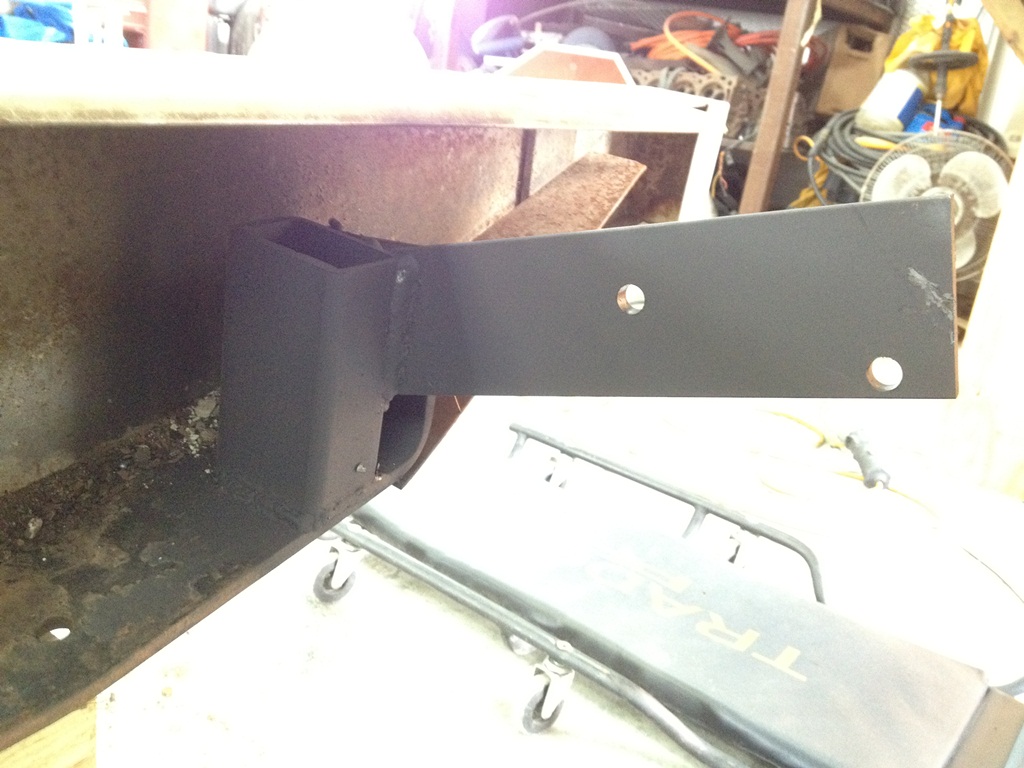
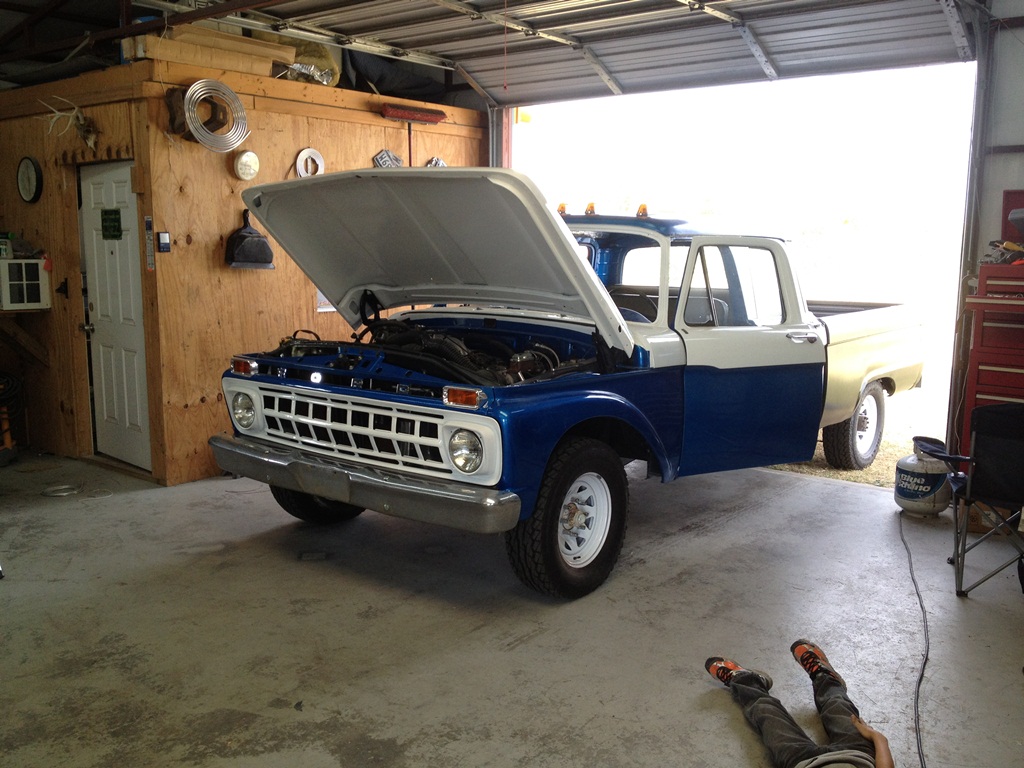
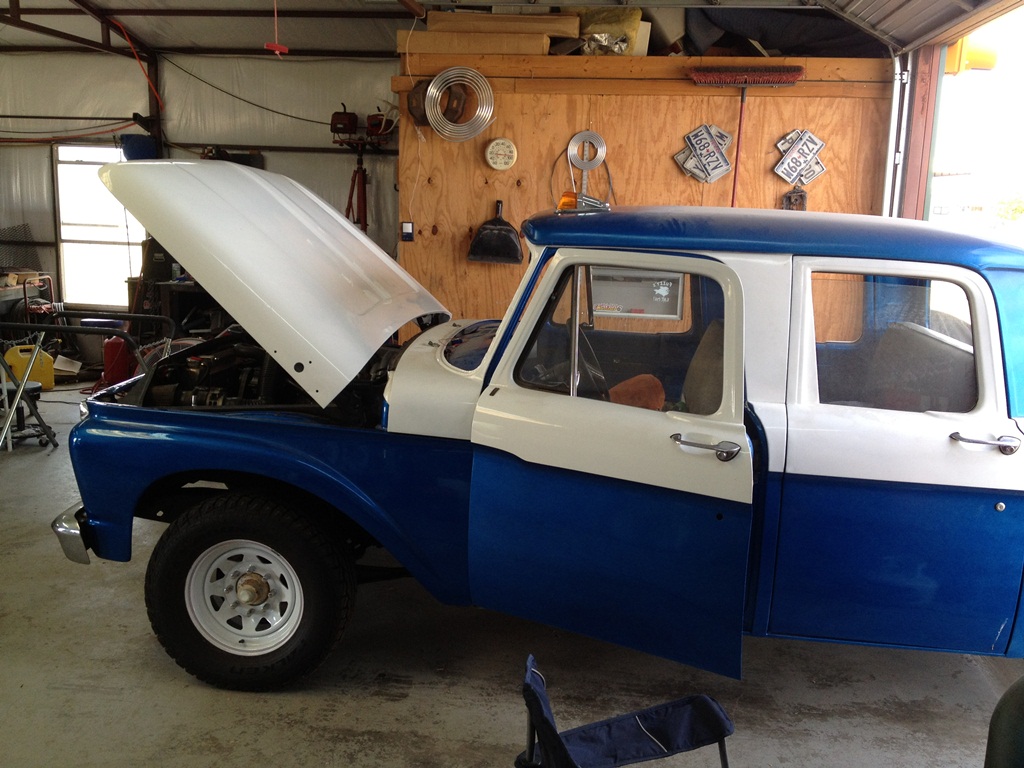
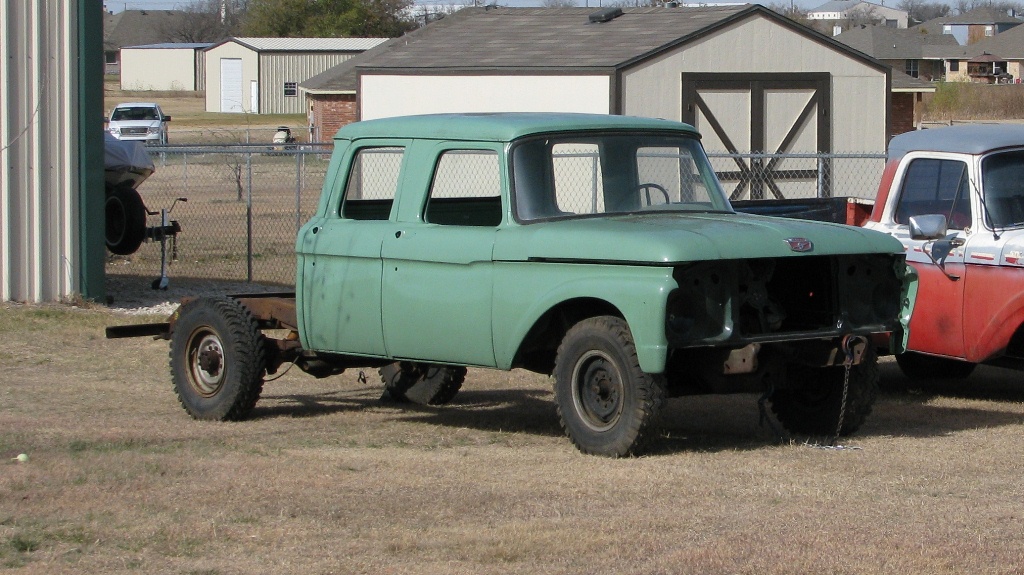
More updates from this weekend. I changed the spring bushings out on the driver rear also. This was a pain in the ....... but it is done, the front bushing was a slight bit to wide so a quick mintue with the grinder and it fit just right. 
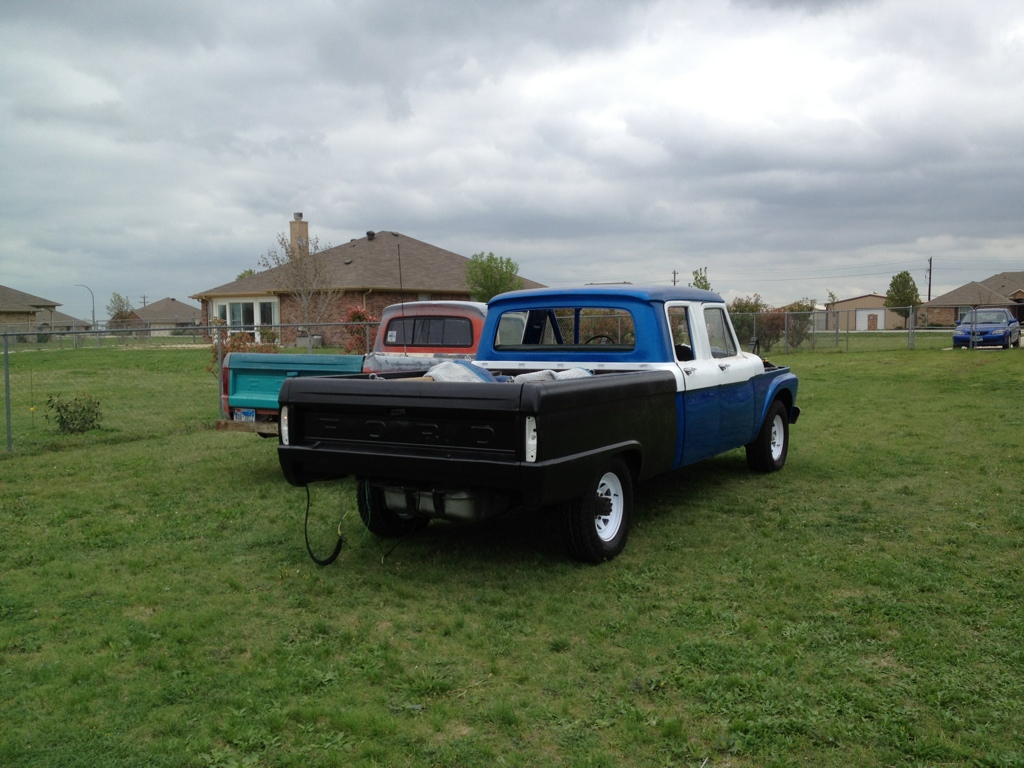
I also got the bed on the truck only got two bolts in but the others need drilling (64 bed on a 65 frame. ) It is on and sure if different backing this truck up now. Wow I can see the end and man this thing is long. I'm used to short beds.
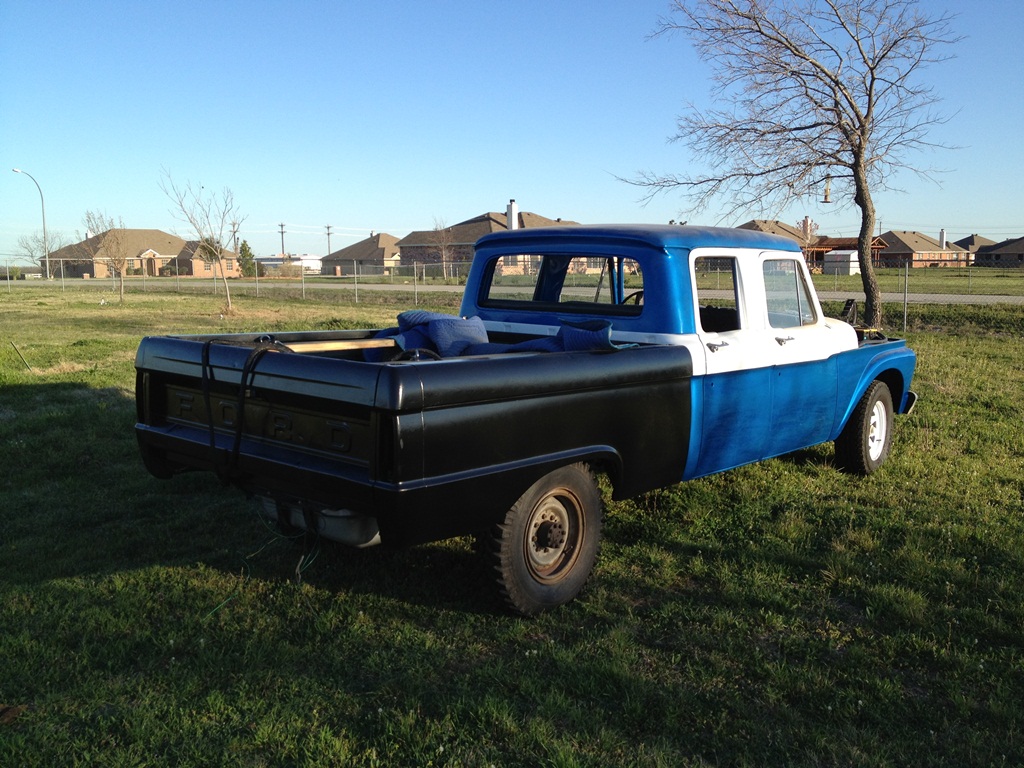
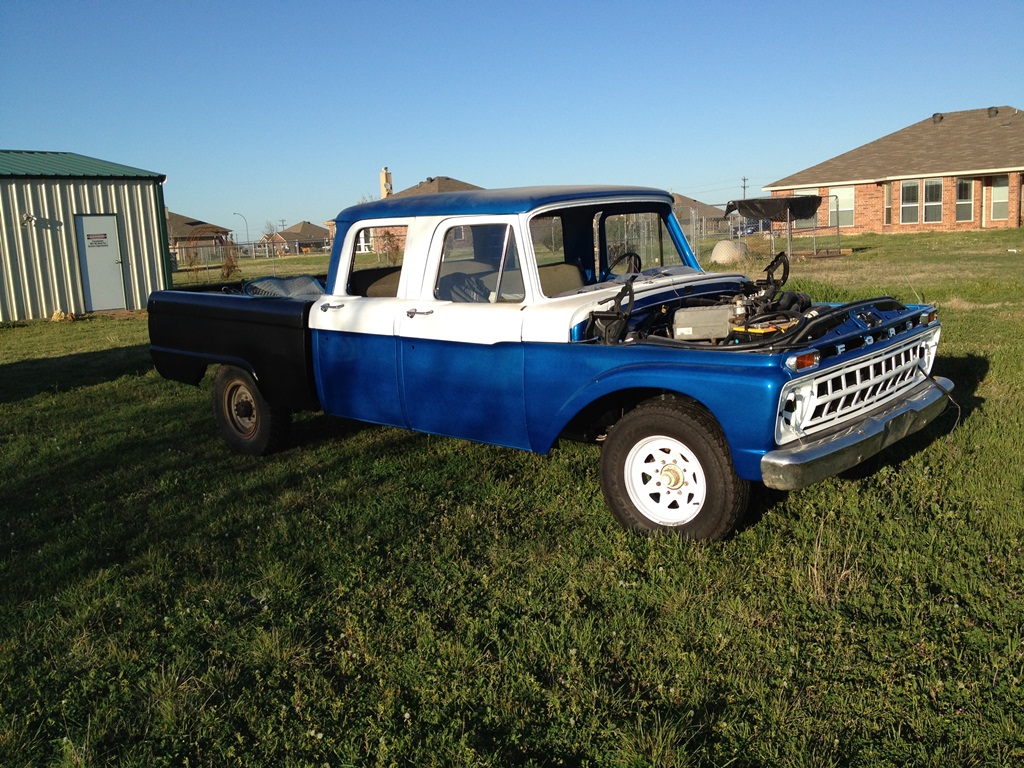

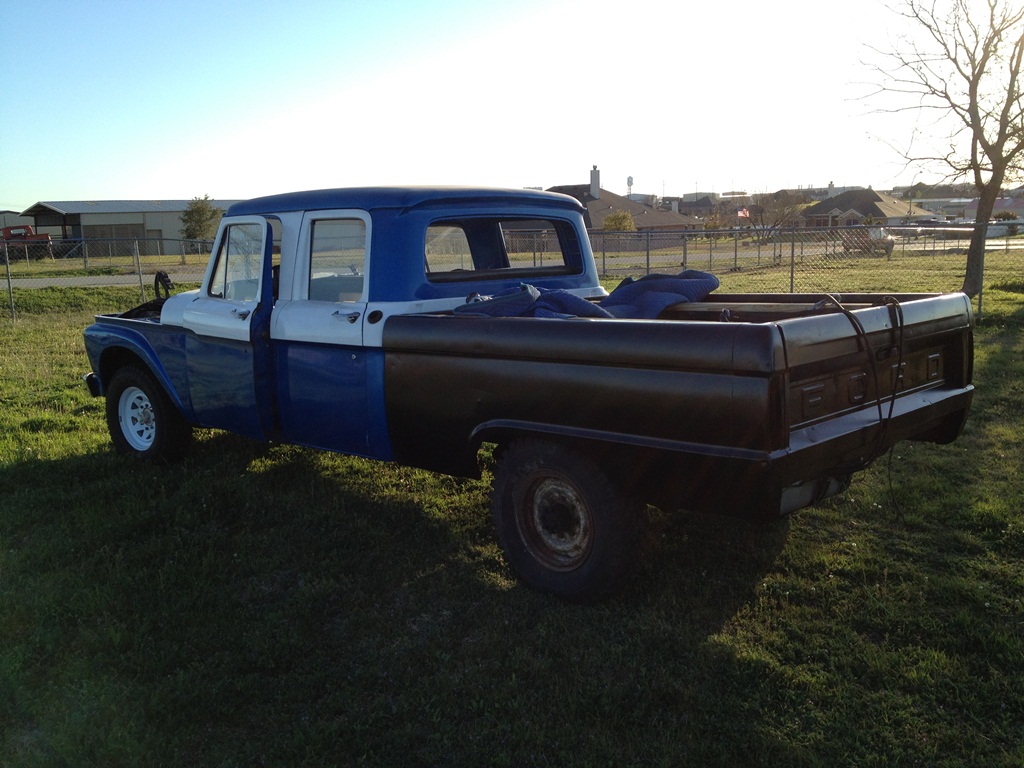
I'm not the most happiest with the bed but I keep telling my self this is just a temp bed the real nice looking one you will get to you need this on the road for testing.. Slick stock is only 154 days away...
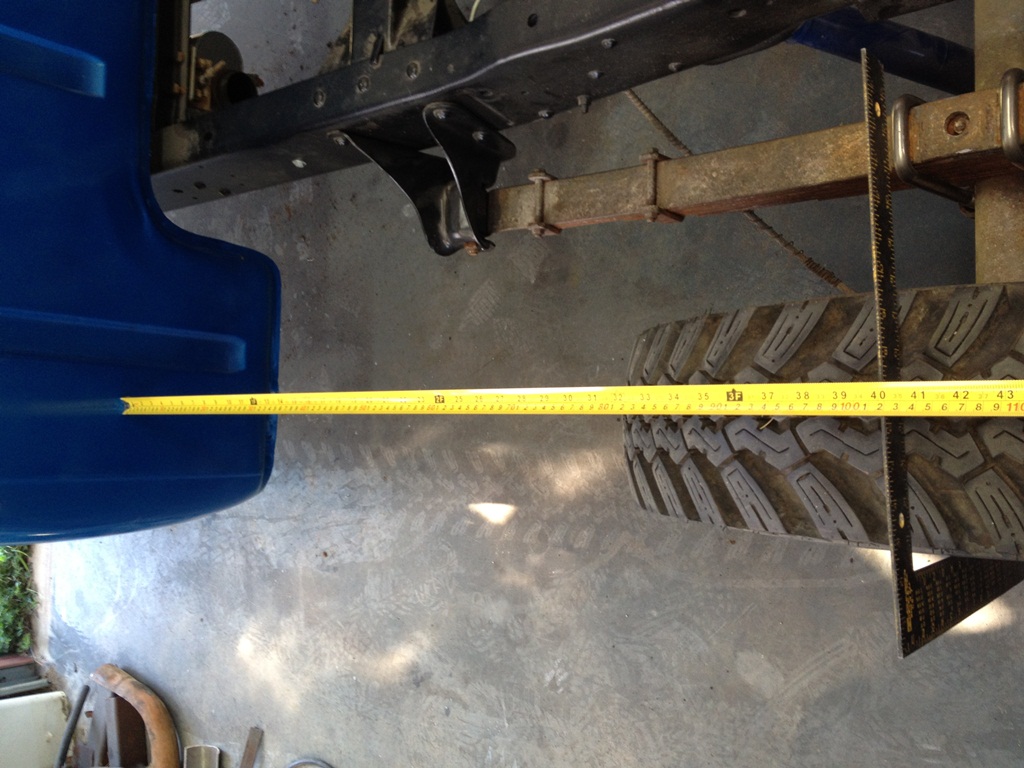
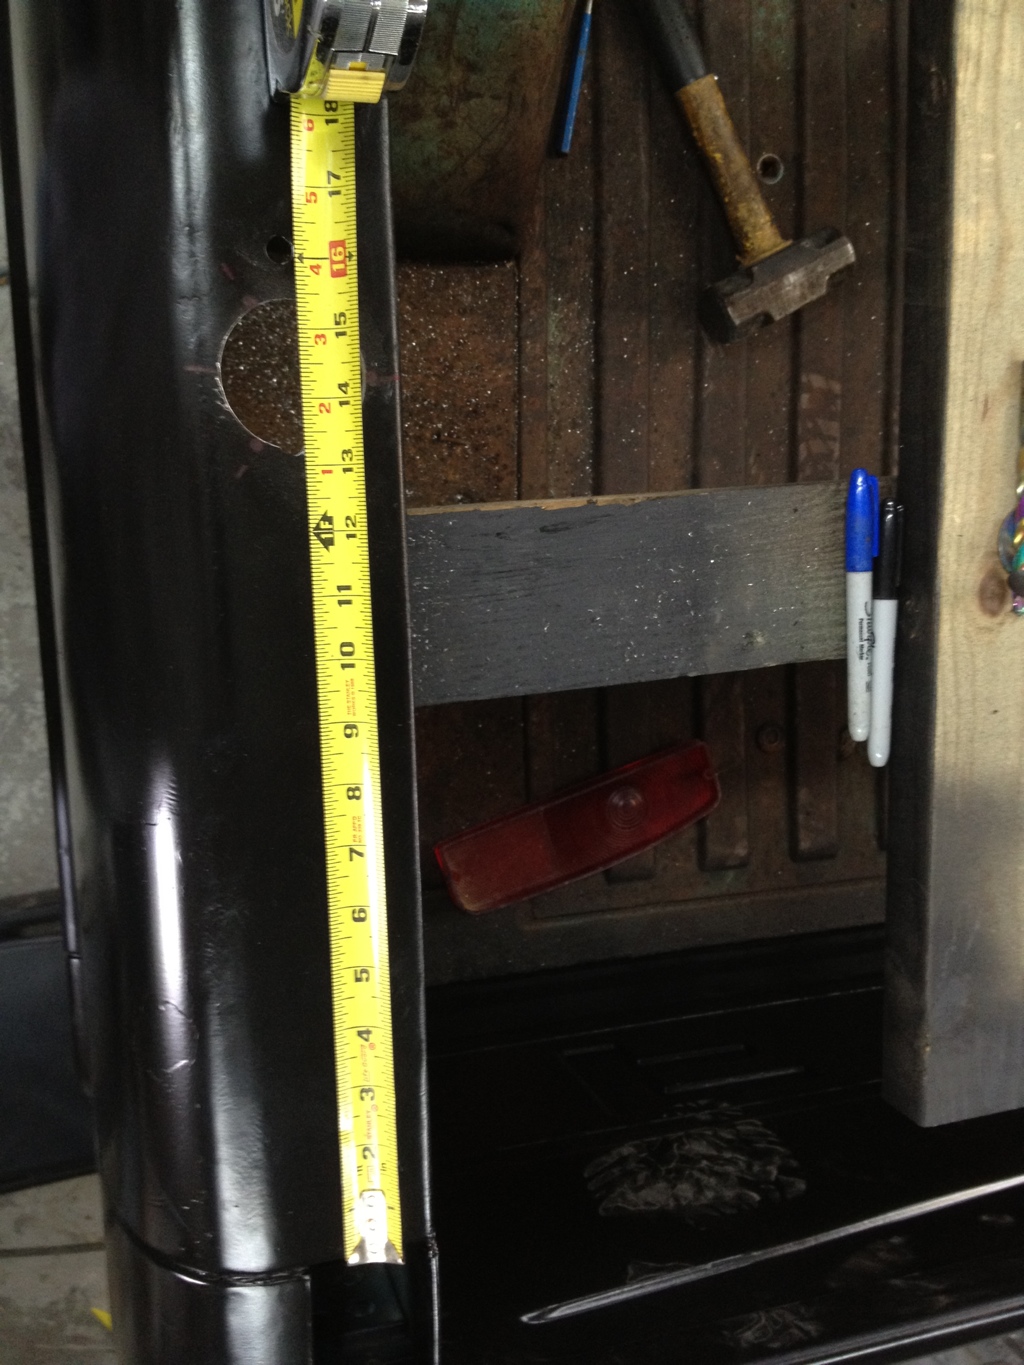
Oh and I had a request for a measurment. I figured it couldn't hurt being here either. 40 inches from the cab to the middle of the axle = short bed.
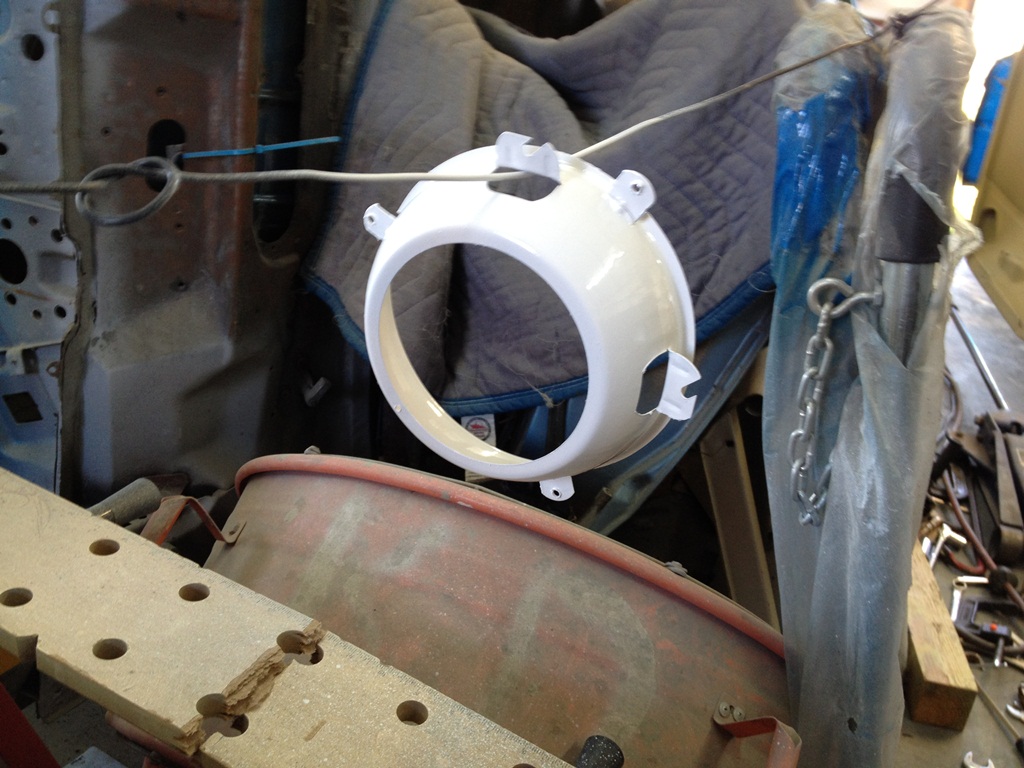
I also worked on getting the head lights put on but only got one done. I just have the trim ring hanging there I need to get it screwed down.
wow headlights does this mean I'm closer?
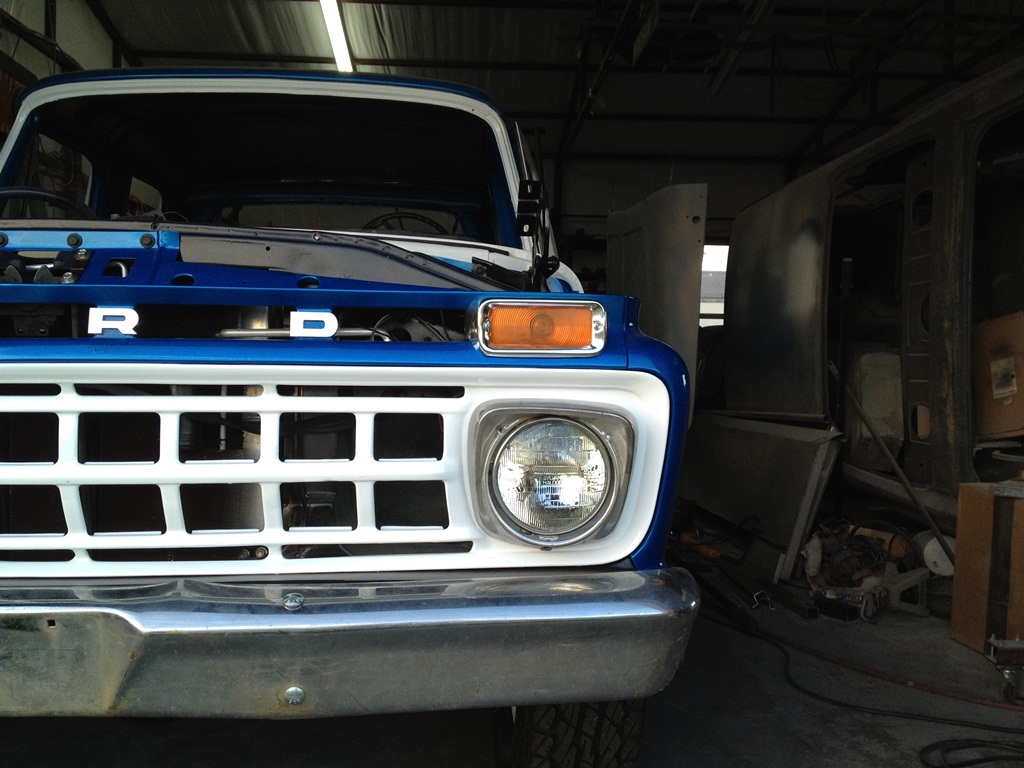
I still need to get a better ground hooked up but hey it's one light at a time right.
I also got the bed on the truck only got two bolts in but the others need drilling (64 bed on a 65 frame.
I'm not the most happiest with the bed but I keep telling my self this is just a temp bed the real nice looking one you will get to you need this on the road for testing.. Slick stock is only 154 days away...
Oh and I had a request for a measurment. I figured it couldn't hurt being here either. 40 inches from the cab to the middle of the axle = short bed.
I also worked on getting the head lights put on but only got one done. I just have the trim ring hanging there I need to get it screwed down.
wow headlights does this mean I'm closer?
I still need to get a better ground hooked up but hey it's one light at a time right.
64 F100 short bed-style side-460-c6-with side toolbox and Dakota Front Suspension
And a 65 CrewCab
Chris W.
The pickups
65 Crew Cab
http://www.purpleflyingmonkey.com/CrewCab/index.html
64 F100
http://www.purpleflyingmonkey.com/1964- ... index.html
The Torino project http://www.purpleflyingmonkey.com/1971- ... eFile.html
And a 65 CrewCab
Chris W.
The pickups
65 Crew Cab
http://www.purpleflyingmonkey.com/CrewCab/index.html
64 F100
http://www.purpleflyingmonkey.com/1964- ... index.html
The Torino project http://www.purpleflyingmonkey.com/1971- ... eFile.html
-
fire truck
- Posts: 2141
- Joined: January 17, 2010, 9:06 pm
- Location: Down in Mississippi and up to no good

Re: PFM's 65 Crew Cab F250
one piece at a time...
So good lookin' that I've attracted an international stalker.
Rest in Peace Bumpstick....I miss ya man.
Rest in Peace Bumpstick....I miss ya man.

Re: PFM's 65 Crew Cab F250
Chris, better to have a bed on there than be without one.
Things will look better with the hood painted and put back on.
Can't wait to see this rig with the bed all painted to match. TR
Things will look better with the hood painted and put back on.
Can't wait to see this rig with the bed all painted to match. TR
-
Julian Mule

- Posts: 38
- Joined: January 23, 2012, 9:15 pm
- Location: SoCal & N.C.
Re: PFM's 65 Crew Cab F250
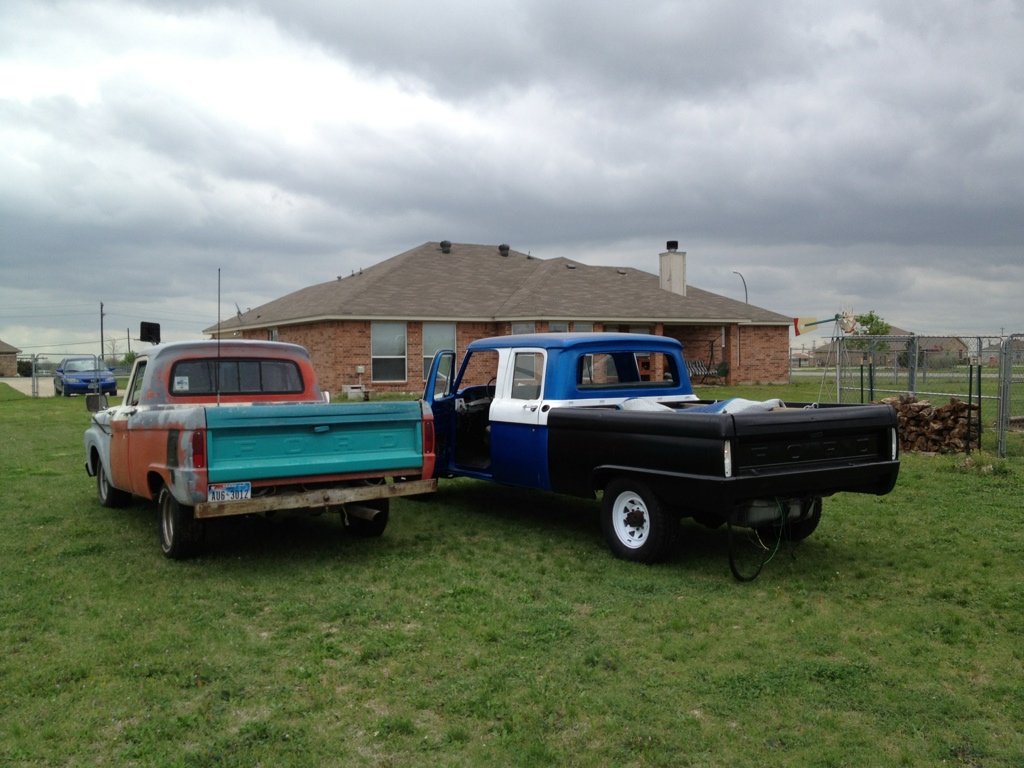
Chris, that is coming together nicely my man! Even with the primered bed, that is a sharp truck.
Thanks for the measurement Mine is about 48" from bed to center of the axle.
Thanks for the measurement
-
PFM-64f100
- Posts: 1270
- Joined: August 7, 2006, 6:37 pm
- Location: Haslet, Texas
- Contact:
Re: PFM's 65 Crew Cab F250
Wow 8" more for a long bed crew. I thought mine was a long truck just being a short bed crew. Good info to know.Julian Mule wrote:Chris, that is coming together nicely my man! Even with the primered bed, that is a sharp truck.
Thanks for the measurement
64 F100 short bed-style side-460-c6-with side toolbox and Dakota Front Suspension
And a 65 CrewCab
Chris W.
The pickups
65 Crew Cab
http://www.purpleflyingmonkey.com/CrewCab/index.html
64 F100
http://www.purpleflyingmonkey.com/1964- ... index.html
The Torino project http://www.purpleflyingmonkey.com/1971- ... eFile.html
And a 65 CrewCab
Chris W.
The pickups
65 Crew Cab
http://www.purpleflyingmonkey.com/CrewCab/index.html
64 F100
http://www.purpleflyingmonkey.com/1964- ... index.html
The Torino project http://www.purpleflyingmonkey.com/1971- ... eFile.html
-
PFM-64f100
- Posts: 1270
- Joined: August 7, 2006, 6:37 pm
- Location: Haslet, Texas
- Contact:
Re: PFM's 65 Crew Cab F250
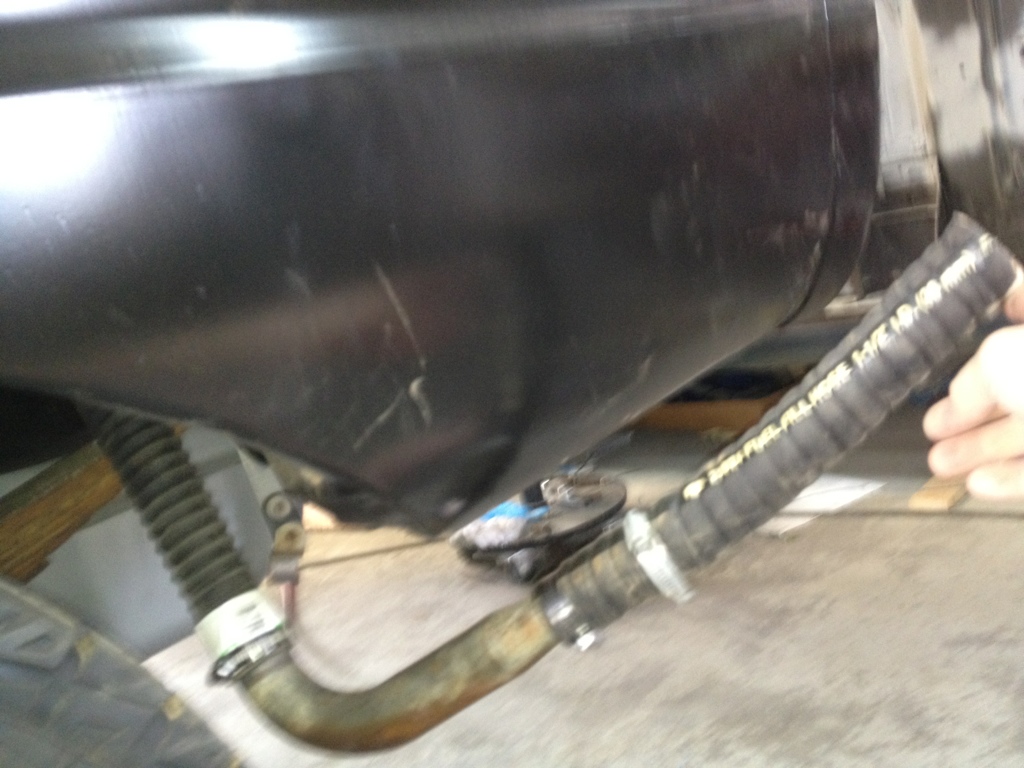
More work done on the Crew this weekend. I got the gas filler all connected up and working. I decided to do this different than my 64 with the filler in the side of the bed.
1st had to cut a hole in the bed rail for the boat style filler. I used a 2 inch to make the hole.
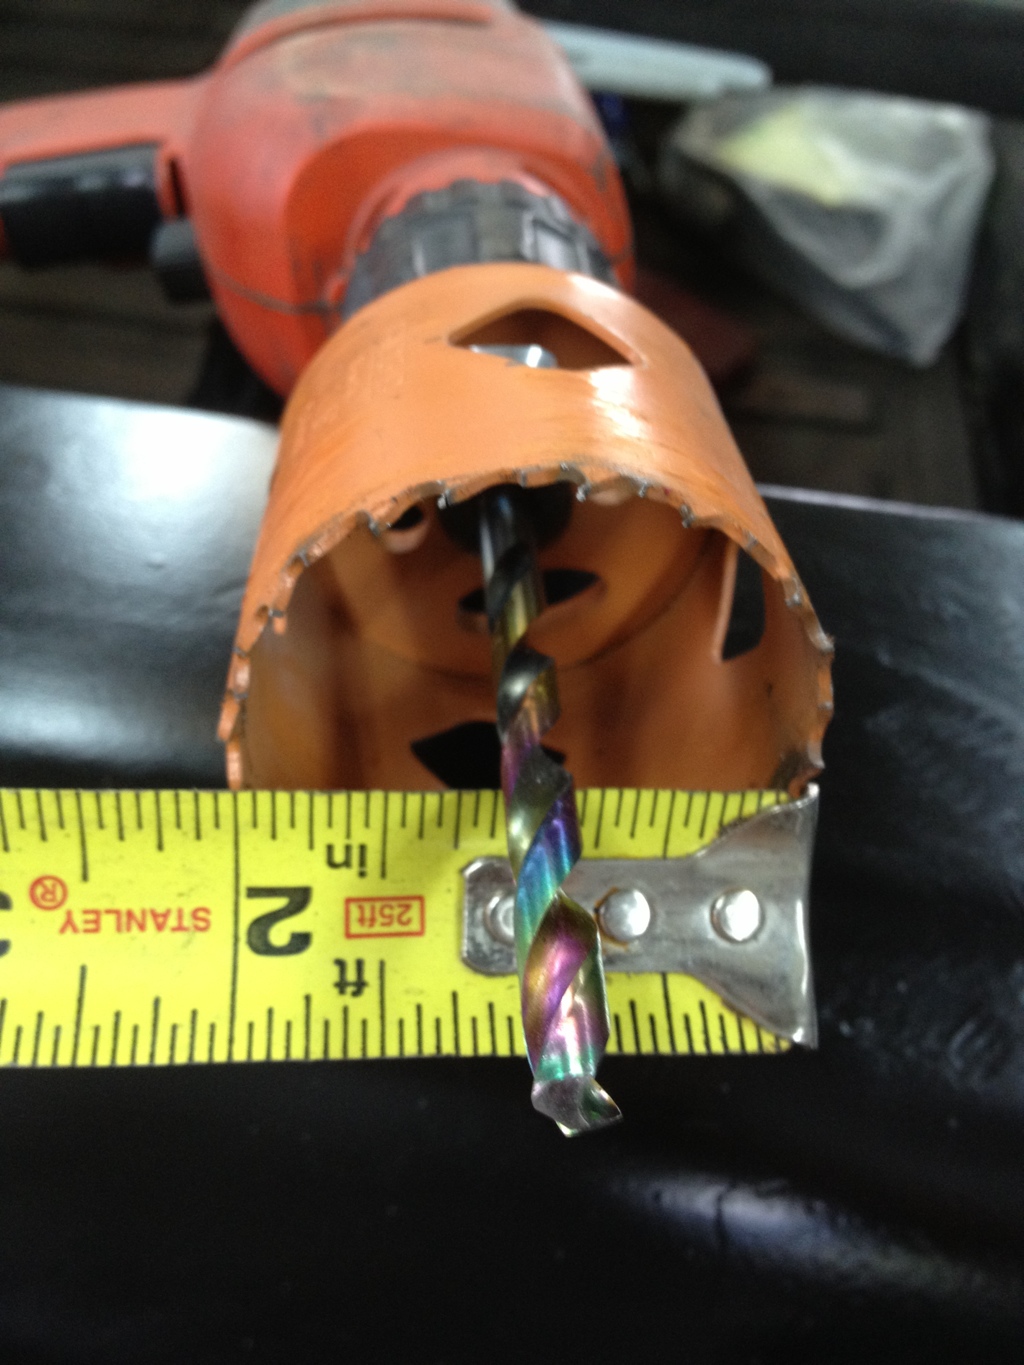
Then I figured out that the hole needed to be about 14 ½ inches from the back stake pocket.
Then I also cut another hole in the inner wall of the bed. I didn’t want this filler neck to interfere with anything that I might have loaded in the bed so this worked the best for me.
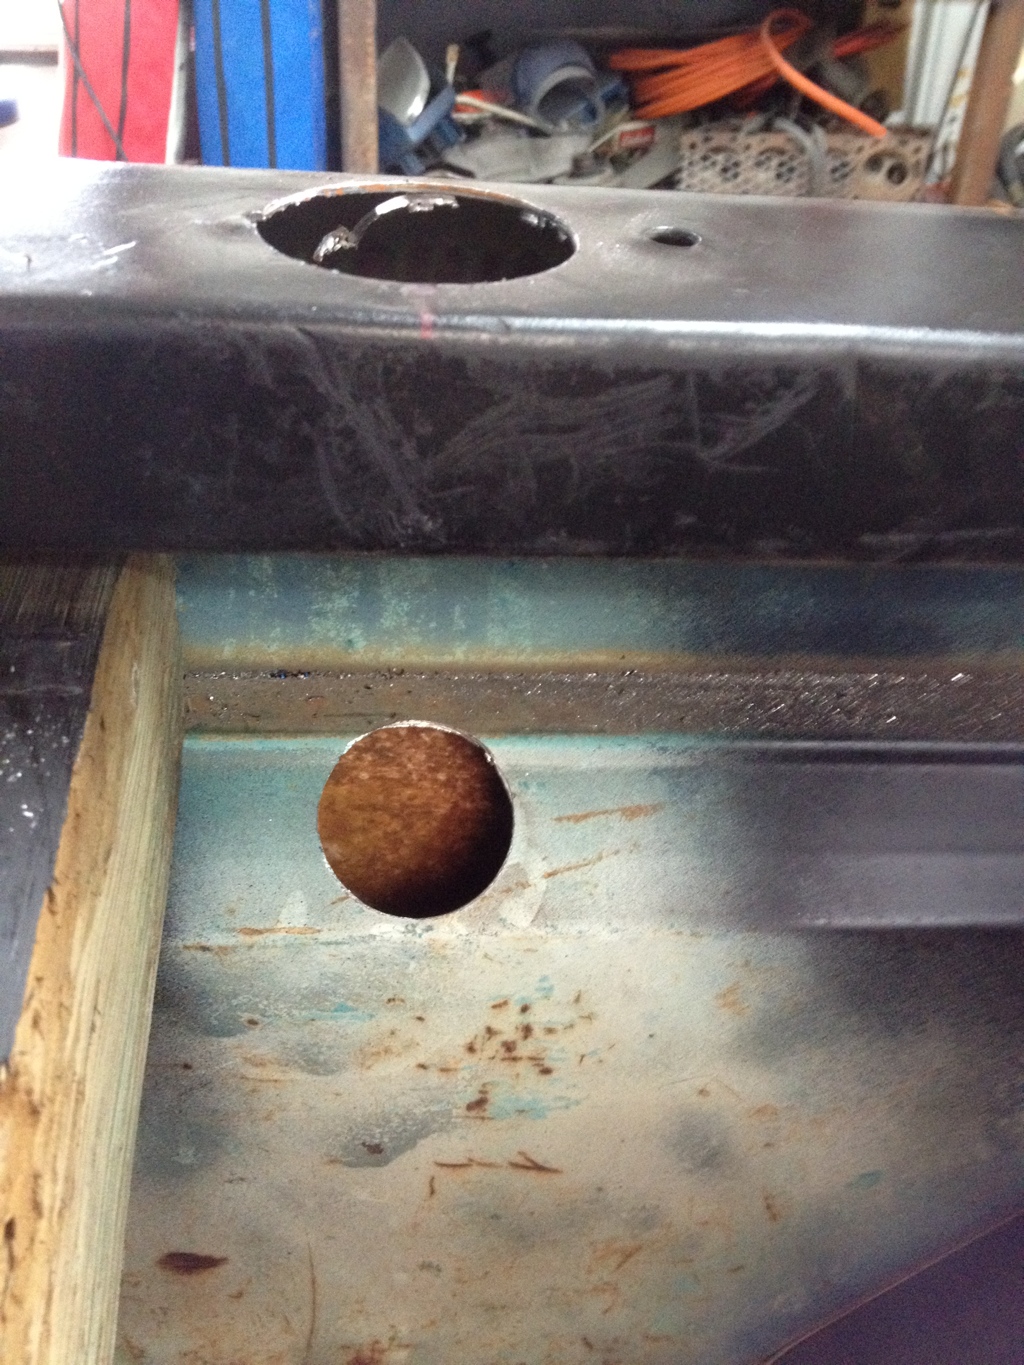
Pics of the hole.


This is a pic of the hose going to the tank. It is actually a flexible radiator hose but the guy at the parts store swore up and down it was gas safe. So I went with it.
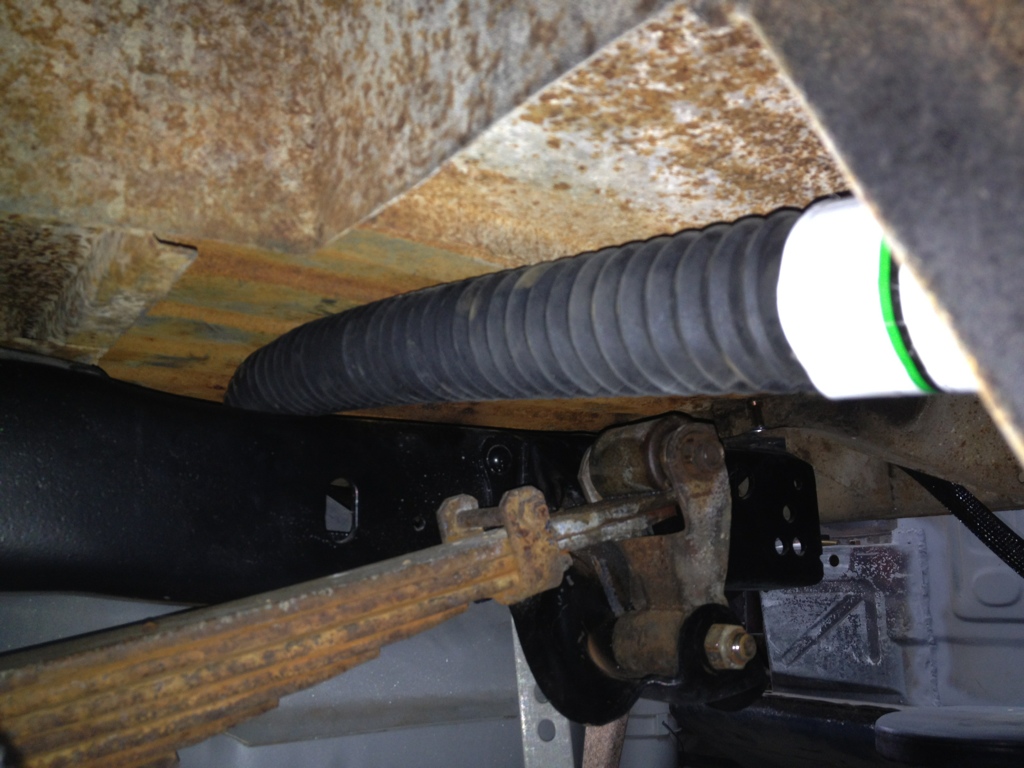
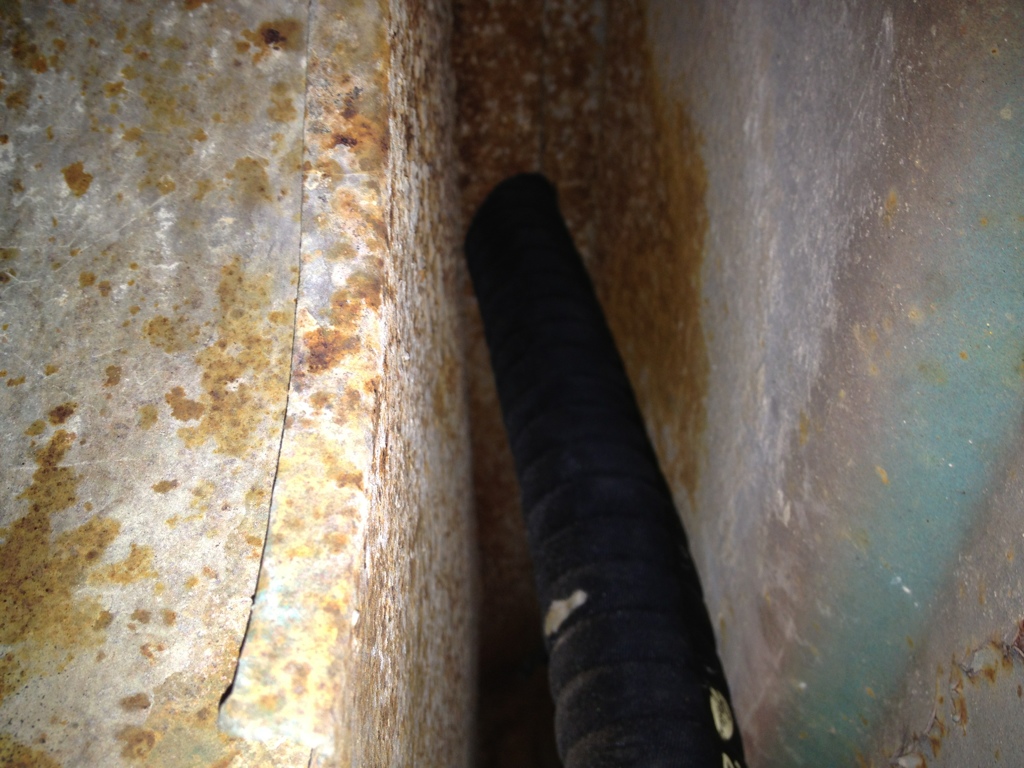
This is the route of the upper hose inside the inner bed fender. Plenty of room for it.
This is the lower and upper hose connected. Sorry picture a little blurry. Since the upper hose is 1 ½ and the lower was almost 2 inch (gas tank had a 2 1/8 hole) I had an extra part of a filler hose that made this transition work great. Plus it had the 90 that was needed.
After getting this all put together I took the gas can and started dumping gas in of course it spilled all over the floor due to the upper hose clamp not being tight. Fixed that and then I could only pour so much until the hose was full. I needed to put some venting in. Took it all a part then got some 3/8 hard fuel line (alum). I drilled a hole in the hose then made a 180 degree bend in the line and shoved it in near the top.
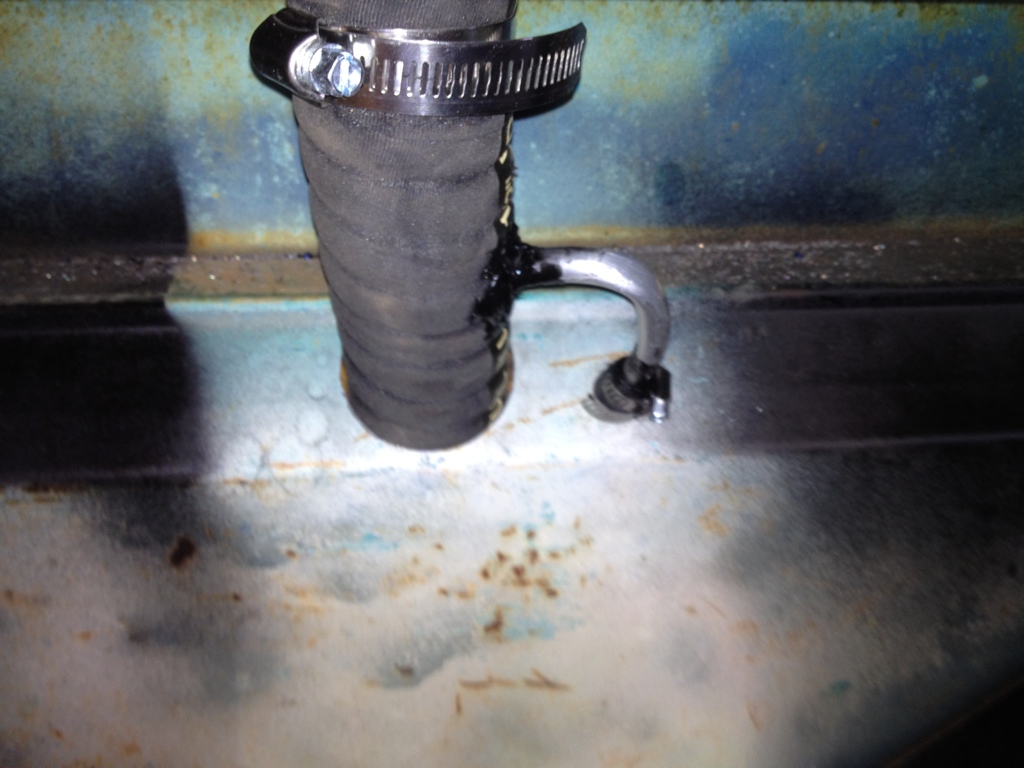
Now for the lower hose, I wanted to have the hard line inside the tank to give it max venting. So I drilled another hole then put the line in. I connected both ends via rubber hose. I did seal up both entry points with some RTV.
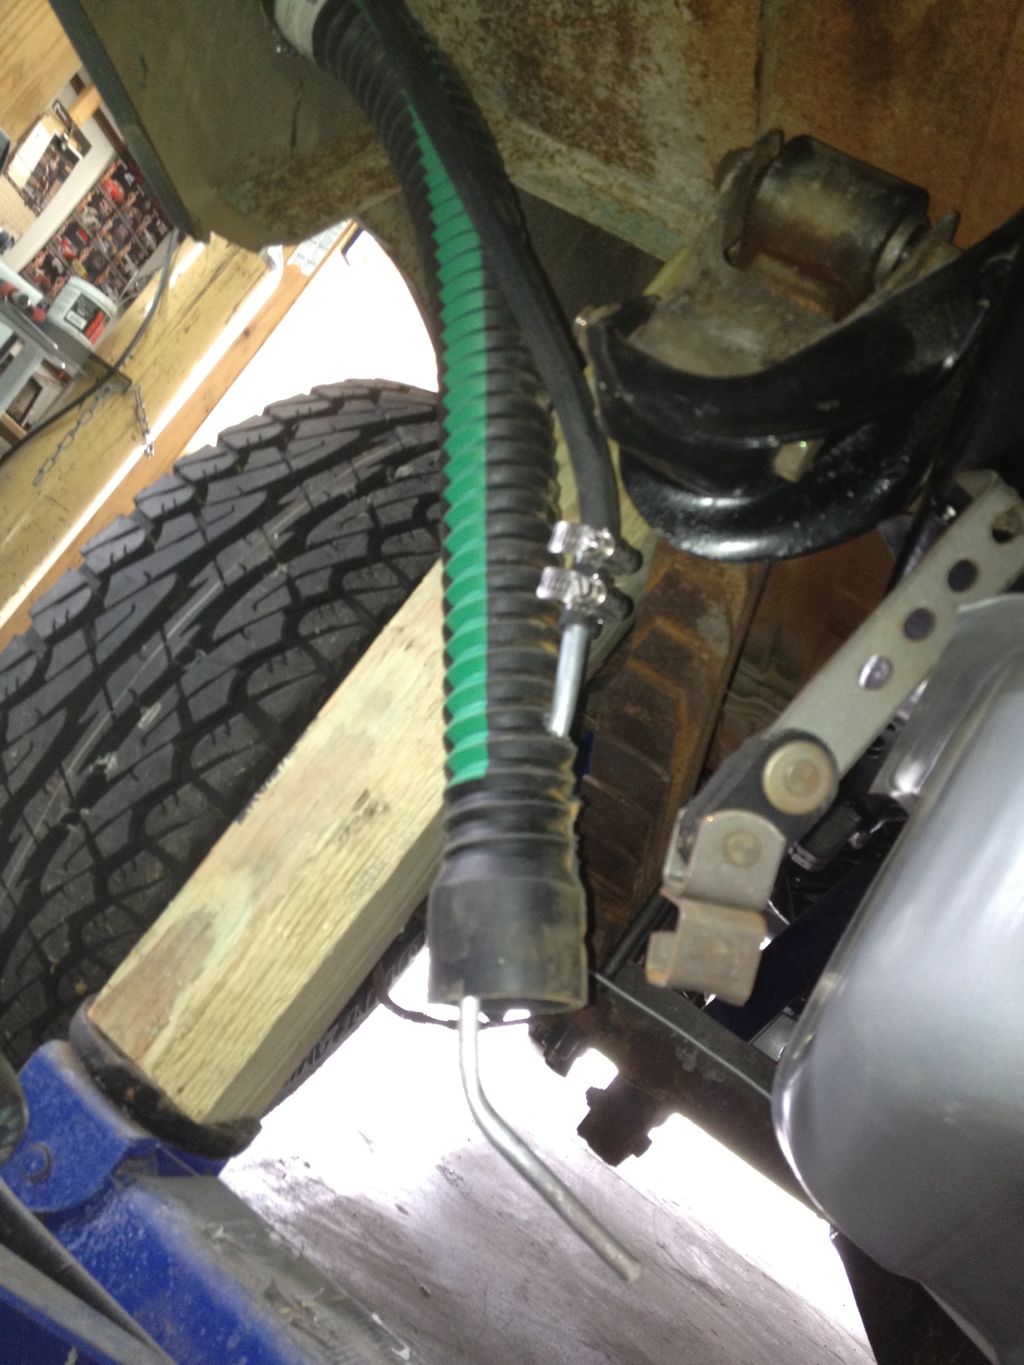
Here is the complete install pictures I did put some screws in the filler cap to hold it to the bed and I will go back and add some rubber to the inner fender hose just to help not cut the filler hose.

1st had to cut a hole in the bed rail for the boat style filler. I used a 2 inch to make the hole.
Then I figured out that the hole needed to be about 14 ½ inches from the back stake pocket.
Then I also cut another hole in the inner wall of the bed. I didn’t want this filler neck to interfere with anything that I might have loaded in the bed so this worked the best for me.
Pics of the hole.
This is a pic of the hose going to the tank. It is actually a flexible radiator hose but the guy at the parts store swore up and down it was gas safe. So I went with it.
This is the route of the upper hose inside the inner bed fender. Plenty of room for it.
This is the lower and upper hose connected. Sorry picture a little blurry. Since the upper hose is 1 ½ and the lower was almost 2 inch (gas tank had a 2 1/8 hole) I had an extra part of a filler hose that made this transition work great. Plus it had the 90 that was needed.
After getting this all put together I took the gas can and started dumping gas in of course it spilled all over the floor due to the upper hose clamp not being tight. Fixed that and then I could only pour so much until the hose was full. I needed to put some venting in. Took it all a part then got some 3/8 hard fuel line (alum). I drilled a hole in the hose then made a 180 degree bend in the line and shoved it in near the top.
Now for the lower hose, I wanted to have the hard line inside the tank to give it max venting. So I drilled another hole then put the line in. I connected both ends via rubber hose. I did seal up both entry points with some RTV.
Here is the complete install pictures I did put some screws in the filler cap to hold it to the bed and I will go back and add some rubber to the inner fender hose just to help not cut the filler hose.
64 F100 short bed-style side-460-c6-with side toolbox and Dakota Front Suspension
And a 65 CrewCab
Chris W.
The pickups
65 Crew Cab
http://www.purpleflyingmonkey.com/CrewCab/index.html
64 F100
http://www.purpleflyingmonkey.com/1964- ... index.html
The Torino project http://www.purpleflyingmonkey.com/1971- ... eFile.html
And a 65 CrewCab
Chris W.
The pickups
65 Crew Cab
http://www.purpleflyingmonkey.com/CrewCab/index.html
64 F100
http://www.purpleflyingmonkey.com/1964- ... index.html
The Torino project http://www.purpleflyingmonkey.com/1971- ... eFile.html
-
PFM-64f100
- Posts: 1270
- Joined: August 7, 2006, 6:37 pm
- Location: Haslet, Texas
- Contact:
Re: PFM's 65 Crew Cab F250
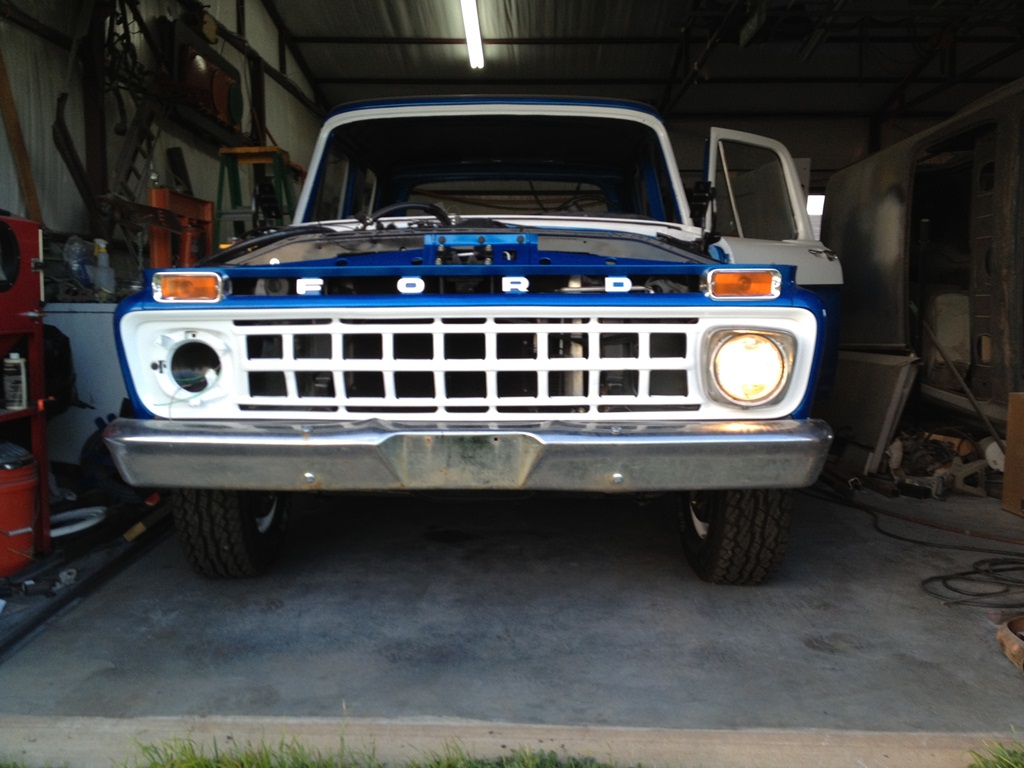
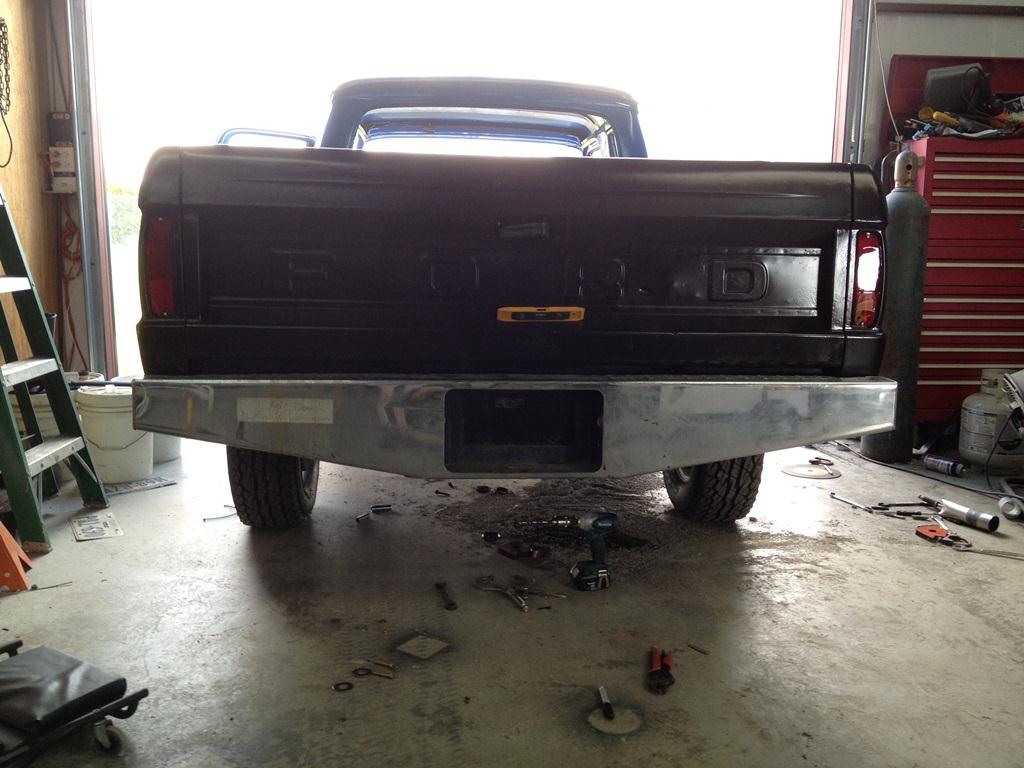
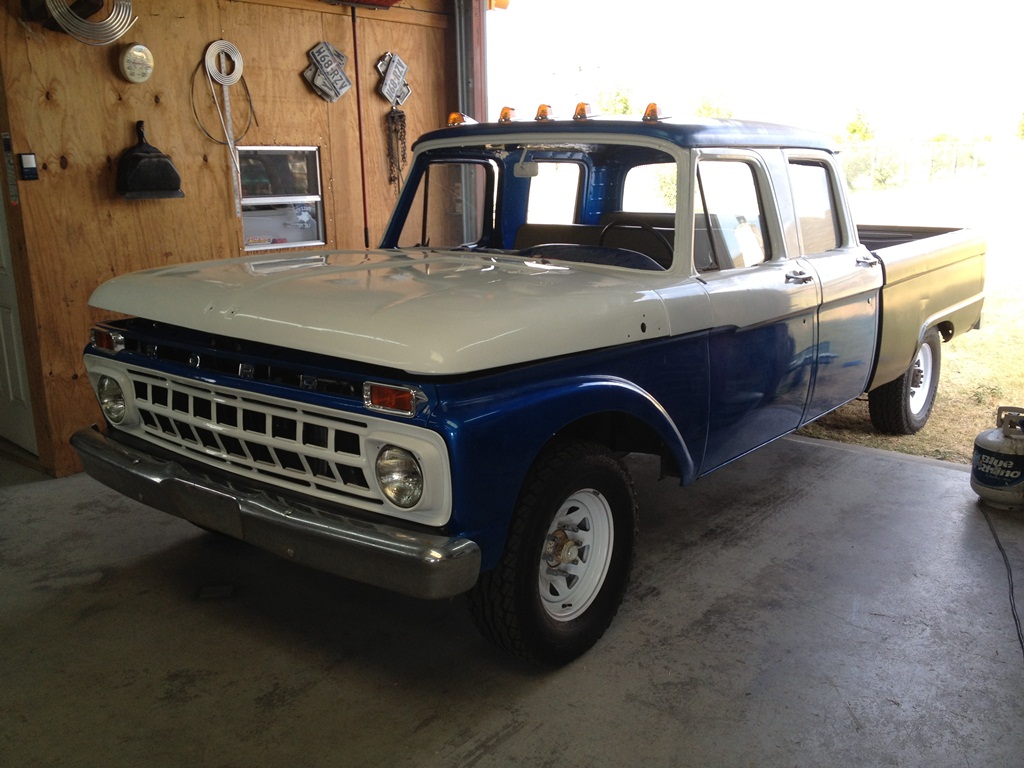
I also moved both trucks this weekend. So I need some more pictures. Yes both head lights are working now. I did replace the passenger side bezel with a white painted one. The driver side I had already done that way and it looked better to me.
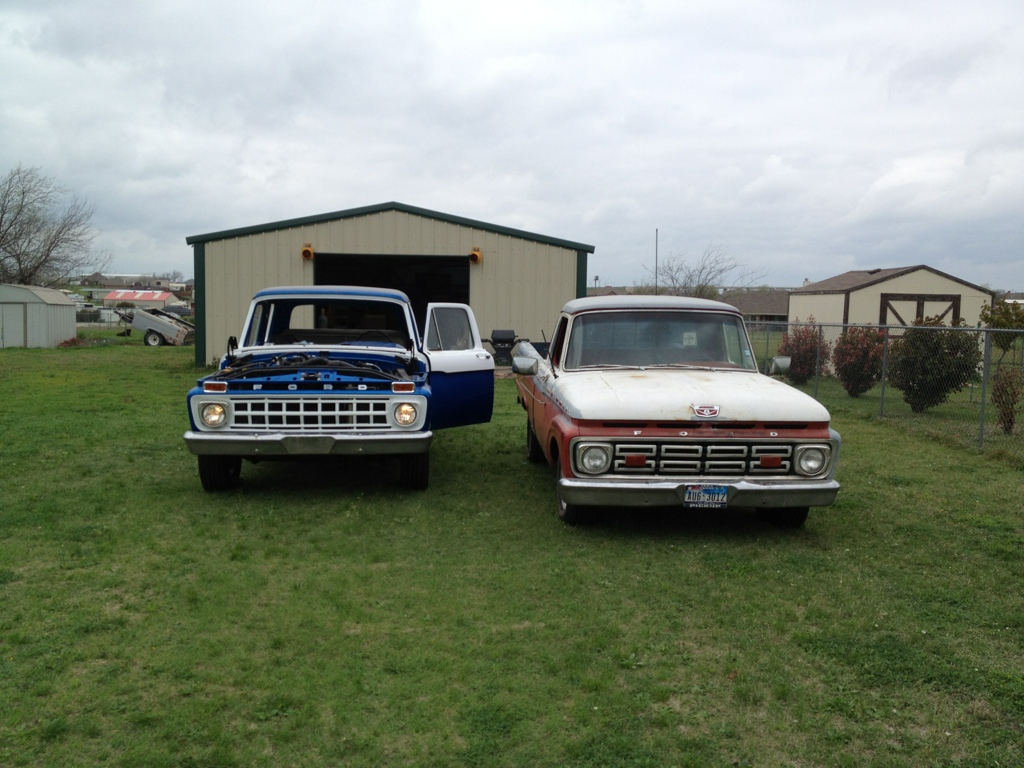
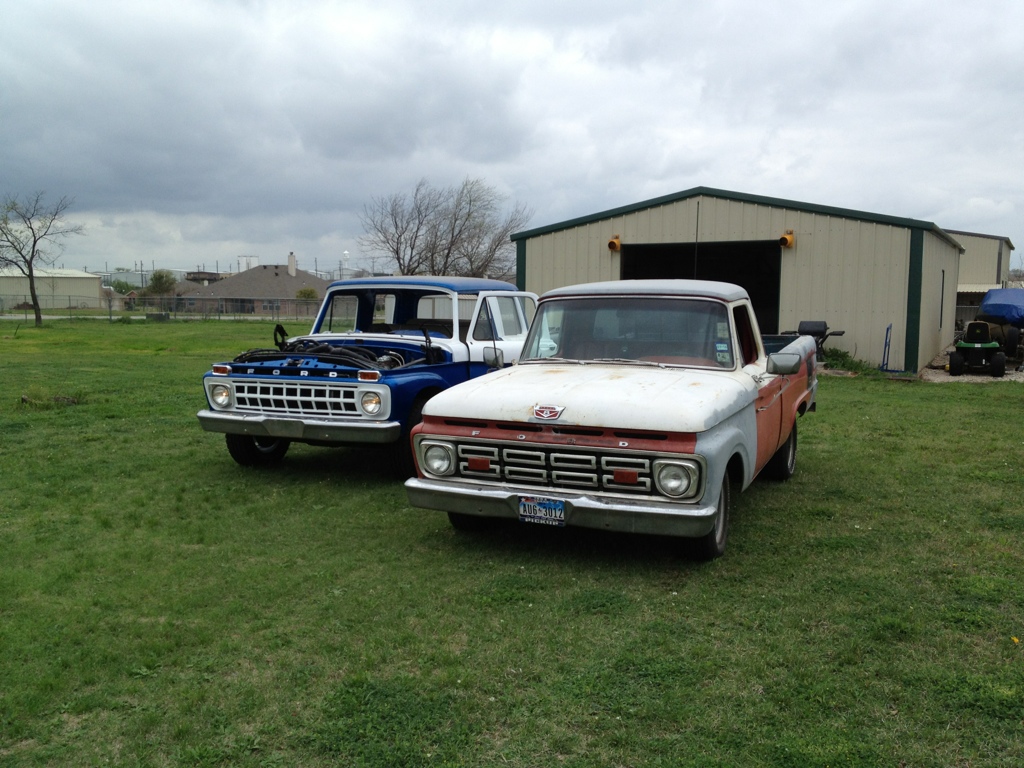
Yes I got the new rear rubber and rims mounted. Yea no more split rims on the crew.

Yes both tail lights are wired up and working. Only one showing in this pic cause I needed to buy some more bulbs.
I also grabbed a picture of the front driver side since I forgot it earlier on in the build post.
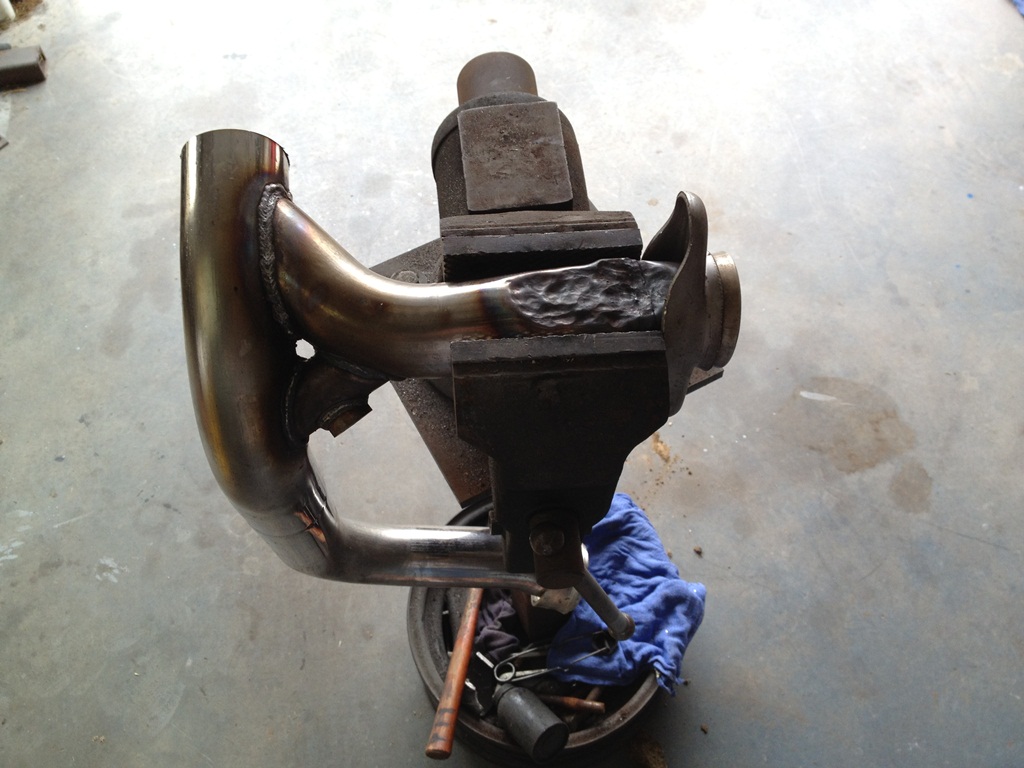
The last thing I tackled or started tackling this weekend was to replace the passenger side exhaust gasket as it had a leak. Well 6 out of 8 bolts broke off and I didn’t put much of anything behind them to break. So now I have 3 broken bolts to remove what a pain in the…. Hopefully I will not have to pull the head to get the broken bolts removed. If that happens I will just have the heads rebuilt. Plus having the intake and upper cleaned. My finger are crossed I don’t want to remove the heads right now.
Yes I got the new rear rubber and rims mounted. Yea no more split rims on the crew.
Yes both tail lights are wired up and working. Only one showing in this pic cause I needed to buy some more bulbs.
I also grabbed a picture of the front driver side since I forgot it earlier on in the build post.
The last thing I tackled or started tackling this weekend was to replace the passenger side exhaust gasket as it had a leak. Well 6 out of 8 bolts broke off and I didn’t put much of anything behind them to break. So now I have 3 broken bolts to remove what a pain in the…. Hopefully I will not have to pull the head to get the broken bolts removed. If that happens I will just have the heads rebuilt. Plus having the intake and upper cleaned. My finger are crossed I don’t want to remove the heads right now.
64 F100 short bed-style side-460-c6-with side toolbox and Dakota Front Suspension
And a 65 CrewCab
Chris W.
The pickups
65 Crew Cab
http://www.purpleflyingmonkey.com/CrewCab/index.html
64 F100
http://www.purpleflyingmonkey.com/1964- ... index.html
The Torino project http://www.purpleflyingmonkey.com/1971- ... eFile.html
And a 65 CrewCab
Chris W.
The pickups
65 Crew Cab
http://www.purpleflyingmonkey.com/CrewCab/index.html
64 F100
http://www.purpleflyingmonkey.com/1964- ... index.html
The Torino project http://www.purpleflyingmonkey.com/1971- ... eFile.html
-
Brian Taylor
- Posts: 1469
- Joined: August 18, 2009, 3:52 pm
- Location: Dallas , Texas
- Contact:
Re: PFM's 65 Crew Cab F250
It is looking good Chris. I will want a ride in it.......on the road this time.
BT
BT
1966 Ford F-100 LWB 300
-
PFM-64f100
- Posts: 1270
- Joined: August 7, 2006, 6:37 pm
- Location: Haslet, Texas
- Contact:
Re: PFM's 65 Crew Cab F250
but last time you laughed at my 14 gauge (wire) throttle cable.Brian Taylor wrote:It is looking good Chris. I will want a ride in it.......on the road this time.
BT
Come one down and take a ride. but first I got to get those broken header bolts out. hopefully tonight.
64 F100 short bed-style side-460-c6-with side toolbox and Dakota Front Suspension
And a 65 CrewCab
Chris W.
The pickups
65 Crew Cab
http://www.purpleflyingmonkey.com/CrewCab/index.html
64 F100
http://www.purpleflyingmonkey.com/1964- ... index.html
The Torino project http://www.purpleflyingmonkey.com/1971- ... eFile.html
And a 65 CrewCab
Chris W.
The pickups
65 Crew Cab
http://www.purpleflyingmonkey.com/CrewCab/index.html
64 F100
http://www.purpleflyingmonkey.com/1964- ... index.html
The Torino project http://www.purpleflyingmonkey.com/1971- ... eFile.html
-
PFM-64f100
- Posts: 1270
- Joined: August 7, 2006, 6:37 pm
- Location: Haslet, Texas
- Contact:
Re: PFM's 65 Crew Cab F250
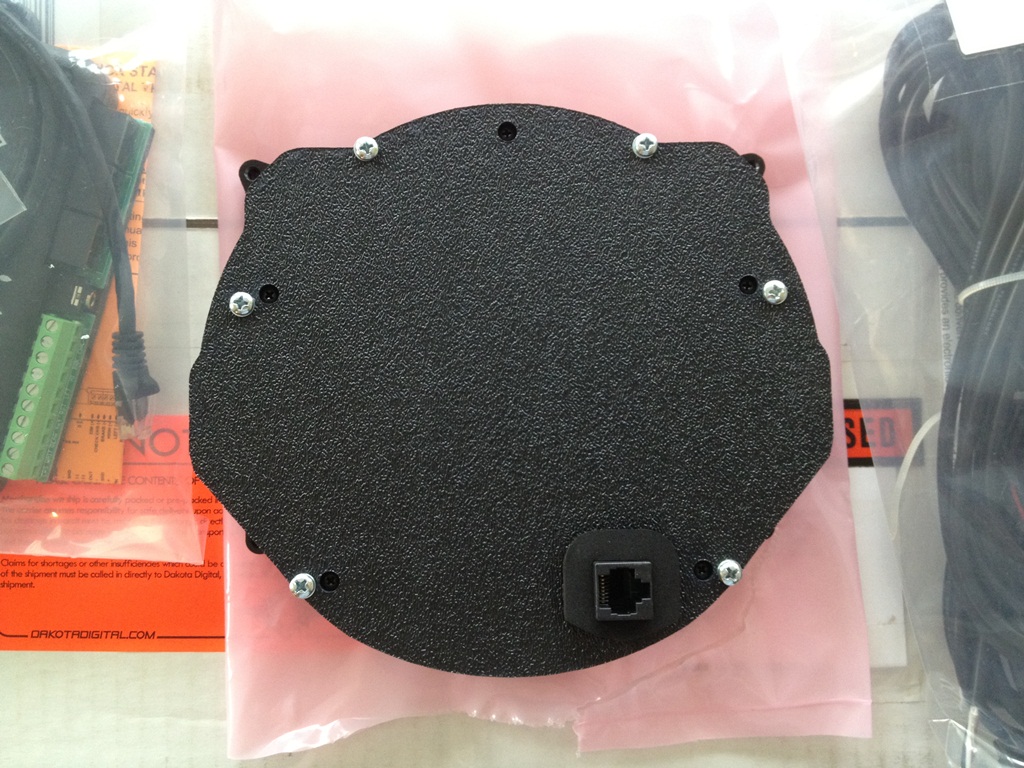
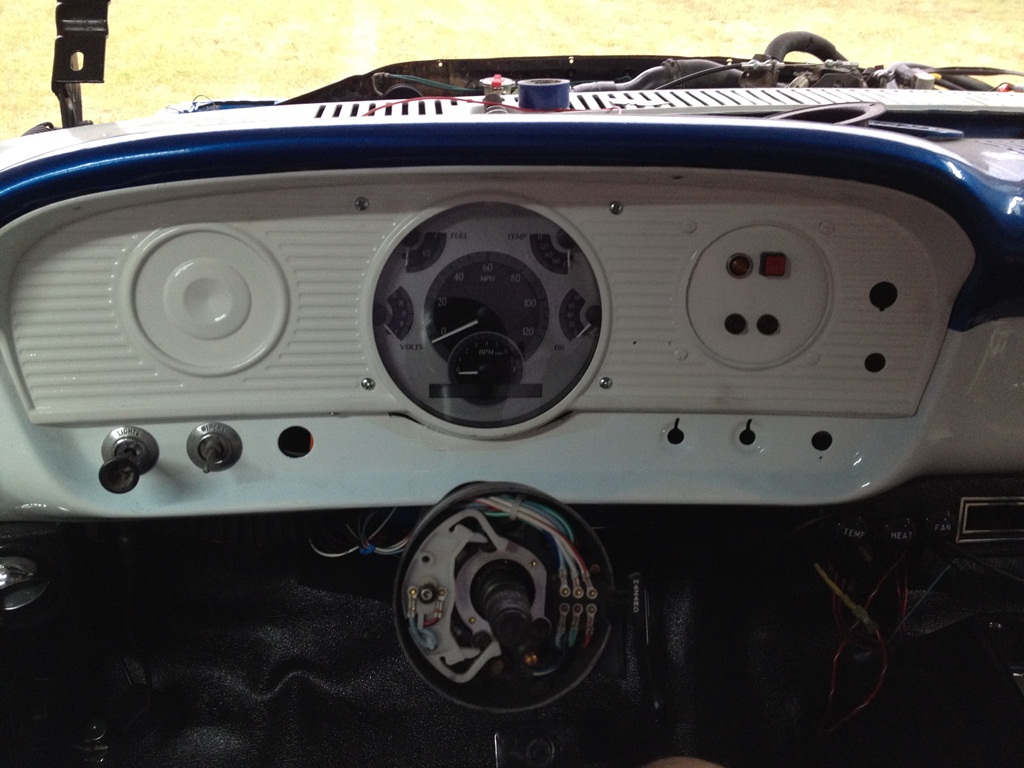
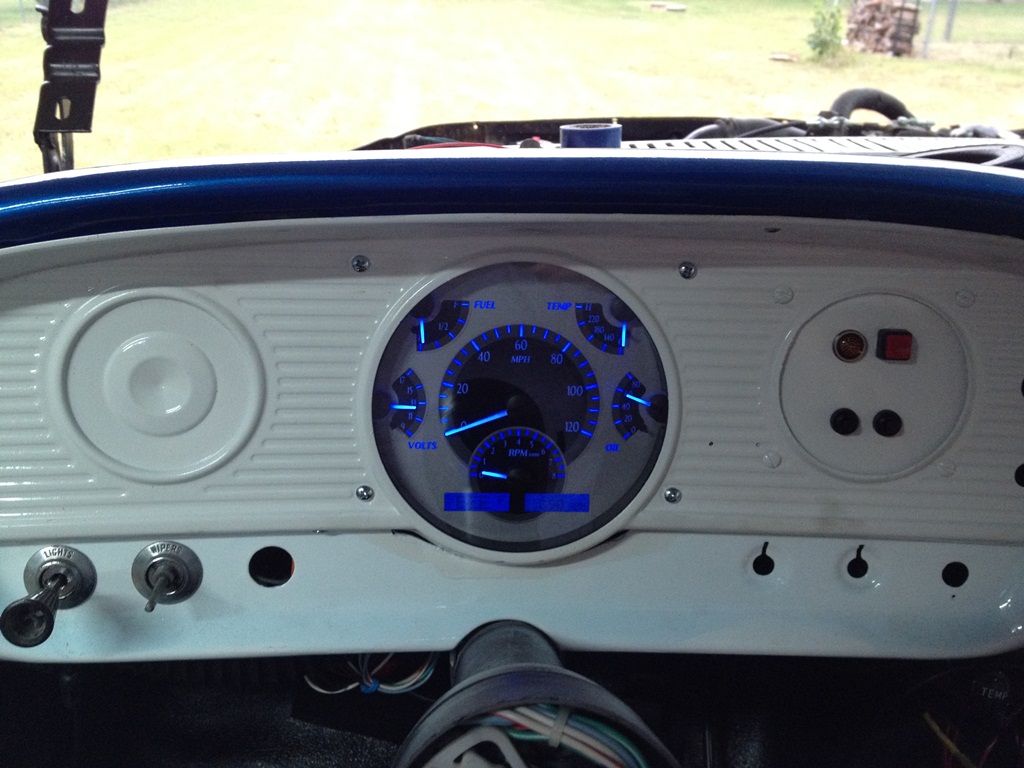
well it has been a little busy since my last update. But summer is here and time to get this CrewCab on the road. First I needed to get a good gauge set. Well I just broke down and took the hit from the frying pan and bought me a gauge. I got the Dakota Digital VHX for the bronco it suppose to fit and looked like it would. Below is my gauge install I do like the gauge a lot. Easy setup and came with sensors if you needed them. I still have to calabrate the Speed and get the water temp working but that is easy enough.. It can show you everything and more in the displays heck if you really went fancy you could do compass, temp, Wideband O2 etc etc.
The Front
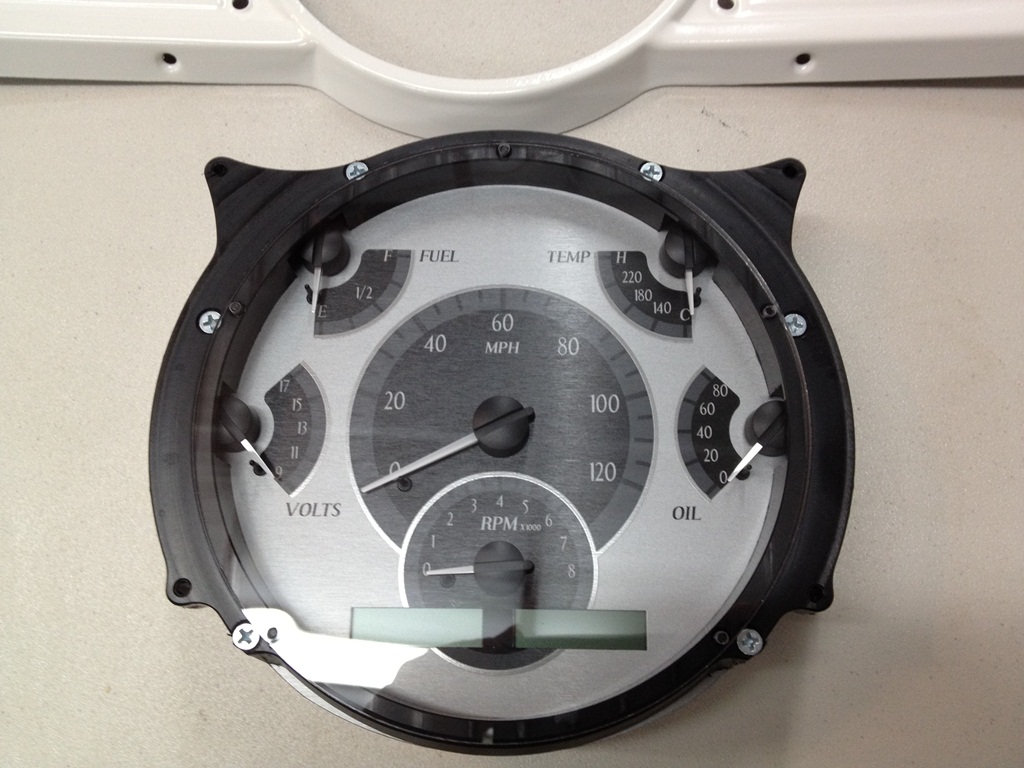
The Back
I put a fresh coat of paint on my sorround.
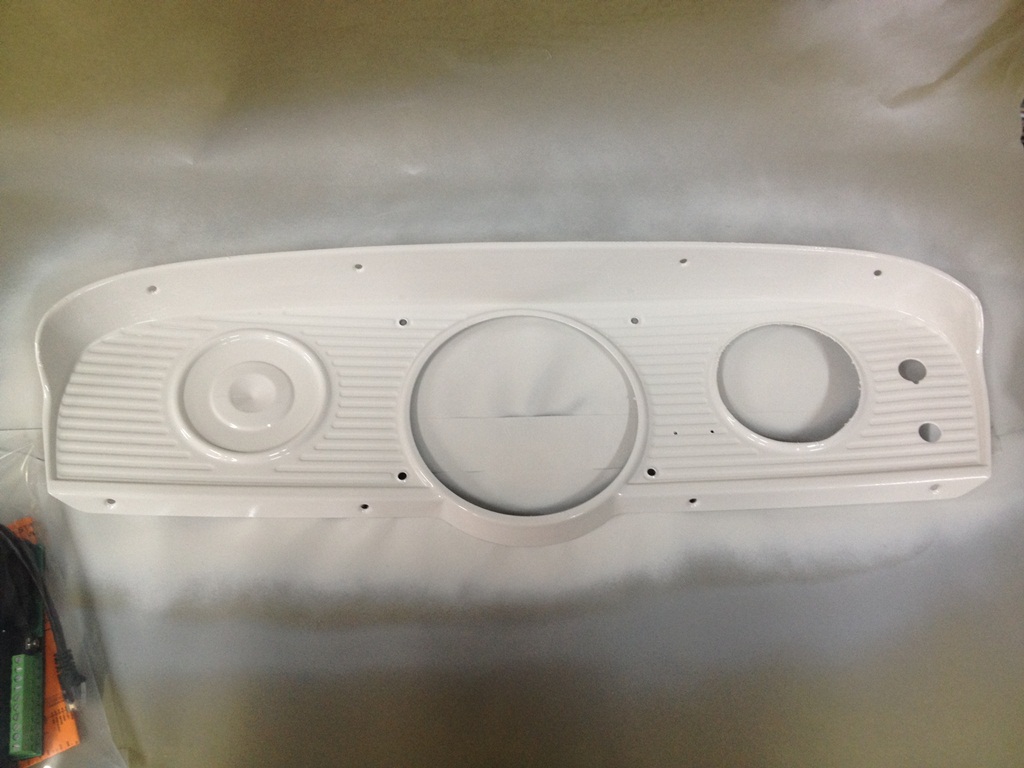
Mounted it and said self that is a mighty big hole what you gonna do?
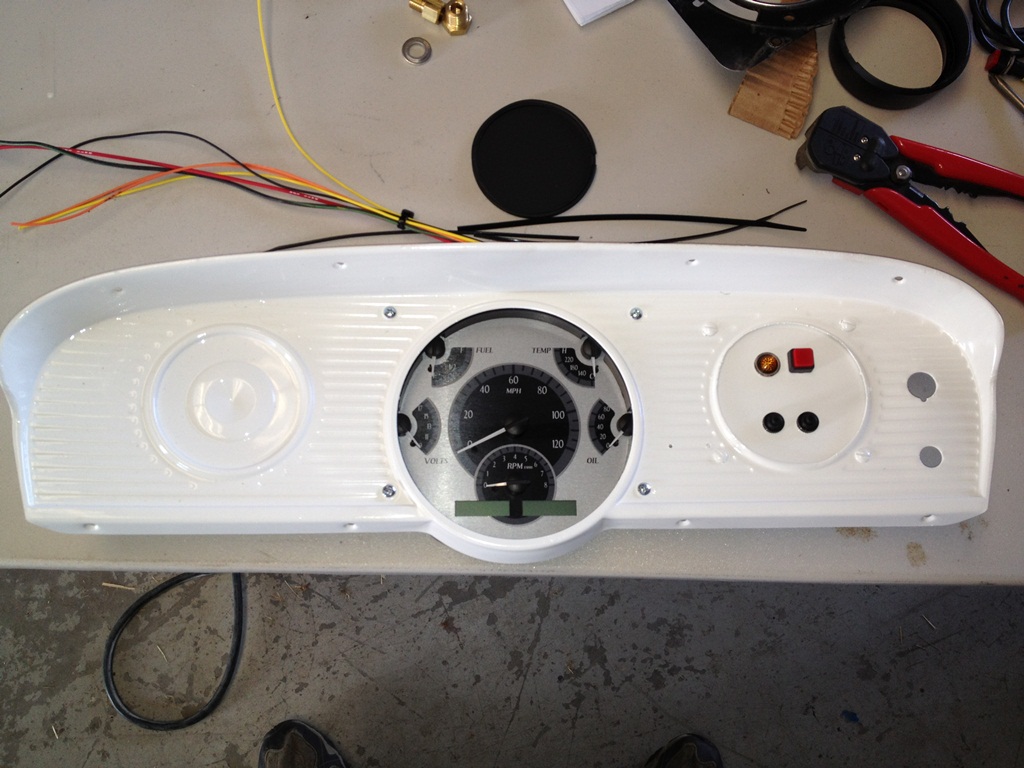
The Answer was this. The light is the OD off line and the red button is to turn OD on/Off. The other two black buttons are for the display selectors and programing this gauge. Simple and very good directions.
Back
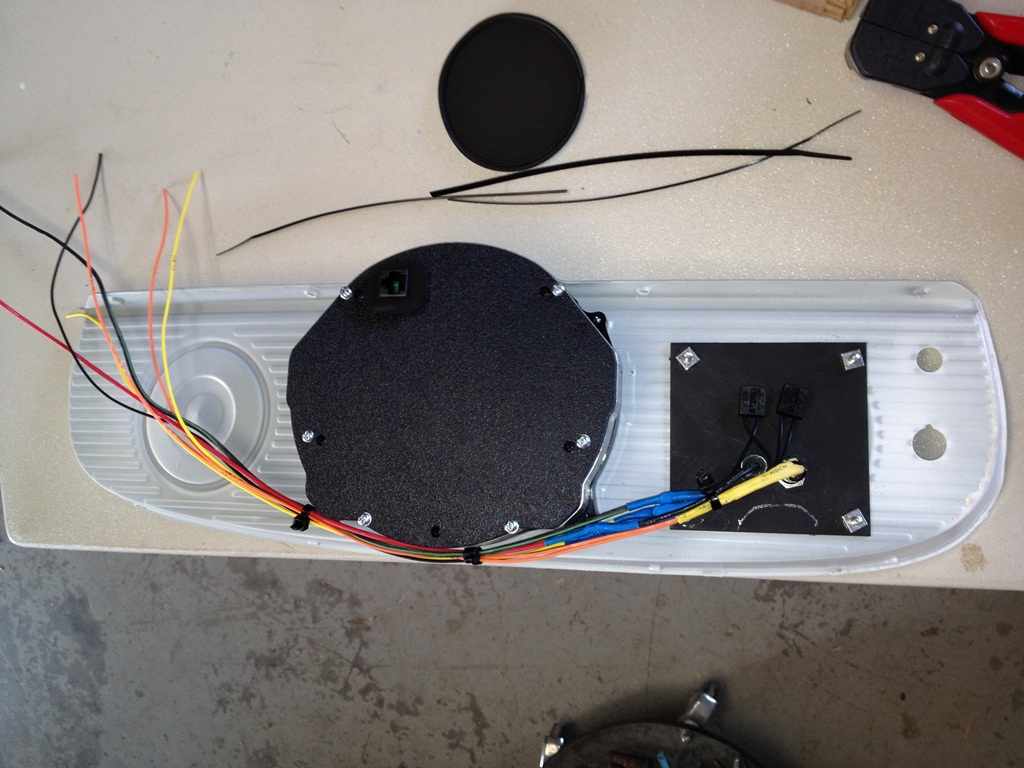
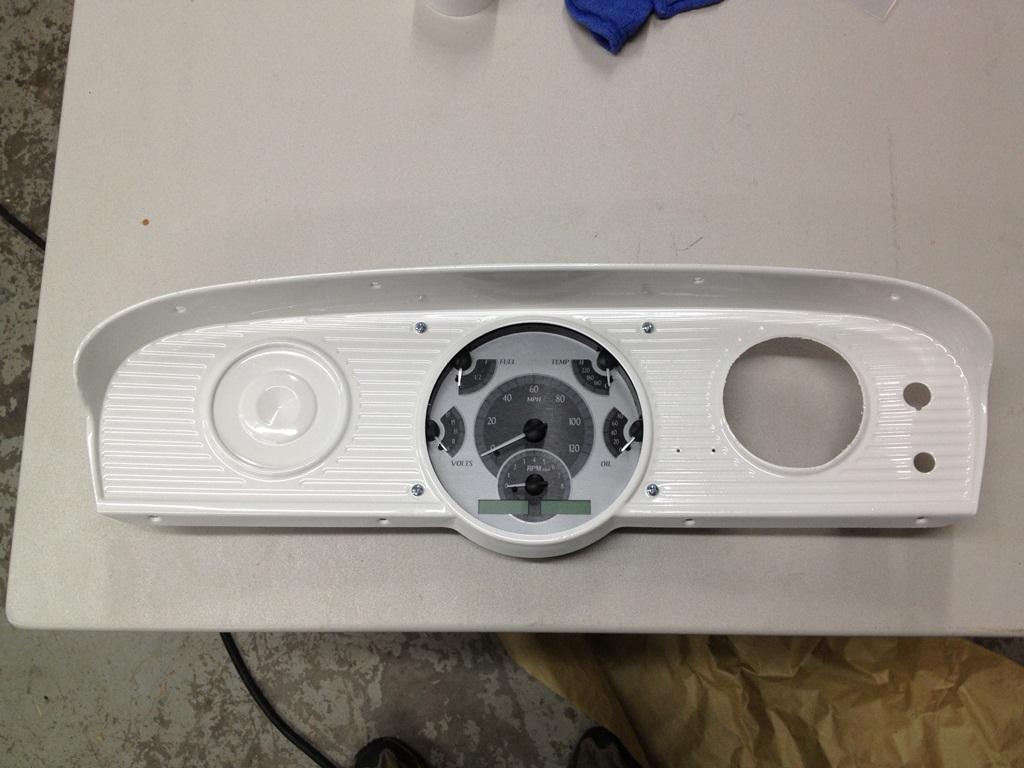
Now there was one slight problem. The guage fit the surrond but it didn't fit into the hole so I did a little trimming. Now all fits. I hated to trim but dang it was worth it.
Now it is mounted all nice like.
Yes I got blue but they do have red.
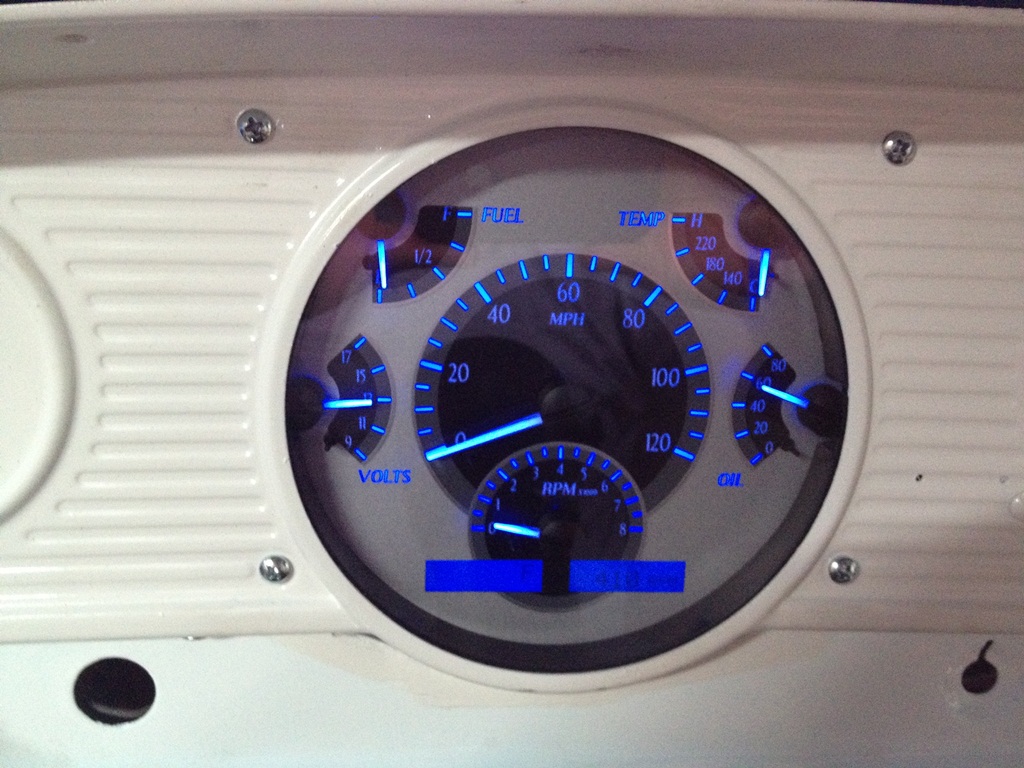
This thing also has blinkers, check engine lights and some other warning lights. It did keep telling me I was almost out of gas. Brian T will love this when he reads it. Not like I've never run the truck out of gas yet. ha.
All in all it looks good and is a great gauge yes expensive but I think it is well worth the money. Now to work lots of OT to get the 64 a guage.
Here is a link for those who want to look more at this gauge. http://www.dakotadigital.com/index.cfm/ ... prd780.htm
The Front
The Back
I put a fresh coat of paint on my sorround.
Mounted it and said self that is a mighty big hole what you gonna do?
The Answer was this.
Back
Now there was one slight problem. The guage fit the surrond but it didn't fit into the hole so I did a little trimming. Now all fits. I hated to trim but dang it was worth it.
Now it is mounted all nice like.
Yes I got blue but they do have red.
This thing also has blinkers, check engine lights and some other warning lights. It did keep telling me I was almost out of gas. Brian T will love this when he reads it. Not like I've never run the truck out of gas yet. ha.
All in all it looks good and is a great gauge yes expensive but I think it is well worth the money. Now to work lots of OT to get the 64 a guage.
Here is a link for those who want to look more at this gauge. http://www.dakotadigital.com/index.cfm/ ... prd780.htm
64 F100 short bed-style side-460-c6-with side toolbox and Dakota Front Suspension
And a 65 CrewCab
Chris W.
The pickups
65 Crew Cab
http://www.purpleflyingmonkey.com/CrewCab/index.html
64 F100
http://www.purpleflyingmonkey.com/1964- ... index.html
The Torino project http://www.purpleflyingmonkey.com/1971- ... eFile.html
And a 65 CrewCab
Chris W.
The pickups
65 Crew Cab
http://www.purpleflyingmonkey.com/CrewCab/index.html
64 F100
http://www.purpleflyingmonkey.com/1964- ... index.html
The Torino project http://www.purpleflyingmonkey.com/1971- ... eFile.html
Re: PFM's 65 Crew Cab F250
Chris,
I also went with the VHX, although I went with the three-display setup. It also took a little trimming, but it looks good in the chromed panel. Having the ability to add additional functions in an integreated assembly was a big factor in justifyiing the cost. After seeing some of your electronic projects, it will be interesting to see what all you come up with! I can't wait to get mine installed in the SB low-rider, but I've been playing with my Pate purchase instead
Paul
The Ford Orphanage
Life's too short for boring vehicles!
My quest to develop a universal solvent is held up by the lack of a storage container.
Paul
Life's too short for boring vehicles!
My quest to develop a universal solvent is held up by the lack of a storage container.
Paul
-
PFM-64f100
- Posts: 1270
- Joined: August 7, 2006, 6:37 pm
- Location: Haslet, Texas
- Contact:
Re: PFM's 65 Crew Cab F250
I looked at those also.Toyz wrote:Chris,
I also went with the VHX, although I went with the three-display setup. It also took a little trimming, but it looks good in the chromed panel. Having the ability to add additional functions in an integreated assembly was a big factor in justifyiing the cost. After seeing some of your electronic projects, it will be interesting to see what all you come up with! I can't wait to get mine installed in the SB low-rider, but I've been playing with my Pate purchase instead
Paul
64 F100 short bed-style side-460-c6-with side toolbox and Dakota Front Suspension
And a 65 CrewCab
Chris W.
The pickups
65 Crew Cab
http://www.purpleflyingmonkey.com/CrewCab/index.html
64 F100
http://www.purpleflyingmonkey.com/1964- ... index.html
The Torino project http://www.purpleflyingmonkey.com/1971- ... eFile.html
And a 65 CrewCab
Chris W.
The pickups
65 Crew Cab
http://www.purpleflyingmonkey.com/CrewCab/index.html
64 F100
http://www.purpleflyingmonkey.com/1964- ... index.html
The Torino project http://www.purpleflyingmonkey.com/1971- ... eFile.html
Re: PFM's 65 Crew Cab F250
Chris,
I've been a fan of the "analog style" stepper gauges for some time and have used the ProSports in the past, so when DD came out with the VHX, I jumped on them! Now I've got to decide which truck they'll end up in!
Yes. Pate was "fun" in the same manner that our Uncle Skip could be considered a "car nut" .
.
A lot of credit for that fun is owed to you. your family and associates! Seeing your projects in person was greatly enriching; it's nice to know there's someone else who doesn't confine himself to ONE project at a time! My Torino needs to be treated to the same approach as yours, but it just sets since I have so many apart and not drivable. The Cyclone is within hours of being roadable, but I've been playing with the newest truck in the little spare time i've had. It is literally the first time I've tackled a roof repair and NOT found it worse than first appearance. So far, about two ounces of Belzona has pretty well taken care of the perforations and pock-marks, both inside and out.
I got carried away with the pressure washer and removed about a third of the paint to find a somewhat solid zinc primer; still didn't make the engine look much better, just cleaner. I keep looking at that long bed and all the spare short beds and cabs I have, and think, well, a crew cab is a bit long and the standard cab is a bit cramped, SO , but that'll have to wait.
looking forward to seeing you and the crew (and crew cab ) at SS!
Paul
I've been a fan of the "analog style" stepper gauges for some time and have used the ProSports in the past, so when DD came out with the VHX, I jumped on them! Now I've got to decide which truck they'll end up in!
Yes. Pate was "fun" in the same manner that our Uncle Skip could be considered a "car nut"
A lot of credit for that fun is owed to you. your family and associates! Seeing your projects in person was greatly enriching; it's nice to know there's someone else who doesn't confine himself to ONE project at a time! My Torino needs to be treated to the same approach as yours, but it just sets since I have so many apart and not drivable. The Cyclone is within hours of being roadable, but I've been playing with the newest truck in the little spare time i've had. It is literally the first time I've tackled a roof repair and NOT found it worse than first appearance. So far, about two ounces of Belzona has pretty well taken care of the perforations and pock-marks, both inside and out.
I got carried away with the pressure washer and removed about a third of the paint to find a somewhat solid zinc primer; still didn't make the engine look much better, just cleaner. I keep looking at that long bed and all the spare short beds and cabs I have, and think, well, a crew cab is a bit long and the standard cab is a bit cramped, SO
looking forward to seeing you and the crew (and crew cab
Paul
The Ford Orphanage
Life's too short for boring vehicles!
My quest to develop a universal solvent is held up by the lack of a storage container.
Paul
Life's too short for boring vehicles!
My quest to develop a universal solvent is held up by the lack of a storage container.
Paul
-
PFM-64f100
- Posts: 1270
- Joined: August 7, 2006, 6:37 pm
- Location: Haslet, Texas
- Contact:
Re: PFM's 65 Crew Cab F250
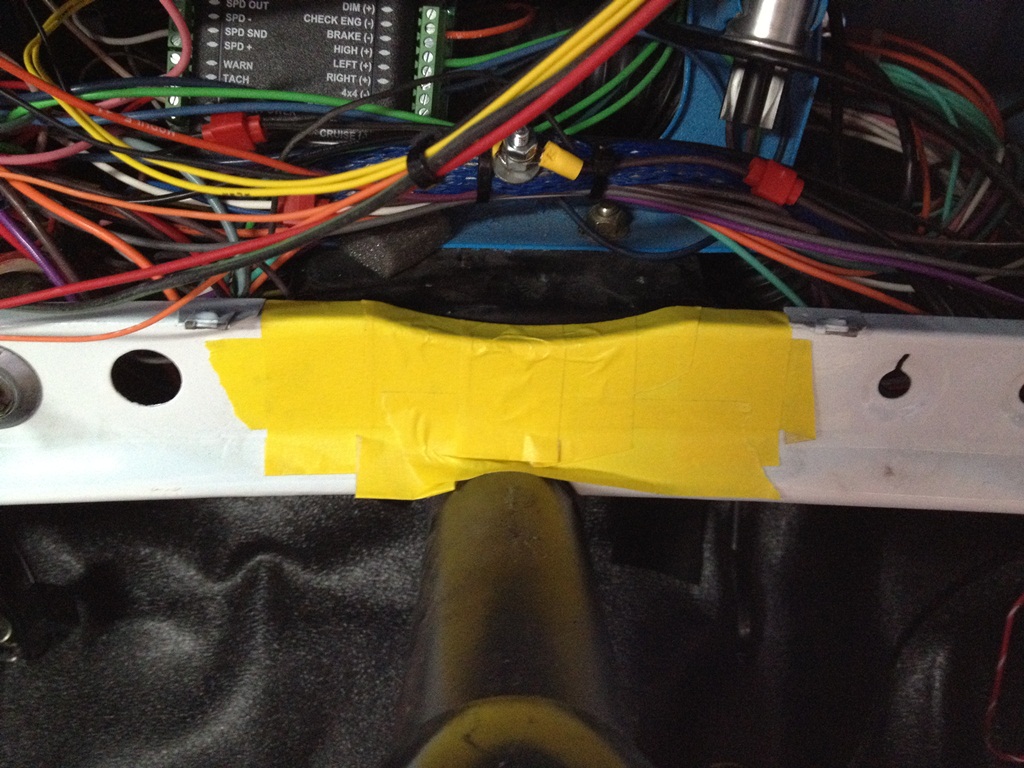
Some updates from the last few weeks. Wow I've done a lot and hadn’t had time to post but making time as this is a big step.
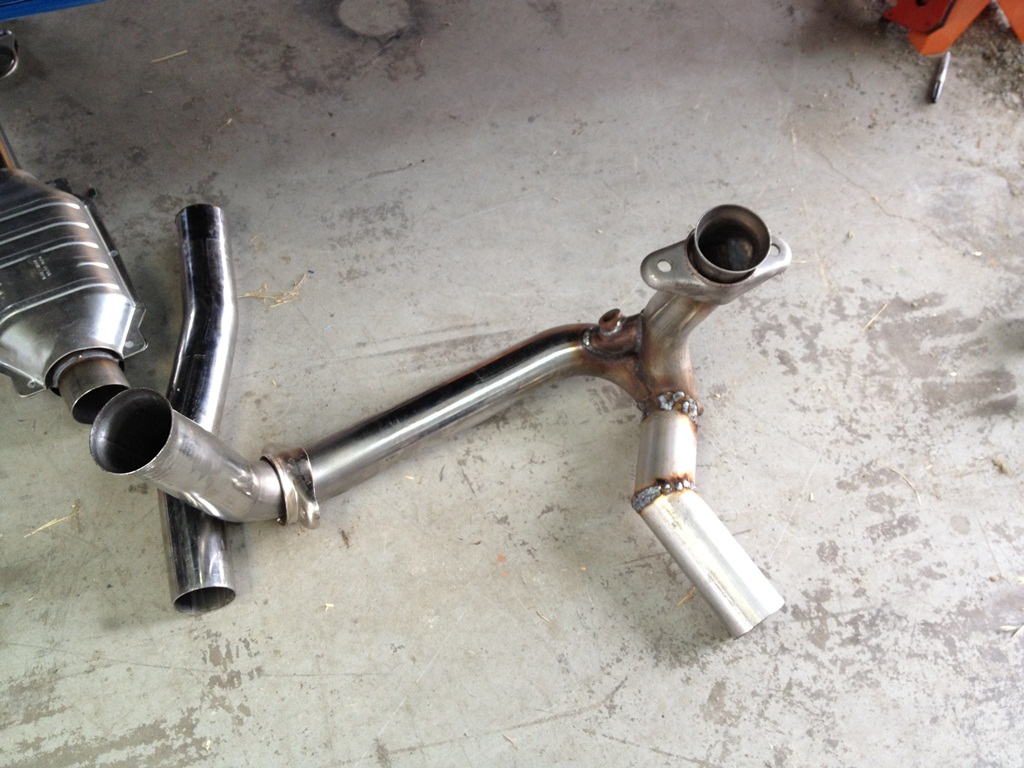
I had to redo the exhaust as the computer didn't like just the one O2 sensor reading one side. The Binary Editor software showed me that. So I decided to do it correct and bought a cat with the down pipes for a 93 f150. All was good but since our frames are narrower than the more modern stuff it posed a problem. This problem was nothing that a heat wrench and welder couldn't solve.
Here you can see it is a little to wide. grrrr
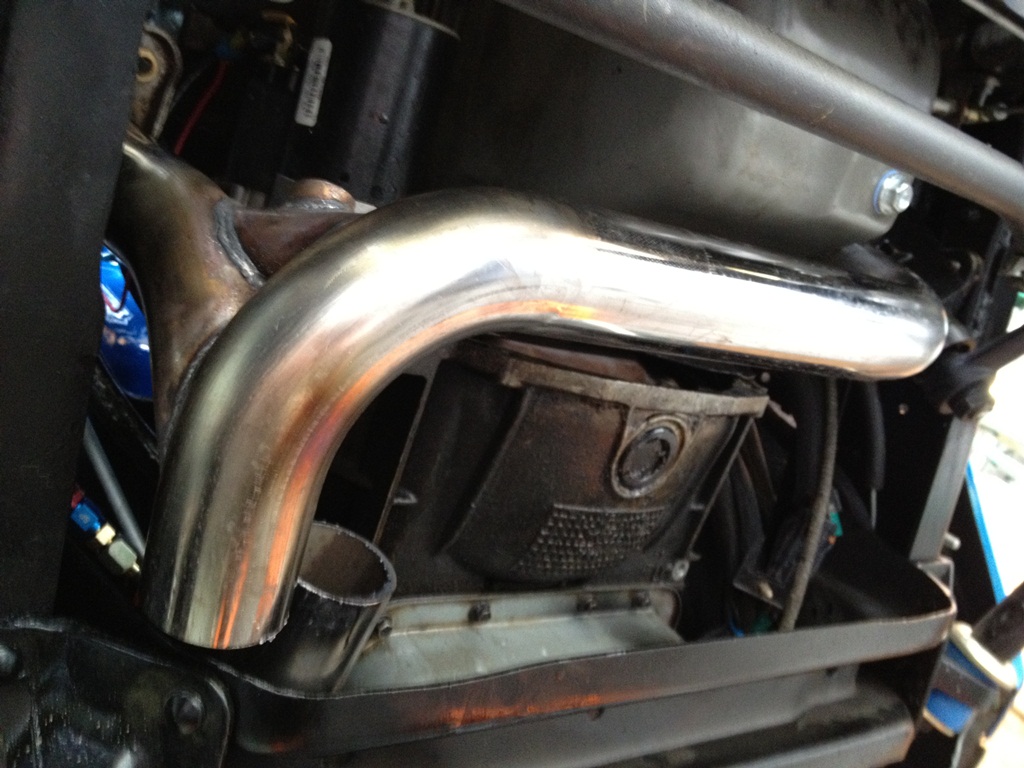
This is where the passenger side was hitting the frame. Well the heat wrench and hammer fixed that.
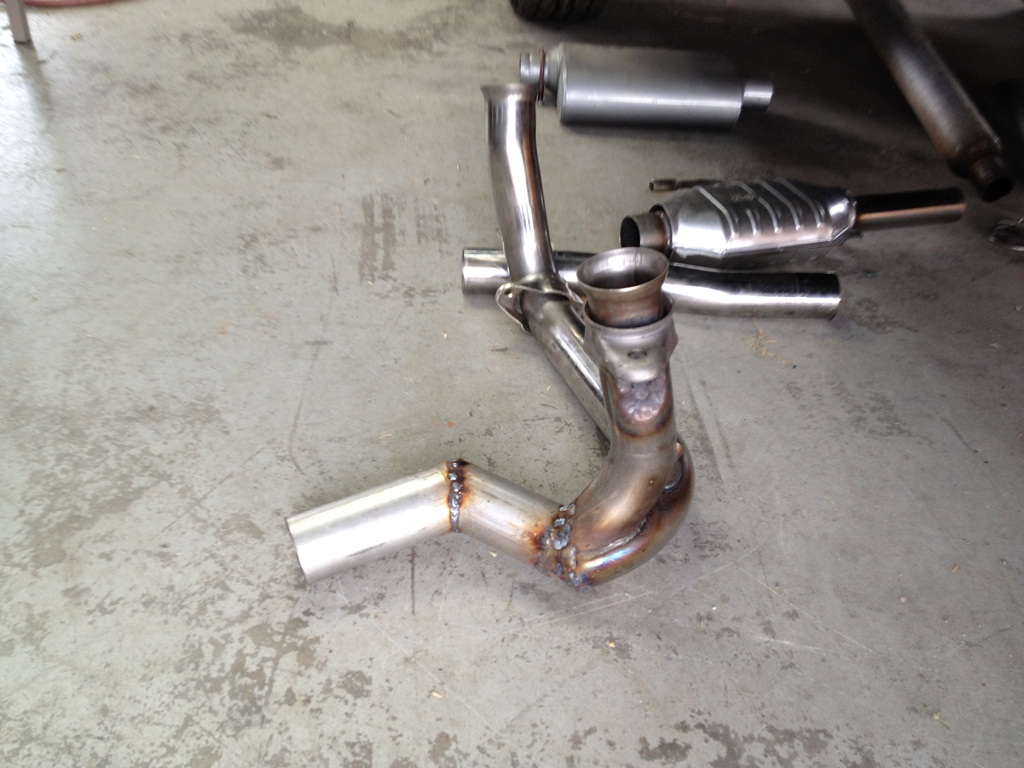
What it finally took to get it to fit. I thought I had more pics but I guess not. I did run it all the way out the back. One day I will take it to the muff shop to get duals. But until then this will work.
Now for the bumper install. This bumper was on the parts truck I got and looked like a good fit. I do still want to build the big ranch hand type of bumper but that will have to wait. Its only 78 days till Slick stock so got to get her done.
This is the before picture.
Made my own mounts and welded them to the bumper. This is for a wider frame truck and this was the clean easy way to do this. I used 2x3 3/16 tube then some 3/8 x 3 in flat stock. Works like a charm.
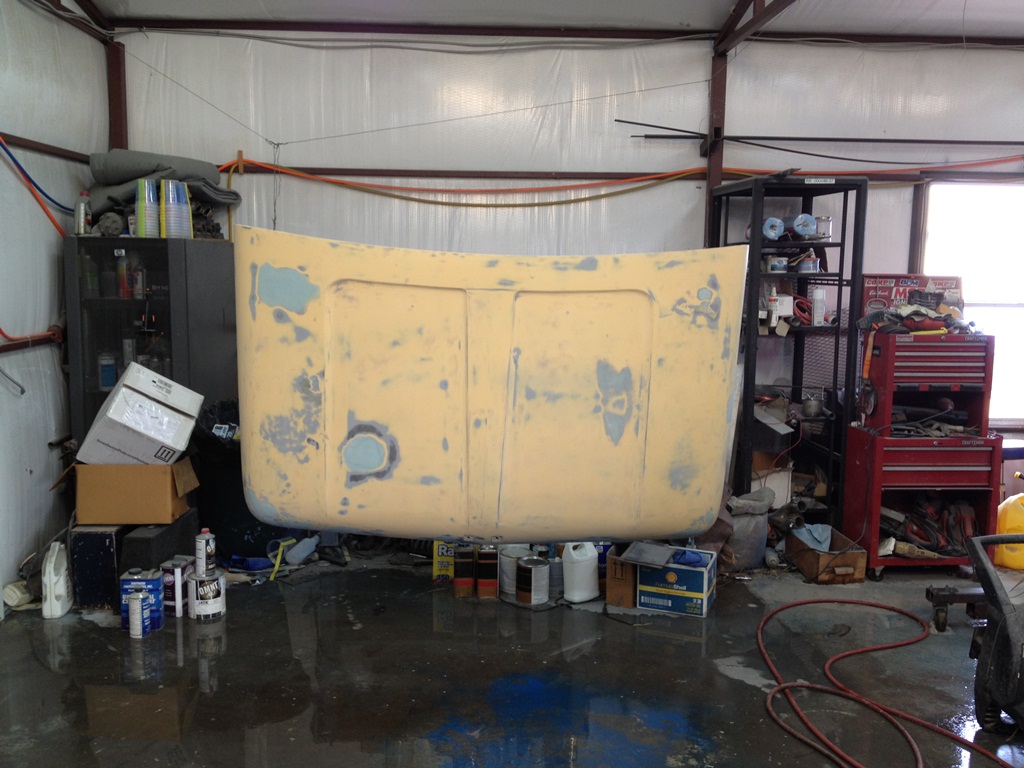
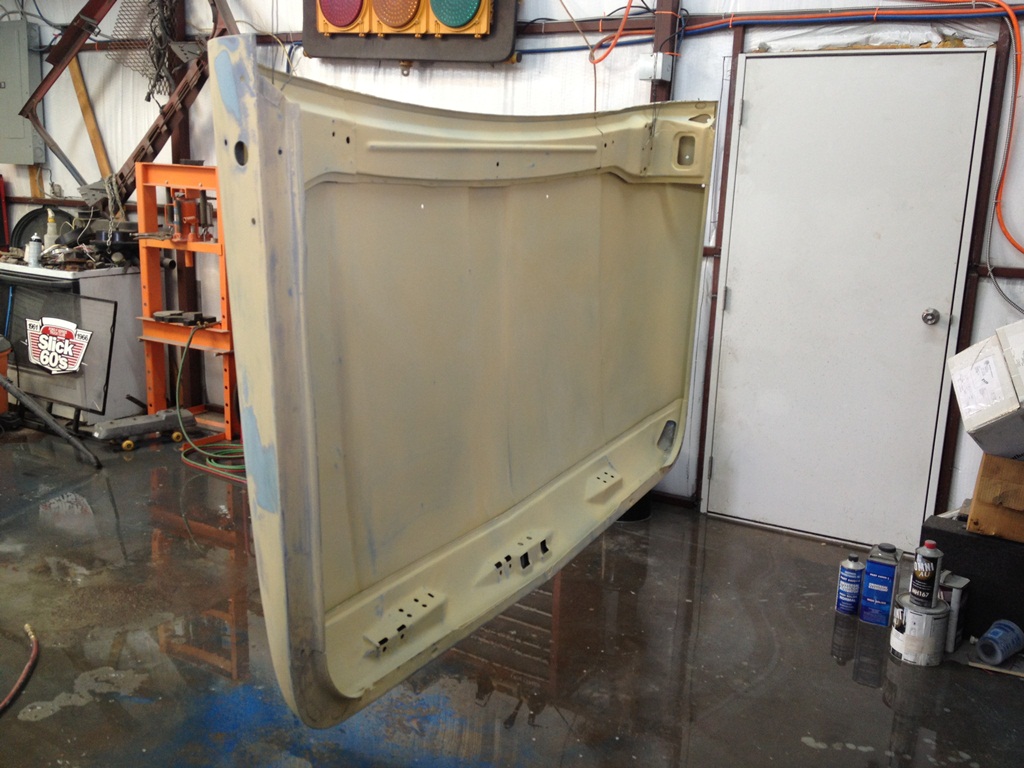
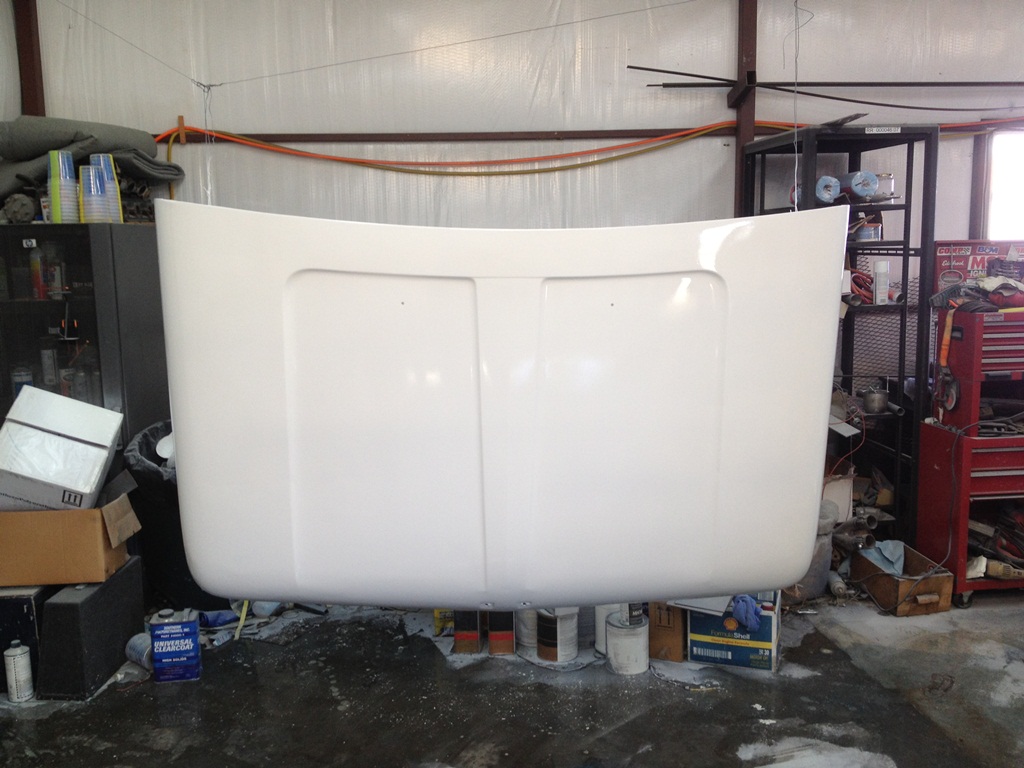
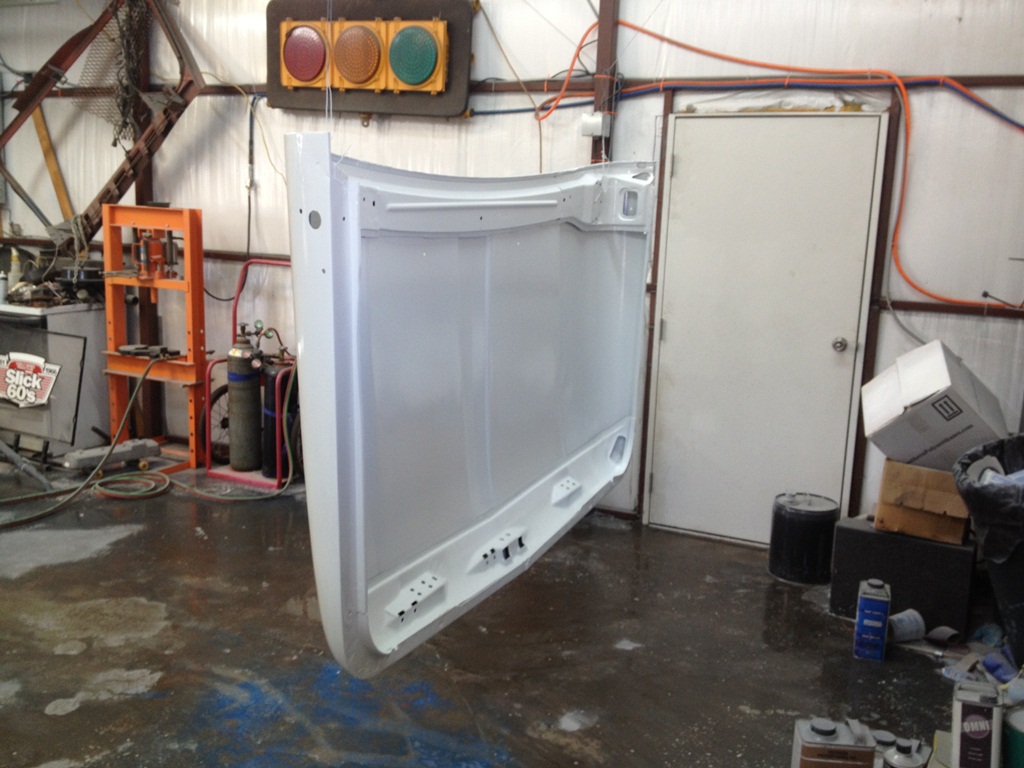
Now to tackle the hood this is the last major part I have to paint and yes it is a big part. I've been sanding on it for a little while now. I did wet down the floor before painting this time. The air felt very different after the floor was wet plus I swear it was trapping all the little particals flying in the air. It for sure made clean up of over spary a lot easier and I just pushed it out of the shop with the squeegie. I think I will do this more on the next painting adventure.
In Primer and ready for sealer.
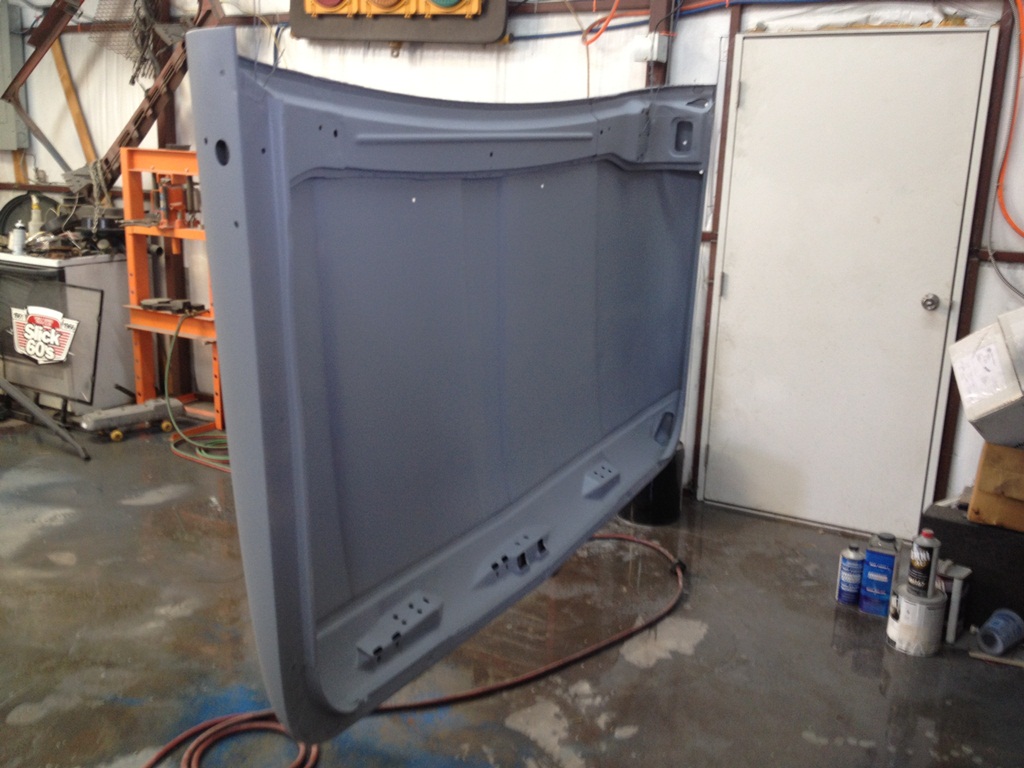
Sealer
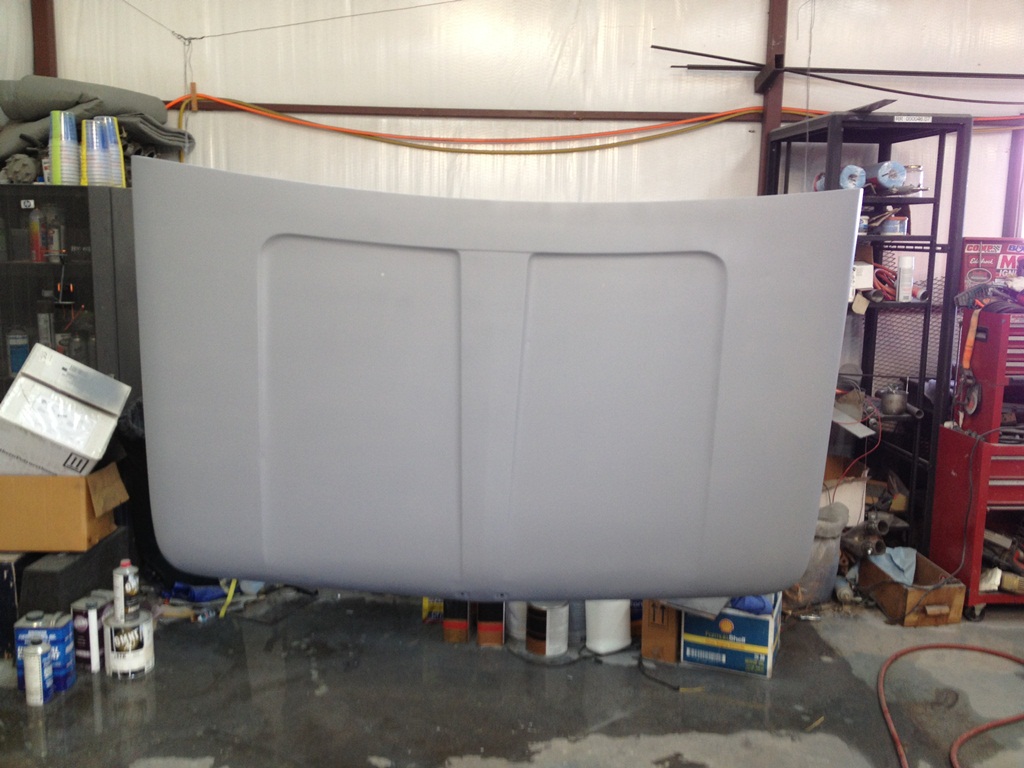
White
Getting ready to install it. This will be fun but first must have some help. Yes i've done installs by my self before but never with something freshly painted so I got help. (my Wife and son)
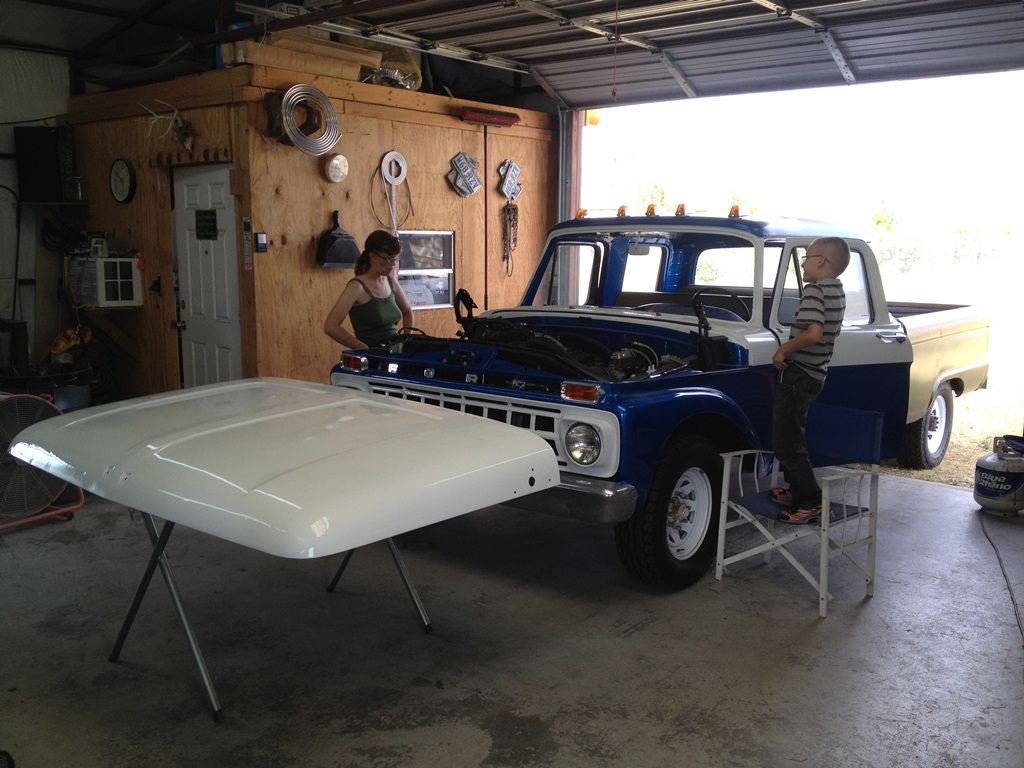
They had to High five each other once it was done. It went smooth enough...
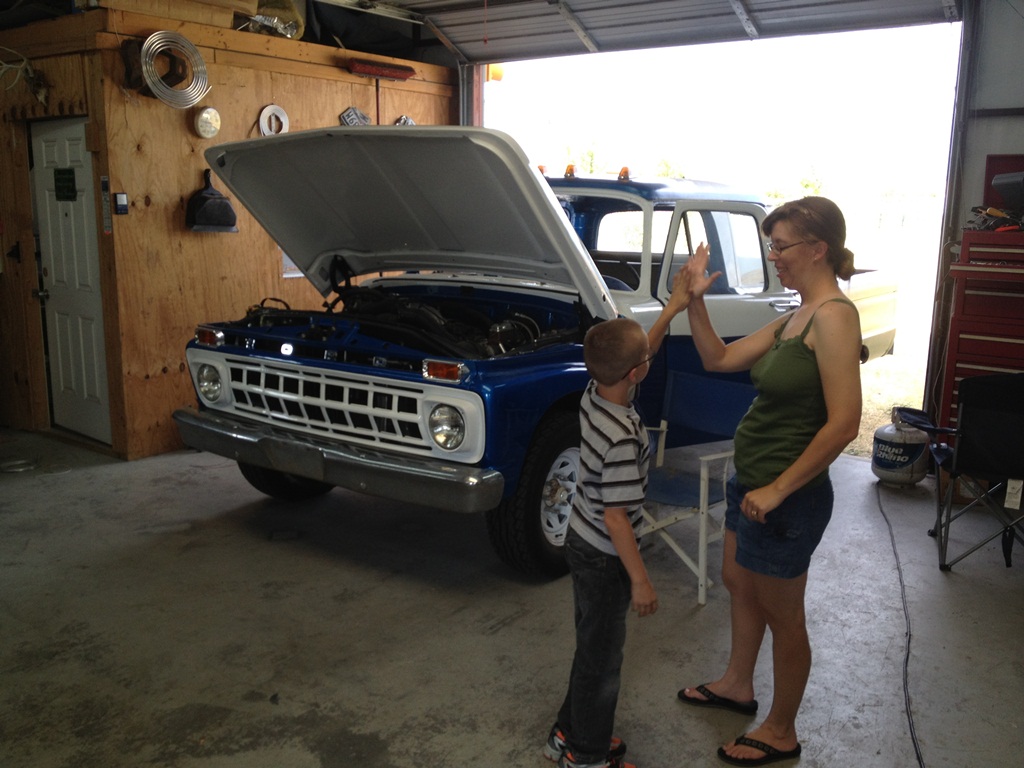
After it was installed.
The not so fun part was getting these hood hinges to work like they should. At first they didn't want to move so I got the PB after them then the screw driver and crow bar. Finally got it to close most of the way. I will fight more tomorrow but the passenger side is really being a pain. Overnight soak should help.
Since I had another major just about completed I had to get a few outside pictures. The 64 was dragging around the boat so I could get it ready for the lake. Said to say it will have to go to the shop because the impeller replacement didn't work. Guess I will pay to have it done correctly. I tried.

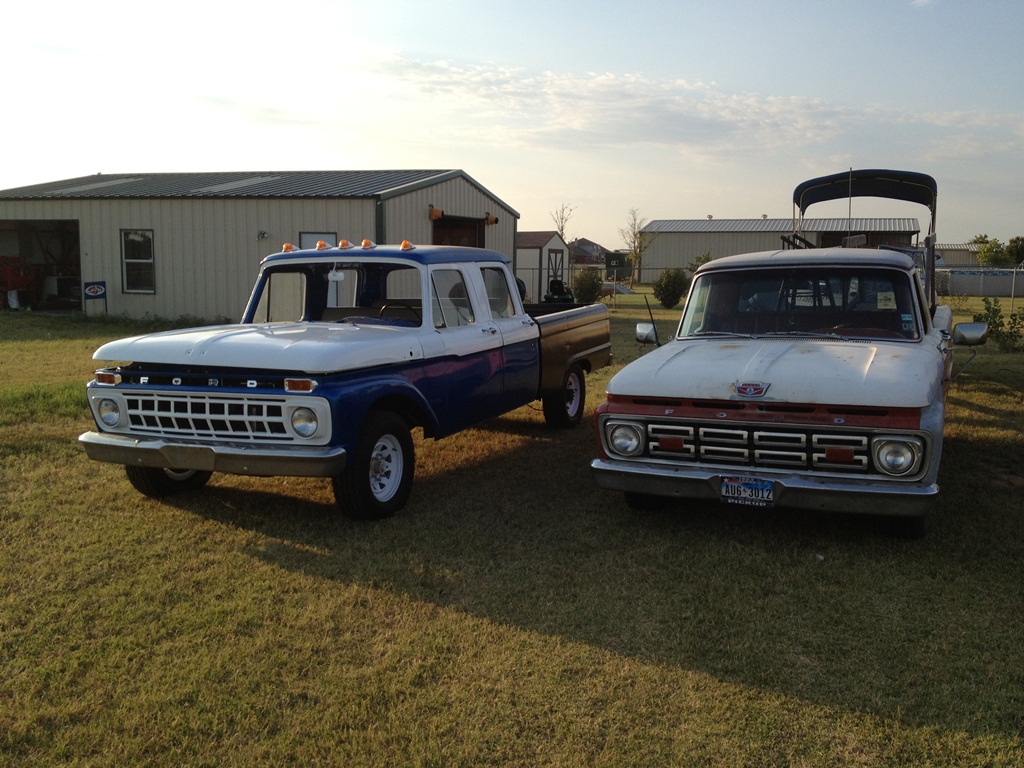
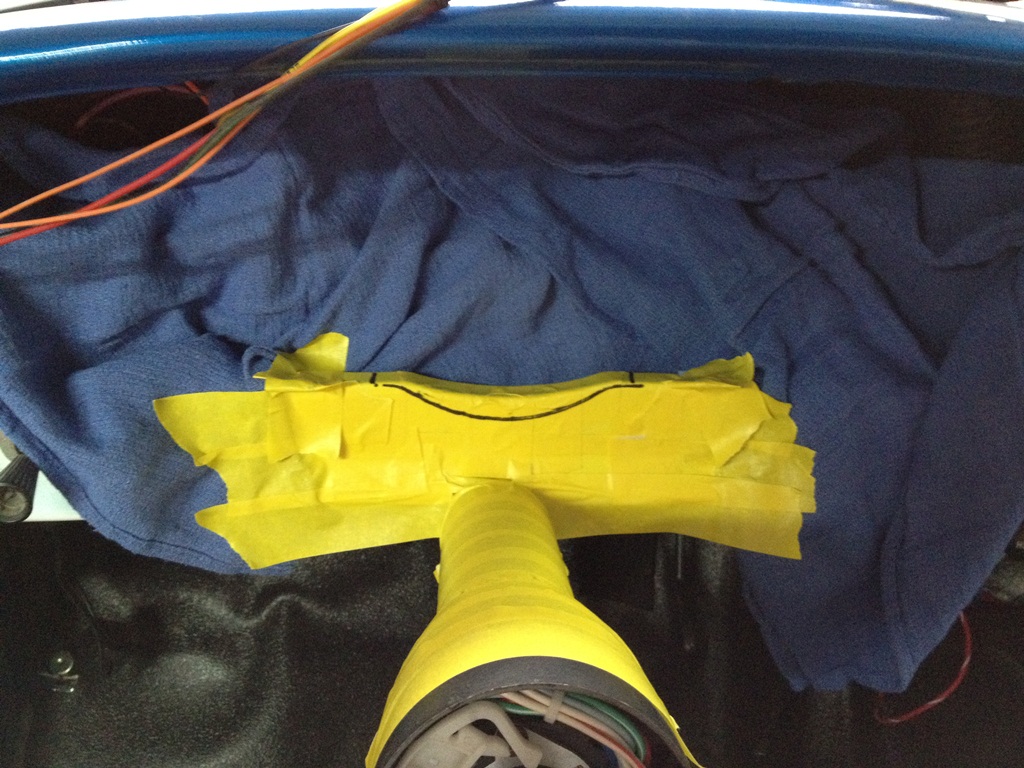
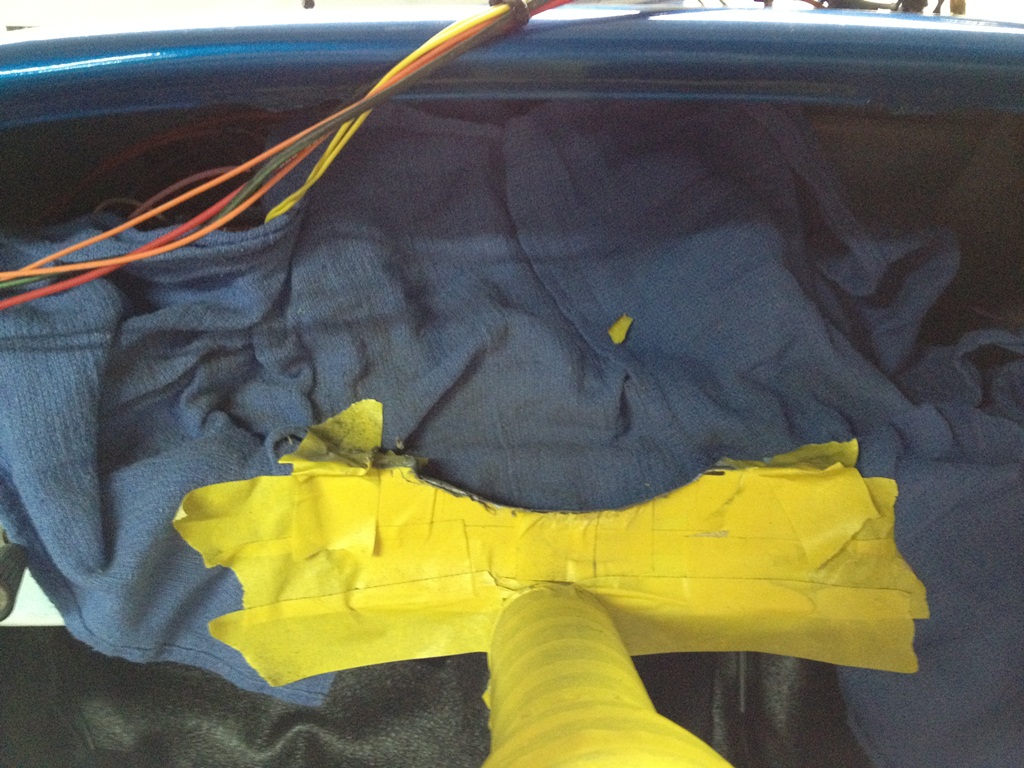
By the way the truck is running great now after the exhaust upgrade and I may even think about taking a real test drive on Monday. We will see. I still need to find a glass guy here local that will call me back. ggrrrrr. I will find one and have them install the windshield and rear window. I also need to wire them cab lights (thanks again Mark (hoofbeat racer) for those lights.
I had to redo the exhaust as the computer didn't like just the one O2 sensor reading one side. The Binary Editor software showed me that. So I decided to do it correct and bought a cat with the down pipes for a 93 f150. All was good but since our frames are narrower than the more modern stuff it posed a problem. This problem was nothing that a heat wrench and welder couldn't solve.
Here you can see it is a little to wide. grrrr
This is where the passenger side was hitting the frame. Well the heat wrench and hammer fixed that.
What it finally took to get it to fit. I thought I had more pics but I guess not. I did run it all the way out the back. One day I will take it to the muff shop to get duals. But until then this will work.
Now for the bumper install. This bumper was on the parts truck I got and looked like a good fit. I do still want to build the big ranch hand type of bumper but that will have to wait. Its only 78 days till Slick stock so got to get her done.
This is the before picture.
Made my own mounts and welded them to the bumper. This is for a wider frame truck and this was the clean easy way to do this. I used 2x3 3/16 tube then some 3/8 x 3 in flat stock. Works like a charm.
Now to tackle the hood this is the last major part I have to paint and yes it is a big part. I've been sanding on it for a little while now. I did wet down the floor before painting this time. The air felt very different after the floor was wet plus I swear it was trapping all the little particals flying in the air. It for sure made clean up of over spary a lot easier and I just pushed it out of the shop with the squeegie. I think I will do this more on the next painting adventure.
In Primer and ready for sealer.
Sealer
White
Getting ready to install it. This will be fun but first must have some help. Yes i've done installs by my self before but never with something freshly painted so I got help. (my Wife and son)
They had to High five each other once it was done. It went smooth enough...
After it was installed.
The not so fun part was getting these hood hinges to work like they should. At first they didn't want to move so I got the PB after them then the screw driver and crow bar. Finally got it to close most of the way. I will fight more tomorrow but the passenger side is really being a pain. Overnight soak should help.
Since I had another major just about completed I had to get a few outside pictures. The 64 was dragging around the boat so I could get it ready for the lake. Said to say it will have to go to the shop because the impeller replacement didn't work. Guess I will pay to have it done correctly. I tried.
By the way the truck is running great now after the exhaust upgrade and I may even think about taking a real test drive on Monday. We will see. I still need to find a glass guy here local that will call me back. ggrrrrr. I will find one and have them install the windshield and rear window. I also need to wire them cab lights (thanks again Mark (hoofbeat racer) for those lights.
64 F100 short bed-style side-460-c6-with side toolbox and Dakota Front Suspension
And a 65 CrewCab
Chris W.
The pickups
65 Crew Cab
http://www.purpleflyingmonkey.com/CrewCab/index.html
64 F100
http://www.purpleflyingmonkey.com/1964- ... index.html
The Torino project http://www.purpleflyingmonkey.com/1971- ... eFile.html
And a 65 CrewCab
Chris W.
The pickups
65 Crew Cab
http://www.purpleflyingmonkey.com/CrewCab/index.html
64 F100
http://www.purpleflyingmonkey.com/1964- ... index.html
The Torino project http://www.purpleflyingmonkey.com/1971- ... eFile.html
-
PFM-64f100
- Posts: 1270
- Joined: August 7, 2006, 6:37 pm
- Location: Haslet, Texas
- Contact:
Re: PFM's 65 Crew Cab F250
I had to do it. A before picture so you don't have to goto page 1.
64 F100 short bed-style side-460-c6-with side toolbox and Dakota Front Suspension
And a 65 CrewCab
Chris W.
The pickups
65 Crew Cab
http://www.purpleflyingmonkey.com/CrewCab/index.html
64 F100
http://www.purpleflyingmonkey.com/1964- ... index.html
The Torino project http://www.purpleflyingmonkey.com/1971- ... eFile.html
And a 65 CrewCab
Chris W.
The pickups
65 Crew Cab
http://www.purpleflyingmonkey.com/CrewCab/index.html
64 F100
http://www.purpleflyingmonkey.com/1964- ... index.html
The Torino project http://www.purpleflyingmonkey.com/1971- ... eFile.html
Re: PFM's 65 Crew Cab F250
Chris, what kind of O2 setup are you running on the 64? Am I missing something here? I'm assuming the CC now has one before and one after the converter, is that right? I hadn't thought of utilizing an OBDII system. Don't know if you noticed, but the PO on mine simply trimmed the frame for clearance  . I'm thinking a set of long tubes may be in my future, if I can find some to fit.
Paul
Paul
The Ford Orphanage
Life's too short for boring vehicles!
My quest to develop a universal solvent is held up by the lack of a storage container.
Paul
Life's too short for boring vehicles!
My quest to develop a universal solvent is held up by the lack of a storage container.
Paul
-
Gritsngumbo
- Posts: 5441
- Joined: August 4, 2007, 4:15 pm
- Location: Monroe, Louisiana
Re: PFM's 65 Crew Cab F250
Looking good Chris. Don't worry about the windshield...just get these for the family:
- Goggles.jpg (16 KiB) Viewed 14613 times
If you understand what you’re doing, you’re not learning anything.
LITTLE RED: 64 F100 Short Style
BIG RED: 62 F100 Long Uni
BIG “UN": 63 F250 Long Flare
BBW RED: 61 F100 CC BBW Long Uni
CRIMSON CREW: 63 F100 "Stageway" Long Flare Crew Cab
"RANGER": 66 F100 CC Long Flatbed
"AVA" 1963 Avion T-20 Travel Trailer
“Lucille” 1955 New Moon 44’ Travel Trailer
LITTLE RED: 64 F100 Short Style
BIG RED: 62 F100 Long Uni
BIG “UN": 63 F250 Long Flare
BBW RED: 61 F100 CC BBW Long Uni
CRIMSON CREW: 63 F100 "Stageway" Long Flare Crew Cab
"RANGER": 66 F100 CC Long Flatbed
"AVA" 1963 Avion T-20 Travel Trailer
“Lucille” 1955 New Moon 44’ Travel Trailer
-
PFM-64f100
- Posts: 1270
- Joined: August 7, 2006, 6:37 pm
- Location: Haslet, Texas
- Contact:
Re: PFM's 65 Crew Cab F250
It is an odb-1 system (94-95 f150 truck aka hug2 computer code) but since it uses a 4r70w computer controlled tranny they only had 1 O2 sensor. That sensor is per cat but needs both sides hitting it to read correctly.Toyz wrote:Chris, what kind of O2 setup are you running on the 64? Am I missing something here? I'm assuming the CC now has one before and one after the converter, is that right? I hadn't thought of utilizing an OBDII system. Don't know if you noticed, but the PO on mine simply trimmed the frame for clearance
Paul
Good old PO's cutting the frame was easier.
@ grits. May needs those for the test drive hopefully today maybe
64 F100 short bed-style side-460-c6-with side toolbox and Dakota Front Suspension
And a 65 CrewCab
Chris W.
The pickups
65 Crew Cab
http://www.purpleflyingmonkey.com/CrewCab/index.html
64 F100
http://www.purpleflyingmonkey.com/1964- ... index.html
The Torino project http://www.purpleflyingmonkey.com/1971- ... eFile.html
And a 65 CrewCab
Chris W.
The pickups
65 Crew Cab
http://www.purpleflyingmonkey.com/CrewCab/index.html
64 F100
http://www.purpleflyingmonkey.com/1964- ... index.html
The Torino project http://www.purpleflyingmonkey.com/1971- ... eFile.html
Re: PFM's 65 Crew Cab F250
Chris, did that venting of the fuel tank work? I had the same issue of trying to fill it ----added vent and still cant fill it! Although I ran the vent from the top off the tank.
I just picked up some hose that the nozzle on the gas pump fits into(tightly) and plan on running it inside the big hose and to the tank. I'll force the beast to take fuel LOL!
Tim
I just picked up some hose that the nozzle on the gas pump fits into(tightly) and plan on running it inside the big hose and to the tank. I'll force the beast to take fuel LOL!
Tim
INEPTOCRACY: (in-ep'-toc-ra-cy) : a system of government where the least capable to lead are elected by the least capable of producing, and where the members of society least likely to sustain themselves or succeed are rewarded with goods and services paid for by the confiscated wealth of a diminishing number of producers.