64 Tweety Bird

A place just for our project & build threads.

Moderators: Kid, Casey 65

User avatar
loosrp
Posts: 220
Joined: June 22, 2009, 7:30 am
Location: Dayton Ohio

Re: 64 Tweety Bird

Post by loosrp »

Here you go Skip, I also used the EZ Wire Harness
Image

Hope this helps!
Russ
Rusted64
Posts: 389
Joined: January 13, 2011, 3:34 pm
Location: The Woodlands, TX
United States of America

Re: 64 Tweety Bird

Post by Rusted64 »

Uncle Skip wrote:Got started in earnest with the wiring today, A/C power hooked up, wiper motor switch installed, and the ignition switch in. The original light switch change over to the EZ wire harness is causing me to have gas. Can't decipher the Ford to GM scheme. Any suggestions would be appreciated.
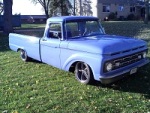
The big issue is the shocks on the lowered rear end. I need a shock that has about a 15" OAL and a 7" compression/ extension.
Here are photos of what we have to work with. I can gain about 1" with the original upper shock mounts by rotating them up but I can't go much above the frame because of interference with the bottom of the bed wood. I'm open to most anything here.
Help me out.

Skip, here are the shocks I found for my axle flip. I believe they are actually for an RV.

http://www.rockauto.com/catalog/moreinfo.php?pk=118461

If you recall, I did almost the exact same method of notching that Daryl did. In fact, Daryl gave me the pipe halves he had left over and I boxed in the frame based on his pictures.

I was able to use the stock shock mounts and it seems to be working well with these shocks.

I think we discussed this before, but I want to bring it up again. With the axle flip, there is a bed rail bolt that is very close to the rear axle differential. I would suggest making that bolt a fake bolt and make it short, with just a nut on it, no washer. On normal driving I would regularly hit that bolt and it would push up the rail. I would bet that I would hit the bed even if the bolt wasn't there on some occasions.

Now, I am sure that Daryl will not be putting anything of weight in the bed like I do. But I did add a Firestone ride leveling kit so I can raise the rear when I have something in the back. Any extra weight, even a full tank of fuel (since I put in the mustang bed tank) causes contact.

Just food for thought.


J
Last edited by Rusted64 on August 22, 2013, 10:47 pm, edited 1 time in total.
1964 F100, 292ci

1963 Buick Wildcat, 401ci

They just don't make them like they used to.
Rusted64
Posts: 389
Joined: January 13, 2011, 3:34 pm
Location: The Woodlands, TX
United States of America

Re: 64 Tweety Bird

Post by Rusted64 »

loosrp wrote:Here you go Skip, I also used the EZ Wire Harness
Hope this helps!
Russ
Hey Russ, probably a dumb question, but do you know if the dome blade is 12+ or a negative connection?


Thanks,

J
1964 F100, 292ci

1963 Buick Wildcat, 401ci

They just don't make them like they used to.
User avatar
Uncle Skip
Posts: 4695
Joined: July 15, 2006, 8:30 pm
Location: Pearland, Texas
United States of America

Re: 64 Tweety Bird

Post by Uncle Skip »

Jason.
The lead to the dome light is a 12v source. The light is mechanically grounded.
BTW Russ, thanks for the information.
The terminals on the switch check out with what I have as does the ignition switch. Thanks.
Skipper
I'm not arguing with you. I'm just explaining why I'm right.
Pardon me. Does your deaug bite?
User avatar
loosrp
Posts: 220
Joined: June 22, 2009, 7:30 am
Location: Dayton Ohio

Re: 64 Tweety Bird

Post by loosrp »

Like Skip said, 12+
User avatar
Uncle Skip
Posts: 4695
Joined: July 15, 2006, 8:30 pm
Location: Pearland, Texas
United States of America

Re: 64 Tweety Bird

Post by Uncle Skip »

After two weeks of being on the unable to perform list, we finally got Daryl healthy enough to work on the truck and got some good progress completed today.
You can't see much but trust me. We chewed up and swallowed several big bites of elephant.
The dash is complete and wired. (Ignition switch, light switch and wiper switch are installed and wired and finished.)
The only thing left to do now is wire the plugs for the instrument panel.
The Gen II Vintage Air controls are wired and completed.
The passenger side air vent is installed and the under dash control panel is wired and done including a data port charger for the passenger side and cigarette lighter on the drivers side..
The new headlight upgrade kit w/ relays has been installed on the core support and is just waiting to splice in the wiring from the original switch that controls (high/ low beam switch) on the steering column.
We also finished planning the final routing of the wires from the firewall to the core support (lights, etc), engine components, and other accessories like the electric fans, stereo power supply, etc has been finalized and planned out. We're running everything we can under the fender wells to hide as much wire as possible.
All this took 6 hours including a quick lunch of enchilades verdes, and this is all the progress you can see?
Damn......... sucks being us.
Image
I'm not arguing with you. I'm just explaining why I'm right.
Pardon me. Does your deaug bite?
User avatar
unibody madness
Posts: 2140
Joined: December 4, 2008, 4:33 pm
Location: Paradise,CALIFORNIA 95969
United States of America

Re: 64 Tweety Bird

Post by unibody madness »

Actually no it does'nt.... I for one marvel at the rate of completion, all things concidered. Will and drive are not always easy to come by, you both seem to work well together.
The project looks awesome.
John
P.S. your door rails are in the mail hope you have some luck finding your corners
Turk build thread at:
viewtopic.php?f=32&t=18944

It does not matter what you think, it only matters what you do about it!
User avatar
Uncle Skip
Posts: 4695
Joined: July 15, 2006, 8:30 pm
Location: Pearland, Texas
United States of America

Re: 64 Tweety Bird

Post by Uncle Skip »

More progress today. We got the Lokar shifter mounted with nut-zerts (I love that tool) hooked up and adjusted on the AOD and wired the ignition lockout switch, mocked up the Edlebrock carburetor and accelerator linkage and pedal, pre-planned the hidden stereo location and planned the power cable to the 400 watt amp.
I'm also including a picture of the firewall exit wiring. It will have a wire loom when its finished and the wires will re-enter the engine compartment thru grommets from under the inner fender low down.. One will take the A/C compressor wire, coil wire, temp and oil pressure sender wire, electric choke wire thru one opening and another for all the lighting wires for the front of the truck.
Not bad for a couple of fat old white guys with an attitude.
Image
Image
Image

Image
I'm not arguing with you. I'm just explaining why I'm right.
Pardon me. Does your deaug bite?
MadMaxetc
Posts: 2600
Joined: July 10, 2006, 12:00 pm
Location: Wichita, KS
Contact:
United States of America

Re: 64 Tweety Bird

Post by MadMaxetc »

Nice work. Those fenders are shinny!
Dan
Project: '63 F-100 LWB / 460 / C6 / 2x4
My Build Thread
User avatar
Uncle Skip
Posts: 4695
Joined: July 15, 2006, 8:30 pm
Location: Pearland, Texas
United States of America

Re: 64 Tweety Bird

Post by Uncle Skip »

Another weekend gone and no "visible" progress. Just wiring and mounting components.
That, and we had the very first real "Fall" day of the year and I had a case of the DON'Ts
That means I don't want to and ain't going to.
It was freaking glorious here Saturday and today.
We do have most of the wiring that has to go from the dash to the back side of the cab routed and taped down. Planned the location of the remote power antenna, and mounted the remote (hidden) radio and amp.
Now we can go ahead and put the insulation on the floor, the back of the cab and the firewall.
In fact, I'm thinking we should go ahead and put the carpet down.
Next week, we're planning on starting PurpleFlyingMonkey's Saturn electric window mod so we can finish up the doors.
Chris, how long does it take to do both doors and is there anything special I need to know about before we start cutting things up?
Maybe that will get us some update pictures.
Tune in next week, same Bat time, same Bat channel.
I'm not arguing with you. I'm just explaining why I'm right.
Pardon me. Does your deaug bite?
User avatar
Uncle Skip
Posts: 4695
Joined: July 15, 2006, 8:30 pm
Location: Pearland, Texas
United States of America

Re: 64 Tweety Bird

Post by Uncle Skip »

Finally, some progress you can see. Grill, header and splash pan are in color and looking good. I finally got a chance to try out my inner fender seal idea.... 1/2" pipe insulation. The silver grey is good but I'd like to find some black, and the 3-point seat belt mounting points were located and installed.
The retractor is going to be bolted in the torque box behind the seats. We're cutting a hole in the top of the box and mounting the mechanism to the side of the box and then sealing the hole with an aluminum cover. All of it will be covered with the carpet and we managed to avoid drilling the floor trim to mount the retractor on the floor by doing this.
Also, no pictures but we did one side of PFM's electric power window mod today.
What do you think?
Image
Image
Image
Image
Image
I'm not arguing with you. I'm just explaining why I'm right.
Pardon me. Does your deaug bite?
User avatar
Uncle Skip
Posts: 4695
Joined: July 15, 2006, 8:30 pm
Location: Pearland, Texas
United States of America

Re: 64 Tweety Bird

Post by Uncle Skip »

FYI.
Daryl got the retract anchor points installed today and here are the pictures so you can see how we did them. Note, there is a nut plate behind the sheet metal for reinforcement and that is glued to the inside with gorilla snot so it won'[t fall out of place if we have to remove the anchor bolt to put in the carpet. The loose end anchor is going to have to be moved to the outside of the seat, but I already know how I'm going to do that.
Cut a hole in the torque box behind where the anchor point is.
Image
Bolt it in with a nut plate for reinforcement and cover with a piece of sheet metal.
Image
Here is the passenger side.
Image
I'm not arguing with you. I'm just explaining why I'm right.
Pardon me. Does your deaug bite?
grump
Posts: 962
Joined: September 14, 2006, 6:47 pm
Location: ohio

Re: 64 Tweety Bird

Post by grump »

Skip, what was your reasoning behind using the floor mount versus tranny mount for the Lokar shifter? I talked to one of the tech reps from Lokar at goodguys and he said the tranny mount was a solider mount than the floor mount. Do you see much flex in the floor mount? I'm looking to put a Lokar in my 66 and I was just wonding. Thanks
Daryl
Posts: 27
Joined: February 19, 2011, 3:40 pm
Location: Houston, TX
Contact:

Re: 64 Tweety Bird

Post by Daryl »

Grump, I'll answer for Skip and me. 1st I have an AOD so I don't have the stress of constant shifting like with a stanard trany. 2nd I got a hell of a deal on a new shifter. Now you got me thinking about it!

And I am almost right as Skipper!
Thanks in advance
DADwood
User avatar
Uncle Skip
Posts: 4695
Joined: July 15, 2006, 8:30 pm
Location: Pearland, Texas
United States of America

Re: 64 Tweety Bird

Post by Uncle Skip »

Grump.
There is a heim joint style link on each end of the rod between the transmission and the floor mounted shifter unit that takes up most of the movement from the transmission. You'll get a lot less shake and "road" noise from this one.
That and the slot you have to cut in the floor is way smaller than the other one. Its just a little more difficult to locate and mount than the one that bolts to the transmission.
The girdle mounted unit that bolts on the transmission will move every time the transmission moves, IE, when the motor torques so does the transmission etc., plus you have to cut that big honking hole in the floor to mount it.
Besides, Daryl stole this one. 8)
I'm not arguing with you. I'm just explaining why I'm right.
Pardon me. Does your deaug bite?
grump
Posts: 962
Joined: September 14, 2006, 6:47 pm
Location: ohio

Re: 64 Tweety Bird

Post by grump »

Skip and Daryl, thanks for your answers. That makes sense for the floor mounted shifter. I'm guessing you measure twice and then measure 3 or 4 more times to get the slot cut just right?
User avatar
Uncle Skip
Posts: 4695
Joined: July 15, 2006, 8:30 pm
Location: Pearland, Texas
United States of America

Re: 64 Tweety Bird

Post by Uncle Skip »

More accomplished today, but we're in "no-man's land" as far as pictures.
We did a bunch more wiring today, including the harness plug for the instrument panel (which was finished several months ago).
And, I finally figured out how to crimp those GM style connectors properly. They can be tricky so it its your first rodeo, ask somebody how before you try them.
We are wiring the headlight switch directly in the harness and removed the original fuse block that connected to the bottom of it.
I have to be honest, I can not for the life of me figure out how somebody can product such a good product as the EZ-wire fuse block and not have a decent schematic or instructions.
Seriously.
Anyway, we are slowly progressing.

Report update.
PFM's power window upgrade:
New motors are available cheaper than we got the used ones from LKQ. Get the all metal variety, the plastic ones won't work.
There is a right and left.
With the batter fully charged, they work great.
Stay tuned.
I'm not arguing with you. I'm just explaining why I'm right.
Pardon me. Does your deaug bite?
User avatar
loosrp
Posts: 220
Joined: June 22, 2009, 7:30 am
Location: Dayton Ohio

Re: 64 Tweety Bird

Post by loosrp »

You guys are doing a great job Skip!! Nice work!
User avatar
Uncle Skip
Posts: 4695
Joined: July 15, 2006, 8:30 pm
Location: Pearland, Texas
United States of America

Re: 64 Tweety Bird

Post by Uncle Skip »

After a little trial and error, Daryl got the brake pedal and accelerator pedal installed in the truck. Was a little tricky at first because he tried to use the clutch pedal for the brake..... not. Also, the linkage from the pedal to the M/C wasn't so obvious but we did figure it out.
He also got the oil pressure sender mounted on the engine too.
I think we'll put the seat in and mount the steering column in tomorrow.
And, Daryl has a great idea for the interior door trim panel instead of using the original Custom Cab insert. We'll see how that pans out soon.
Believe it or not, we're getting really close to finishing the inside of the truck.

Image

Image
I'm not arguing with you. I'm just explaining why I'm right.
Pardon me. Does your deaug bite?
User avatar
Uncle Skip
Posts: 4695
Joined: July 15, 2006, 8:30 pm
Location: Pearland, Texas
United States of America

Re: 64 Tweety Bird

Post by Uncle Skip »

Real progress today. We put the seat in the truck to make sure the seat belts fit properly and so we could adjust and finish the install of the chrome tilt column to fit the driver.
Seat belts, column, pedals...... all fit exactly as expected.
The column is a gorgeous piece and went in like it was designed to be there. (Well, I guess it was, wasn't it?)
The steering column is done.... finished and bolted down all the way to the rack and pinion.
And when you see the tan color of the seat against all that yellow paint it looks bitchin'.
Still lots of small details to go, but this is a major milestone.
Couldn't resist just sticking the instrument panel in temporarily so we could see what its finally going to look like.
I think next we'll finish the wiring and hang the front clip sheet metal.
But for now, here you go...
:D

Image

Image

Image

Image

Image
I'm not arguing with you. I'm just explaining why I'm right.
Pardon me. Does your deaug bite?
Post Reply