Power Windows (part 2)
Wiring for the power window motors is pretty straight forward, you just need a 20a circuit that is fused (or a circuit breaker), a source for ground, and the connectors. The single switches we used have 5 connections, two window motor connections, one power connection, and two ground connections, to run the motors up and down all you are basically doing is changing the polarity between the power and ground feeding the motor, in one position it runs the motor in the up position in the other it goes down...simple.
All of this is done by the switches so it's important to get your connections correct to avoid a short between the power and ground. The connectors for the GM switches we used look like this.

The pigtail connectors are sold through several companies but appear to only be made by AC Delco and they are not cheap costing more than the PW motors each, so I have more money invested in the connectors than the actual motors, but it is the only game in town that we could find, I even bought the connector for the dual switch (drivers side) so I have options for later date and you never know just how long things like these will be manufactured since they are no longer put in new cars, if you have a source and your doing a conversion like this it is probably worth the trip to a salvage yard to cut them out of a harness, just be careful removing them from the switches the plastic becomes brittle over the years and brakes easily.

The connector for the dual switch even though came in a BWD (Borg Warner) box is just a repackage of the AC Delco part having the very same gray wiring and same plastic connector but of course is 6 conductor instead of 5 for the single switches.
Like I said wiring is pretty straightforward but you need to study the connector well, the wire connections are off-set so it's not always evident which wire is going to which terminal, but what your looking to do is attach the PW motor to the two center (or middle) terminals, the power goes to the corner opposite the blank space in the connector, and the last two corner wires are grounds which are opposite each other and can be just tied together with the ground attached.
It's a good idea to test the switches for orientation before installing them so up is up and down is down...lol
The first one I did went off without a hitch, but the second one I got the power and ground shorted and blew a couple fuses before getting it right (study the connector), I hadn't installed the circuit beaker at that point and was down to my last fuse when I got it right...finally..lol
----------
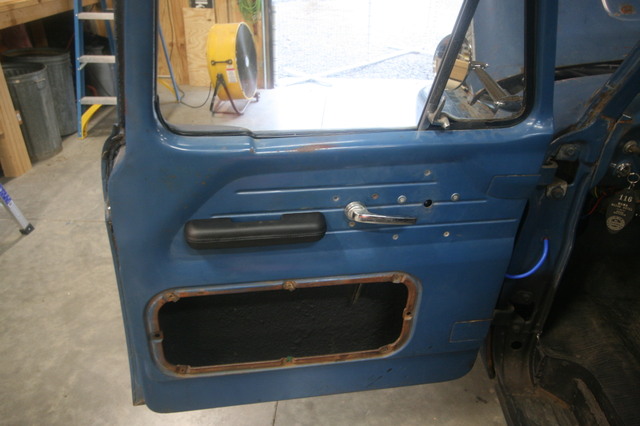
On a related topic, if your following my build you might remember when I rebuilt the door window channels, anti-rattlers, wing windows, that I mentioned the rollers for the window that is on the end of the lift arm and runs in the window lift channel, I mentioned how they were only a few dollars each and that it would be a good idea to replace them. (which I didn't do) Ours were in good shape for their age.... Well I should have replaced them because I broke the passenger side roller.
Let me back up, when I did all the sheet metal as in floor pans, cab steps and risers months ago I did the passenger side first since it was in the worst shape, to replace the lower door hinge pocket I of course removed the passenger door, I did mark it's location and left the hinges intact on the door never moving them but I didn't do the drill a reference hole like people who do this stuff all the time recommend to do so it's easier to line everything back up.
Needless to say I've been fighting the door alignment ever since, so fast forward to last weekend and I'm doing some final tweaking on the passenger door so it doesn't have to be slammed hard to get it to latch, in the process of slamming the door and adjusting the striker plate in and out I slam the door and the window glass slides down it's channel....oops this ain't good at all!
So I took the door apart and of course the plastic roller broke at the clip that holds it on the arm, I got it put back together and it'll hold the window up but I'm sure rolling it up and down a few times it'll pop back out, of course I had to order a couple of them which would have been much cheaper while ordering other things to cover the shipping.....just another lesson learned.
----------
Observation on the above topic, if you can do body work on your slick without removing the 200 pound doors I'd not remove them especially if you don't have help to reinstalling them because it's more then a one person job hanging the doors, if you must remove them do the recommended marking and drilling to make putting them back in the same location easier. When I did the drivers side I didn't remove that door and was still able to replace the rotted metal and the door lines up and closes like it's suppose to.
This is probably stupid to you guys that have had the doors on and off your slick and didn't have a problem getting them lined back up, but when you have 12 bolts holding a door your first clue should be that it's going to be a problem getting all of that back in place unless your well versed in doing the job which I'm not.

Jon