broken headliner - augh!!!

The place to talk Slicks. All we ask is that discussion has something to do with slicks...

Moderators: Kid, Casey 65

User avatar
tarps3
Posts: 89
Joined: November 6, 2008, 11:05 am
Location: Oklahoma

broken headliner - augh!!!

Post by tarps3 »

I was given a repro headliner as a gift for my '66 F100.
It was the 4-piece perforated kit from Dennis Carpenter.

Well, I waited for a humid day, wetted the back of the cardboard, took my time, sacrificed some roosters, called upon the help of my ancestors, and ALMOST succeeded in installing it.....

I put the large front piece in; located the screw hole....piece of cake.
I wetted and formed the 2 corners and installed them - easy.

The I went to install the middle piece above the rear window and a l m o s t h a d i t......

SNAP!!
broke it right in 2 at the dome light hole. :shock:

&*(^#$@^!!!!!! :x

patched it up with heavy tape on the backside and gave it another try.

SNAP!! :x :x :x
broke/tore where it snaps into one of those stupid clips. and broke a corner.

so I stopped, drank a lot of beer and cursed the fates!!! :evil:

my question:
does ANYONE just sell that middle piece?
I find it hard to believe I'm the only one who has broken a part of their headliner.
Surely I don't have to buy an entirely new kit just for that part!?!?
I refuse to do that...well at least until I get my gubment bailout.

It's coming to us little people soon - right??


Anyway :roll:
I like the look of the original headliner material, but now my cab looks stupid with the corners and middle part installed and a large gap above the window....

anyone know of an extra piece of headliner material?
I'll cut my own pattern....
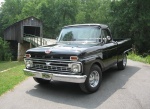
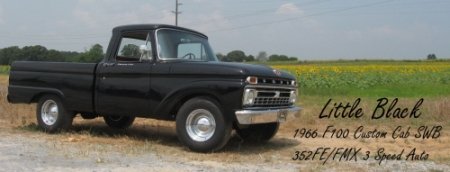
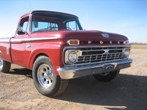
User avatar
Hoofbeat Racer
Posts: 1782
Joined: July 6, 2006, 12:22 am
Location: Rocky Mountains, Alberta
Canada

Post by Hoofbeat Racer »

I feel your pain. Did exactly the same thing. What else can I say. It sucks. I ended resusing my old piece. Did I mention I really feel your pain
Mark


Image
ICEMAN6166
Posts: 11470
Joined: July 11, 2006, 11:28 am
Location: Dove Creek, Co. elevation 6842
Poland

Post by ICEMAN6166 »

tape the backside of the hole area with duct tape, when you get it installed take a razor blade and cut out the hole.
1966 F250 4x4
1964 Rambler Ambassador 990
Rest in peace departed Slick family members
Cam Milam
Lesley Ferguson
Steve Lopes
John Sutton
User avatar
tarps3
Posts: 89
Joined: November 6, 2008, 11:05 am
Location: Oklahoma

Post by tarps3 »

my old piece is in even more pieces than the one I broke.

what a mickey-mouse design!
I'd actually rather have no headliner but Ford had to make these trucks all "fancy-like".

Who needs a headliner in a pickup anyway? :roll:
User avatar
tarps3
Posts: 89
Joined: November 6, 2008, 11:05 am
Location: Oklahoma

Post by tarps3 »

ICEMAN6166 wrote:tape the backside of the hole area with duct tape, when you get it installed take a razor blade and cut out the hole.


that's what I tried the first time.
Then when I made another attempt, chunks of it broke out where I was trying to install it on those lousy clips.

It has numerous tears and breaks now...

I may have to fabricate a new piece out of thin plastic or something.
It won't be perforated and won't match the pattern but it's better than what I have now.

question:
When installing it, do you start it on the clips first and then push it under the weatherstripping or vice-versa?
I tried both methods and neither were working for me - thus the destruction of the headliner.
Dave Rogers
Posts: 78
Joined: February 22, 2009, 9:23 pm
Location: FT Worth, Texas

Post by Dave Rogers »

I am considering making one out of thin vinyl. Glad I haven't bought one as I am not patient enough.
DAVE
User avatar
tarps3
Posts: 89
Joined: November 6, 2008, 11:05 am
Location: Oklahoma

Post by tarps3 »

Dave Rogers wrote:I am considering making one out of thin vinyl. Glad I haven't bought one as I am not patient enough.


I really took my time and test-fitted stuff, etc.
Everything went great until that last piece.

patience really had nothing to do with it - it's just a horrible design: trying to make material perform and shape in ways that it doesn't want to.

The whole thing with the clips and having the panels in compression like that is just crude and silly.

Ford could have installed some simple ribs at the roof and screwed panels to them.

easy.

sorry for the negativity.
it's infuriating when you're dealing with a solution that is unnecessarily difficult and paying $150 for the privilege.

It's not even that sophisticated of a look when it IS installed properly.
I just wanted to try and stick with a stock look for my interior.
User avatar
Alan Mclennan
Posts: 9324
Joined: October 14, 2006, 6:16 pm
Location: In the shed... Cranebrook NSW
Australia

Post by Alan Mclennan »

you could try what I did!, as they don't make envelopes big enough to have a new one mailed down here!, I covered the old one with a light grey felt that they use on head linings, used contact glued. That way all pieces will match!

[img][albumimg]2551[/albumimg][/img]
Honey, If I say I`ll fix something I will, there`s no need to remind me every 6 months!!
66 f100 tabletop swb 351 Clevo C6 "Beryl"

Slick Stock 3 KCMO
Slick Stock 4 Altoona
Slick Stock 5 KCMO
Slick Stock 6 Altoona
Slick Stock 7 Salina KS
Slick Stock 8.............................. cry.gif
User avatar
bird55
Posts: 558
Joined: February 16, 2009, 11:56 am
Location: Tulsa, Oklahoma
United States of America

Post by bird55 »

seems like a flawed design. Not the first time we've had trouble with repro stuff. I didn't know you had to soak it with water?

I was thinking of going to remove mine and using it as a pattern and making my own and maybe use a thin abs plastic or something else. Even new cardboard is available in oversize sheets.

But I too like the stock chickenscratch design

Here I go again, overthinking stuff.

Anyway thanks for the heads up in case I order one, that was the plan anyway.

It's to late for you, but how about covering that area with duct tape…on the back first, would that give some more leeway?
User avatar
bird55
Posts: 558
Joined: February 16, 2009, 11:56 am
Location: Tulsa, Oklahoma
United States of America

Post by bird55 »

on second thought call carpenters and complain. Might be worth a try. They need to know, or they can't improve.
User avatar
tarps3
Posts: 89
Joined: November 6, 2008, 11:05 am
Location: Oklahoma

Post by tarps3 »

Alan Mclennan wrote:you could try what I did!, as they don't make envelopes big enough to have a new one mailed down here!, I covered the old one with a light grey felt that they use on head linings, used contact glued. That way all pieces will match!

[img][albumimg]2551[/albumimg][/img]


that looks nice!

when you installed the piece above the window, did you put it behind the weatherstrippnig first or did you put the clip-edge in first and then bend it back to the weatherstripping?

Mine just DID NOT want to work either way.
Gritsngumbo
Posts: 5441
Joined: August 4, 2007, 4:15 pm
Location: Monroe, Louisiana
United States of America

Post by Gritsngumbo »

I did the same thing as Alan, the front and side pieces went in OK (at least my wife and I didn't kill each other, though it was close) but the rear piece is still not in (It's only been a year LOL). I didn't want to break it, but just couldn't get it down behind the rear window rubber and hook up to the clips at the same time. Have been meaning to take it by my upholstery lady to see if she has a secret way of making it fit. I'm sure she has lots more patience than I do.
If you understand what you’re doing, you’re not learning anything.


LITTLE RED: 64 F100 Short Style
BIG RED: 62 F100 Long Uni
BIG “UN": 63 F250 Long Flare
BBW RED: 61 F100 CC BBW Long Uni
CRIMSON CREW: 63 F100 "Stageway" Long Flare Crew Cab
"RANGER": 66 F100 CC Long Flatbed
"AVA" 1963 Avion T-20 Travel Trailer
“Lucille” 1955 New Moon 44’ Travel Trailer
User avatar
tarps3
Posts: 89
Joined: November 6, 2008, 11:05 am
Location: Oklahoma

Post by tarps3 »

Gritsngumbo wrote:I did the same thing as Alan, the front and side pieces went in OK (at least my wife and I didn't kill each other, though it was close) but the rear piece is still not in (It's only been a year LOL). I didn't want to break it, but just couldn't get it down behind the rear window rubber and hook up to the clips at the same time. Have been meaning to take it by my upholstery lady to see if she has a secret way of making it fit. I'm sure she has lots more patience than I do.


If she shows you the "secret" let me know what it is.

I just can't get it to work.
Well, especially now that it's broken, but it would be nice to know how it is supposed to work if I have to make my own...
User avatar
Effie
Posts: 756
Joined: November 12, 2007, 10:14 pm
Location: Temple, GA

Post by Effie »

I just re-installed my used headliner.

We put the lower part into the weatherstrip first, then pushed it back until it snapped into those devil clips.

Good luck. :lol:
~/\/\elissa~
Image '66 F100 -- Little Black
Image '78 Bronco -- Brutus

Image
User avatar
dotcentral
Posts: 1341
Joined: August 18, 2006, 5:13 pm
Location: Charlotte, NC

Post by dotcentral »

Tarps, sorry to read about the problem with the headliner. wonder if there is a felt or other cloth materal with a pattern similar to the cardboard pattern, so you could cover it and have it look close to stock?

Does one of the vendors offer a plastic version of the headliner? I wonder if they are any easier to install?
Driver: 71 F100 Shortbed: Disc swap, 5.0 HO EFI & AOD
Project Vehicle/Mild Custom: 66 F100 CC longbed: Sold
User avatar
tarps3
Posts: 89
Joined: November 6, 2008, 11:05 am
Location: Oklahoma

Post by tarps3 »

Effie wrote:We put the lower part into the weatherstrip first, then pushed it back until it snapped into those devil clips.


that's a very good description of those clips.

That's what I tried to do but the headliner broke a chunk out of it where the clips were.
I wonder if I bent the clips down a little so it wouldn't have such a tall lip to snap over?
hmmm..

I think I'll get a thin piece of plastic or pressboard and make that piece over and try to at least match the color.
User avatar
tarps3
Posts: 89
Joined: November 6, 2008, 11:05 am
Location: Oklahoma

broken headliner - UPDATE

Post by tarps3 »

I just contacted Dennis Carpenter (the makers of my headliner kit) and I can buy the piece I broke for $25.
I didn't have to buy a new kit.

They were very nice about it and very helpful.

so.....we'll try this again in a few days!
Breezeman
Posts: 19
Joined: July 28, 2007, 6:04 pm
Location: Valdosta, Ga.
United States of America

Post by Breezeman »

I trimmed my piece down just a little. I trimmed it on the side that goes in the rubber. Mine went in but I did get little crack in it.

A little trick I did was run gray duct tape all around the edges on the back of all pieces. Thought maybe that would help with the edges "chipping/breaking" off. Seemed to help some, I guess.
I also traced all the pieces on the cardboard box it came in so I can make my own now with the patterns. Maybe.

Good luck guys. I have to do it again on another truck I'm working on. We will see how that one goes.


Larry
1965 F-100 Shortbed 390 automatic
1997 K1500 Z71 4X4
2002 31' Fleetwood RV
User avatar
tarps3
Posts: 89
Joined: November 6, 2008, 11:05 am
Location: Oklahoma

Post by tarps3 »

Breezeman wrote:I trimmed my piece down just a little. I trimmed it on the side that goes in the rubber. Mine went in but I did get little crack in it.

A little trick I did was run gray duct tape all around the edges on the back of all pieces. Thought maybe that would help with the edges "chipping/breaking" off. Seemed to help some, I guess.
I also traced all the pieces on the cardboard box it came in so I can make my own now with the patterns. Maybe.

Good luck guys. I have to do it again on another truck I'm working on. We will see how that one goes.


Larry


good hints - thanks!
did you place the edge under the rubber weatherstripping first and then push the other edge up until they went past the clips?

How many clips did you install on the main piece?

Did you wet the back of it very much?

thanks for the tips.
Breezeman
Posts: 19
Joined: July 28, 2007, 6:04 pm
Location: Valdosta, Ga.
United States of America

Post by Breezeman »

Yes, I did put the bottom in the rubber first then the clip edge. I believe there are 4 "clips" on mine. I did wet all the pieces a little every day for abut a week. The corners pieces, I wrapped around a 5 gallon bucket and strapped them. I used 3 straps do hold them. BUT be careful at first. Try to form them some by hand first. Once I had them completly "flat" against bucket, I wet the sh__ out of them for about a week and set in sun. Worked perfect.

Another thing I did (because I had the time and wasnt in a hurry) was to lay the big piece and the last piece on top of the truck for about a week and wet slighty everyday and sort of "bend" it some with my hands. Little at a time each day. It seemed to work, I guess. Both pieces were shaped somewhat when I installed them.

Also, try not to install them alone. I'm usually alone on everything else but not this time. Just make sure your helper is there just to hold, NOT help push and bend.

Hope this helps, Larry
1965 F-100 Shortbed 390 automatic
1997 K1500 Z71 4X4
2002 31' Fleetwood RV
Post Reply