Page 6 of 8
Re: 65 F100 4x4 parts truck turns project
Posted: January 21, 2013, 7:51 pm
by HiBoy63
totten wrote:Great build up. Cant wait to see in paint.
Thanks Ive got some other doors to install. Ill be welding up all the holes and doing some body work this spring. Plan is to get a HVLP paint set up and either get some flat black epoxy prime on it with a white top or do a satin black paint with a white top and that should hold it until its time for a complete resto in a year or two.
Re: 65 F100 4x4 parts truck turns project
Posted: March 12, 2013, 1:57 pm
by HiBoy63
Got the rear bumper hammered out as good as it will be for now and sitting in primer ready for paint.
 DSCN5031
 by
HiBoy63-65, on Flickr
Bumper brackets por15d and ready for paint
 DSCN5025
 by
HiBoy63-65, on Flickr
Brackets will be a satin black and the bumper will be a silver color next pix will be of painted and installed.
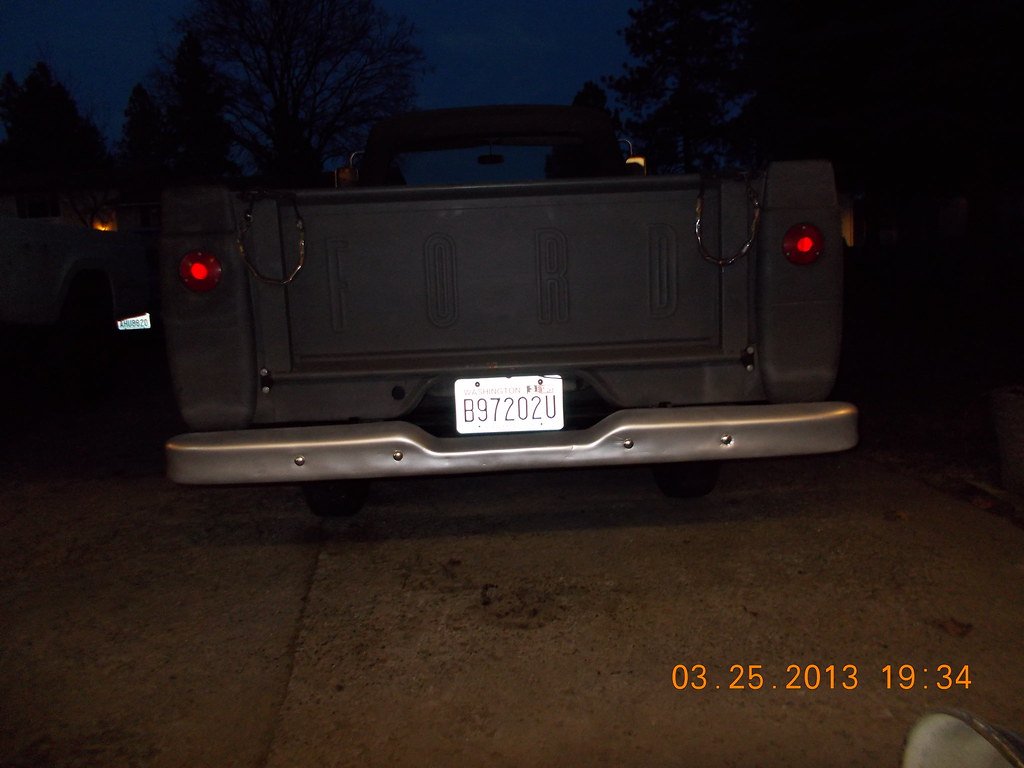
Re: 65 F100 4x4 parts truck turns project
Posted: March 25, 2013, 9:33 am
by HiBoy63
Rear bumper with rattle can silver paint. I might go back to white it hides alot of sins. It will be a good 20ft bumper. Man that thing looks like a $5 bumper. Oh well repop in the future if I cant find a better chrome one.
 DSCN5091
 by
HiBoy63-65, on Flickr
Lined it up on the back of the truck it should fit pretty good. Just waiting for the paint to dry on the mounting brackets.
Re: 65 F100 4x4 parts truck turns project
Posted: March 26, 2013, 8:41 am
by HiBoy63
Bumper installed
 DSCN5102
 by
HiBoy63-65, on Flickr
It looks like a $5 bumper. It doesnt look like I did much to it. Hey that bumper metal is hard to pound out.
Re: 65 F100 4x4 parts truck turns project
Posted: March 29, 2013, 12:46 am
by HiBoy63
looks a little better in day light. I think Ill re paint it in a flat white color it will probably hide the dents and dings that I couldnt pound out.
 DSCN5112
 by
HiBoy63-65, on Flickr
 DSCN5111
 by
HiBoy63-65, on Flickr
Not to bad from 20ft and in pics. The flat white paint should hide the abuse a little better. I hope.
Re: 65 F100 4x4 parts truck turns project
Posted: March 29, 2013, 4:30 am
by Rusty 63
I kinda like a little rough around the edges. Looks great
Re: 65 F100 4x4 parts truck turns project
Posted: March 29, 2013, 10:56 am
by ironminer
wow, my bumper looks totally different.. guess it was added at the dealership, weird that I didn't realize ha
Re: 65 F100 4x4 parts truck turns project
Posted: March 29, 2013, 1:28 pm
by HiBoy63
Yes that is the stock factory bumper that would have come with this styleside bed. Just so you know the bumper brackets used on the flairside box will work with this bumper on the older styleside bed. You have to drill a new hole for the front bolt but other wise they are the same. In the aftermarket cats that I have looked at I dont think they say those brackets will fit this bumper it could be because you have to redrill for the front hole on the frame. And price wise they sure are proud of these brackets.
Re: 65 F100 4x4 parts truck turns project
Posted: March 31, 2013, 10:41 pm
by HiBoy63
Started welding up the chrome holes and all previous holes in the doors and box by previous owners.


Ill be posting more of these as I go. Im finding these are not the easiest holes to repair and weld in.
Re: 65 F100 4x4 parts truck turns project
Posted: April 1, 2013, 11:34 am
by ken462
Hiboy,
I used nails when I filled mine in. Just used a nail head with slightly small diameter then hole, tack it in an then fill in. Nail shaft gives you something to hang onto when tacking and then grinds off easy enough.
Looking good.
Ken
Re: 65 F100 4x4 parts truck turns project
Posted: April 1, 2013, 9:44 pm
by HiBoy63
I might give that a try on the doors if I cant figure out a way to get a piece of copper to stay behind the hole or the brass punch. Thanks for that tip Ken.
Finished the passanger side of the hood and did a hole in the front lip of the hood from a bug deflector screw that had rubbed a hole in the front of the hood. Moved around to the drivers side and started filling on that side.


Next I will be doing the passanger door with all the various holes that have been put there by the previous ownders of the truck these doors came off of.

Re: 65 F100 4x4 parts truck turns project
Posted: April 2, 2013, 2:45 pm
by ken462
Inside of the doors have holes that you can run a bolt thru...double nut it and you can turn the bolt to press against a 2x4 or other suitable scrap lumber to press against the copper, holding it in place. I used copper pipe, cut down the center and flatten...it will bend easily to the contour of the doors if needed.
Re: 65 F100 4x4 parts truck turns project
Posted: April 2, 2013, 5:51 pm
by HiBoy63
ken462 wrote:Inside of the doors have holes that you can run a bolt thru...double nut it and you can turn the bolt to press against a 2x4 or other suitable scrap lumber to press against the copper, holding it in place. I used copper pipe, cut down the center and flatten...it will bend easily to the contour of the doors if needed.
Great idea Ken. That sounds like it would work really well. Maybe even a piece of angle iron or square tubing. Sounds like a plan thanks for that.
Re: 65 F100 4x4 parts truck turns project
Posted: April 8, 2013, 8:14 pm
by HiBoy63
Re: 65 F100 4x4 parts truck turns project
Posted: April 13, 2013, 1:48 am
by HiBoy63
Re: 65 F100 4x4 parts truck turns project
Posted: April 14, 2013, 10:09 pm
by HiBoy63
Re: 65 F100 4x4 parts truck turns project
Posted: April 18, 2013, 1:26 am
by HiBoy63
I used a slap dolly or hammer on and off dolly to finish the crease out. With this method I was able to get most of it out but unfortunately when the metal was creased it stretched it to. I come back to it later with and english wheel to try and shrink it back a little. In the night pic I can see where the bed floor and wheel well attach to the outer wall in all the spot welds appear to be puckering in so a coat of filler over those for now.


Its still to cold outside here to start with the filler.
Re: 65 F100 4x4 parts truck turns project
Posted: April 18, 2013, 9:13 am
by bird55
looking good
Re: 65 F100 4x4 parts truck turns project
Posted: April 20, 2013, 1:36 am
by HiBoy63
Re: 65 F100 4x4 parts truck turns project
Posted: April 20, 2013, 9:06 am
by sgettin
liking watching your progress on the bodywork. looking good.


