Installing the 3rd point of a 3 point seatbelt.
Posted: May 12, 2009, 7:41 pm
Due primarily to the fact that I failed to take pictures during the installation of the lower points, this will focus on the slightly more tricky 3rd point installation.
The lower points are pretty straight forward. Measure, mark, measure, measure, get ready to drill, measure, drill, measure again to see if you done messed up. Depending on the seats you're using, and where you need to mount the belts, you may run into issues with cab supports, and other sheet metal that may get in the way. Fortunately, I did not run into any of that during my install.
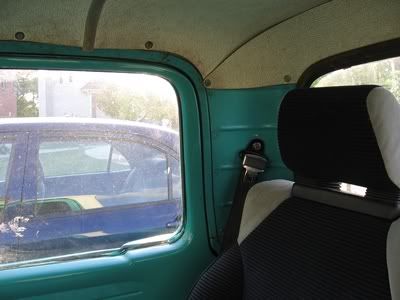
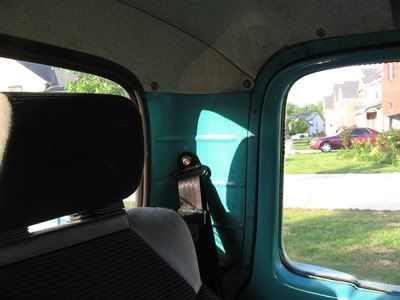
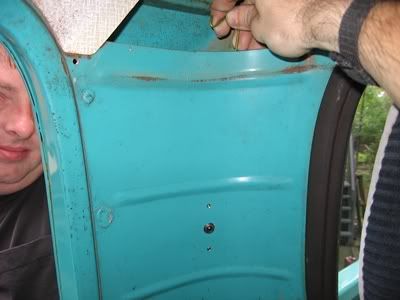
The only place available to install the third point is in each of the 2 rear corners of the cab:
I found these little reinforcement plates online. They're 1/8" thick, 1.5" x 3" and come with a 7/16-20 thread. They can be riveted in place so that any future removal, replacement, or repair of the seatbelts is a one man job. The rivet holes were a hair too small for my 5/32, zinc plated steel rivets. So I opened them up to the proper size with a #20 drill bit. I used this size drill bit for all of the rivet holes. The label on my box of rivets says the hole needs to be .161 to .164 for proper fit. A #20 drill bit is .161. Follow the rivet manufacturers recommendations.

The instructions say to drill a big ole 1 3/4" hole so that the plate can be slid up into place and riveted. I don't know about you, but that was not very appealing to me. Fortunately, we can gain access to the back of the corners by removing the rear portion of the headliner. Here, once again, I forgot to take pictures. I will if anyone needs it but I prefer not to remove that thing again. It pretty much goes like this. Unscrew the 2 screws at each corner, unscrew the dome light lens, unscrew the bulb holder and ground wire and push them behind. The top of the back portion is retained by two tangs. Gently push up on the top part of the headliner while gently pulling forward on the back portion and it will come out. Next, lift it out of the window rubber and it's out. Get a friend to help if you can. It's a bit of a pita to do it alone.
Now, sit in your seat and have a friend hold the shoulder restraint in a position that feels comfortable. It needs to be positioned above your shoulders to avoid compressing your spine should you have an accident. Have him hold the mounting plate as well to be sure that you clear the beads which are rolled into the corners for riveting. For the passenger side, you may want to make it more of a "universal" fit. I had a hard time with that because I like symmetry. Making the passenger side more "universal" isn't going to make my truck faster or make me more comfortable. So, Hopefully my passengers aren't much taller than me.
Now mark the location with a marker. I forgot to take a picture with the marker but here's the dot. Kinda. The flash really ruined this picture.

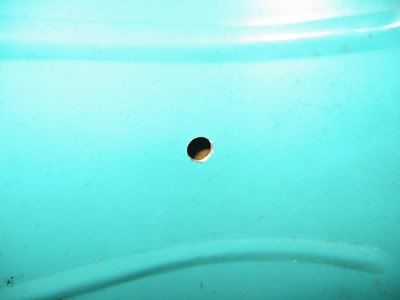
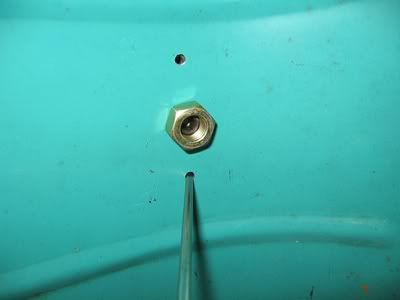
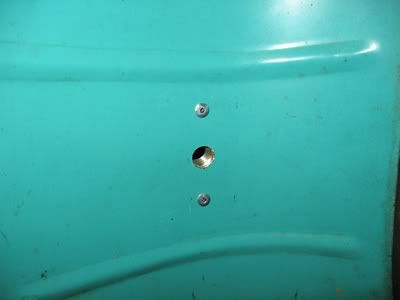
Now you know approximately where the center should be and you don't have to fight with the seat belt while trying to center punch. Use a transfer punch to mark the location. Follow that up with a center punch to get it ready for drilling. Drill the hole. The bolt is 7/16. I usually make my bolt holes 1/64" larger for good clearance. So I used a 29/64" bit. Do your best to debur the back side of the hole. I found a dremel with a small cylindrical grinding stone did a fine job.
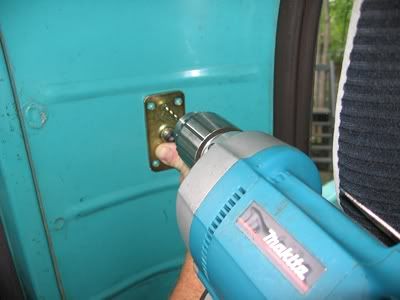
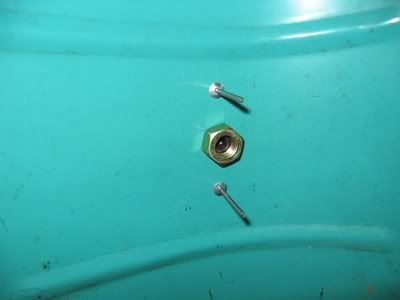
I used a set screw to help locate the plate while drilling the holes for the rivets. If you jiggle the plate around a little, you will find a place where it is happy and stable. I don't know if this will help for the actual function of the seat belts but it sure made it easier to drill the holes or the rivets. Have a friend hold the plate while you drill - or, if you're brave, do it the other way around. Take this opportunity to be a good friend and try to scare them a little. Drill the first hole and don't let the drill go all the way through and make a dimple on the outside body work like I did and damage the dull paint job.
To keep the plate located properly, slide a rivet into the hole. Don't get ahead of yourself and pop that thing in!. Drill the second rivet hole and make sure both rivets will slide in easily.
Now the tricky part. How do we get that plate behind there and into position? My solution:
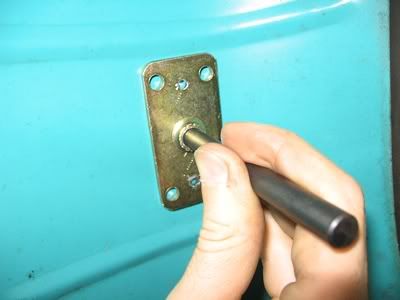
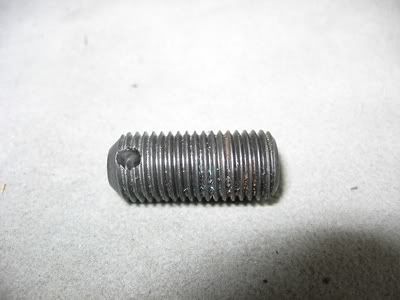
I drilled a hole through my set screw and threaded it into the plate. The screw is 1" long with an allen hex on one end. I threaded the set screw into the plate so that the allen hex will be easy to access once the plate is installed.
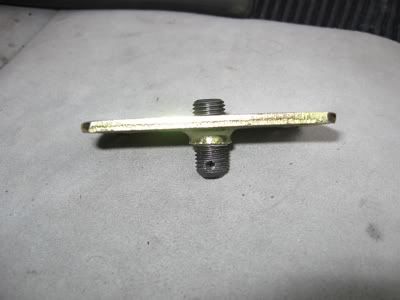
I then fitted my custom bent, super ultra high tech, specialty coat hanger tool through the hole and lowered the plate into position. The set screw also doubled as a pilot for the plate so that it will be easier to retrieve and hold onto.
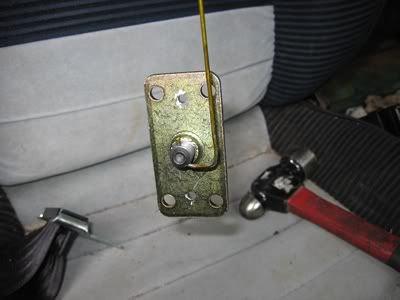
I threaded a nut onto the set screw to hold everything in place. You don't want the nut too tight. Do not disengage the custom bent, super ultra high tech, specialty coat hanger tool until the plate is secured in place! Also don't do what I did and try to unscrew the set screw before disengaging the tool. You're in for a real treat when you wind that thing around most of a turn.
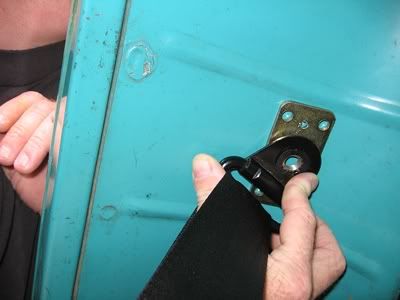
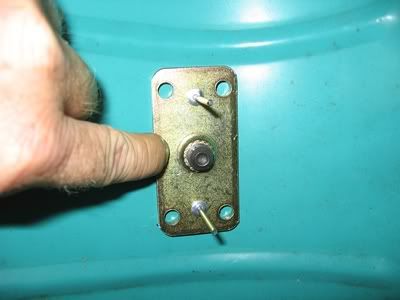
The plate will probably have rotated to the position of least possible benefit while getting it behind there. Get the holes lined up with a pic. Make sure the rivets still fit.
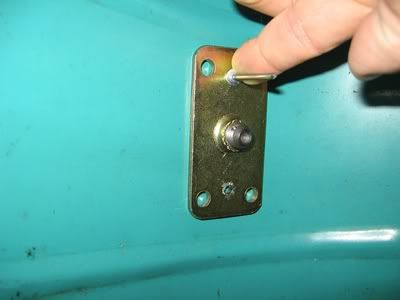
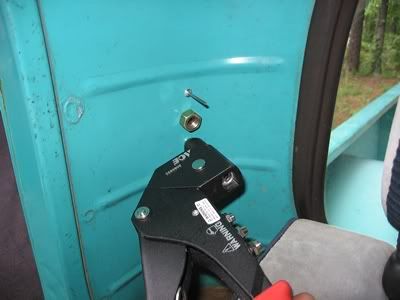
Now pop them rivets in there. I used a rivet tool with a rotating head. It allows for a much more convenient position. And voila! One anchor installed for the 3rd point.
The lower points are pretty straight forward. Measure, mark, measure, measure, get ready to drill, measure, drill, measure again to see if you done messed up. Depending on the seats you're using, and where you need to mount the belts, you may run into issues with cab supports, and other sheet metal that may get in the way. Fortunately, I did not run into any of that during my install.
The only place available to install the third point is in each of the 2 rear corners of the cab:
I found these little reinforcement plates online. They're 1/8" thick, 1.5" x 3" and come with a 7/16-20 thread. They can be riveted in place so that any future removal, replacement, or repair of the seatbelts is a one man job. The rivet holes were a hair too small for my 5/32, zinc plated steel rivets. So I opened them up to the proper size with a #20 drill bit. I used this size drill bit for all of the rivet holes. The label on my box of rivets says the hole needs to be .161 to .164 for proper fit. A #20 drill bit is .161. Follow the rivet manufacturers recommendations.
The instructions say to drill a big ole 1 3/4" hole so that the plate can be slid up into place and riveted. I don't know about you, but that was not very appealing to me. Fortunately, we can gain access to the back of the corners by removing the rear portion of the headliner. Here, once again, I forgot to take pictures. I will if anyone needs it but I prefer not to remove that thing again. It pretty much goes like this. Unscrew the 2 screws at each corner, unscrew the dome light lens, unscrew the bulb holder and ground wire and push them behind. The top of the back portion is retained by two tangs. Gently push up on the top part of the headliner while gently pulling forward on the back portion and it will come out. Next, lift it out of the window rubber and it's out. Get a friend to help if you can. It's a bit of a pita to do it alone.
Now, sit in your seat and have a friend hold the shoulder restraint in a position that feels comfortable. It needs to be positioned above your shoulders to avoid compressing your spine should you have an accident. Have him hold the mounting plate as well to be sure that you clear the beads which are rolled into the corners for riveting. For the passenger side, you may want to make it more of a "universal" fit. I had a hard time with that because I like symmetry. Making the passenger side more "universal" isn't going to make my truck faster or make me more comfortable. So, Hopefully my passengers aren't much taller than me.
Now mark the location with a marker. I forgot to take a picture with the marker but here's the dot. Kinda. The flash really ruined this picture.
Now you know approximately where the center should be and you don't have to fight with the seat belt while trying to center punch. Use a transfer punch to mark the location. Follow that up with a center punch to get it ready for drilling. Drill the hole. The bolt is 7/16. I usually make my bolt holes 1/64" larger for good clearance. So I used a 29/64" bit. Do your best to debur the back side of the hole. I found a dremel with a small cylindrical grinding stone did a fine job.
I used a set screw to help locate the plate while drilling the holes for the rivets. If you jiggle the plate around a little, you will find a place where it is happy and stable. I don't know if this will help for the actual function of the seat belts but it sure made it easier to drill the holes or the rivets. Have a friend hold the plate while you drill - or, if you're brave, do it the other way around. Take this opportunity to be a good friend and try to scare them a little. Drill the first hole and don't let the drill go all the way through and make a dimple on the outside body work like I did and damage the dull paint job.
To keep the plate located properly, slide a rivet into the hole. Don't get ahead of yourself and pop that thing in!. Drill the second rivet hole and make sure both rivets will slide in easily.
Now the tricky part. How do we get that plate behind there and into position? My solution:
I drilled a hole through my set screw and threaded it into the plate. The screw is 1" long with an allen hex on one end. I threaded the set screw into the plate so that the allen hex will be easy to access once the plate is installed.
I then fitted my custom bent, super ultra high tech, specialty coat hanger tool through the hole and lowered the plate into position. The set screw also doubled as a pilot for the plate so that it will be easier to retrieve and hold onto.
I threaded a nut onto the set screw to hold everything in place. You don't want the nut too tight. Do not disengage the custom bent, super ultra high tech, specialty coat hanger tool until the plate is secured in place! Also don't do what I did and try to unscrew the set screw before disengaging the tool. You're in for a real treat when you wind that thing around most of a turn.
The plate will probably have rotated to the position of least possible benefit while getting it behind there. Get the holes lined up with a pic. Make sure the rivets still fit.
Now pop them rivets in there. I used a rivet tool with a rotating head. It allows for a much more convenient position. And voila! One anchor installed for the 3rd point.