Some repair pics, to give ideas, and hopefully help..

Got a helpful tip or trick related to your slick? Please share...

Moderators: Kid, Casey 65

User avatar
foodstick
Posts: 3364
Joined: March 15, 2006, 6:45 pm

Some repair pics, to give ideas, and hopefully help..

Post by foodstick »

Rebuilding 65 cab front lower , all my own scratch built pieces, none of this stuff was available at the time...
Image
Last edited by foodstick on September 19, 2010, 2:24 am, edited 1 time in total.
User avatar
foodstick
Posts: 3364
Joined: March 15, 2006, 6:45 pm

Post by foodstick »

I sorta laugh when I see this, because I did this repair one handed when my left arm was in a sling..(shattered my elbow in bike wreck)

Image
User avatar
foodstick
Posts: 3364
Joined: March 15, 2006, 6:45 pm

Post by foodstick »

Some inner door post work...Made from flat steel, my own template..couldn't buy them then..

Image
Last edited by foodstick on September 19, 2010, 2:23 am, edited 1 time in total.
User avatar
foodstick
Posts: 3364
Joined: March 15, 2006, 6:45 pm

Post by foodstick »

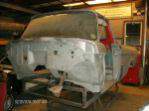
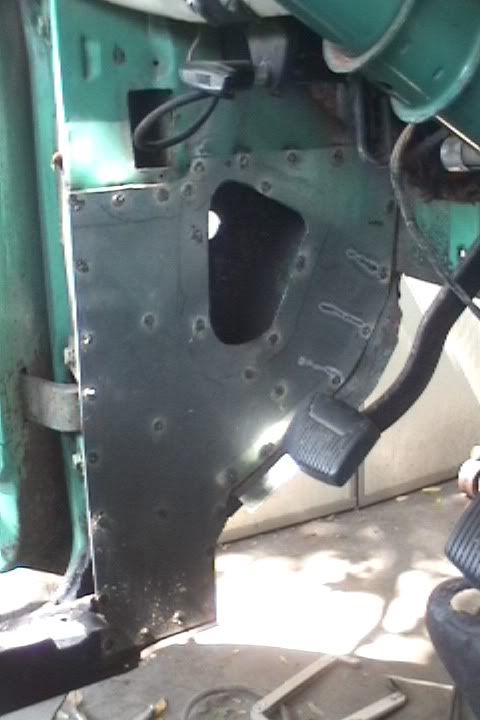
check out the top right, and lower left pics to see how much metal I replaced

also that kickpanel is one of my design to super build the cab from the bottom of the door postup to half the height of the kick panel..makes the cab TOUGH as heck...
Image
User avatar
foodstick
Posts: 3364
Joined: March 15, 2006, 6:45 pm

Post by foodstick »

fixing Kids 65 quarter panel, large patch install...

Image
User avatar
foodstick
Posts: 3364
Joined: March 15, 2006, 6:45 pm

Post by foodstick »

the INFAMOUS 65 frame repair, one soft smack from kid with a hammer, upper spring bearer fell off showing NO frame behind it ..
Image

No words to describe this...

Image
User avatar
foodstick
Posts: 3364
Joined: March 15, 2006, 6:45 pm

Post by foodstick »

Here is the frame cut from long box to short on the 64, Now Donny's truck..
Image
User avatar
olliesshop
Posts: 737
Joined: May 16, 2010, 8:38 am
Location: Grosse Pointe, Michigan (Detroit Metro)
Contact:
United States of America

Post by olliesshop »

Thanks for the pics ... I have to rebuild my lower door posts too, they're rotted pretty bad. :(
Tim - 1961 F250 Uni
"Big Red" pictures ... http://olliesshop.smugmug.com/Trucks
Current build thread ... viewtopic.php?f=32&t=29505
User avatar
1965fordf100
Posts: 483
Joined: February 25, 2008, 3:32 pm
Location: Reno, NV
United States of America

Post by 1965fordf100 »

foodstick...awesome work! You wouldn't happen to have the dimension written down somewhere for that kickpanel you made, would you??? I have to do all of those same repairs on my cab.
Phil
Kid
Posts: 2568
Joined: March 16, 2006, 9:39 pm
Location: Iowa
Contact:
United States of America

Post by Kid »

Dang, we do pretty good work for not knowing what the heck we are doing.
User avatar
slickmainer
Posts: 2555
Joined: October 8, 2007, 6:41 pm
Location: Auburn Maine
Contact:
United States of America

Post by slickmainer »

is it tricky to replace the floor boards without messing up the cab supports? my supports are good but the floor is bad, just wondering how to approach the the job and how not to mess up the supports
--Gregg--
you can't get there from here
User avatar
foodstick
Posts: 3364
Joined: March 15, 2006, 6:45 pm

Post by foodstick »

Somewhere I do have some templates..for my parts..

And as far as the floor repair and cab mounts goes..if the floor is bad over the mount area, they will probably need to be removed from the floor to do a clean floor install...
User avatar
foodstick
Posts: 3364
Joined: March 15, 2006, 6:45 pm

Post by foodstick »

this will beef a old cab up with overthick metal for the new kick panel


Image
User avatar
foodstick
Posts: 3364
Joined: March 15, 2006, 6:45 pm

Post by foodstick »

Replacement piece for cab post base...

Image
User avatar
foodstick
Posts: 3364
Joined: March 15, 2006, 6:45 pm

Post by foodstick »

Image
User avatar
slickmainer
Posts: 2555
Joined: October 8, 2007, 6:41 pm
Location: Auburn Maine
Contact:
United States of America

Post by slickmainer »

you did more in one day than i did in 3 months
--Gregg--
you can't get there from here
User avatar
foodstick
Posts: 3364
Joined: March 15, 2006, 6:45 pm

Post by foodstick »

These aren't all current pics,

I am just uploading reference pics from the old board I had taken..

so people could look at how I did repairs, and maybe give them ideas...or just see how things look with some parts , and metal removed...
69supercj
Posts: 404
Joined: July 24, 2010, 8:17 pm
Location: Fair Grove, MO.

Post by 69supercj »

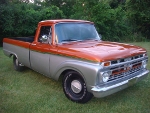
Hey 'stick, when you cut the frame on the long bed to make it a short, you took 12.5 inches out between the wheels. Did you have to take anything out behind the rear wheels? Also, can you tell me where exactly you cut the frame and why? I'm getting ready to do this to my '66. Thanks a bunch!! :)
User avatar
foodstick
Posts: 3364
Joined: March 15, 2006, 6:45 pm

Post by foodstick »

I THINK we cut 6 inchs out of the box behind the wheel well (been so long not positive) so we would have definitly cut that much off the rear frame . I think we just shortened it, not grafting. When we cut the fron part we just cut the straightest piece out..with no mounting points I believe..when ever you cut anything, thats best..so the parts will line up the easiest...
jhewitt
Posts: 130
Joined: August 17, 2008, 2:18 pm
Location: SOUTH OF Atlanta Georgia

EXCELLENT PHOTOS & TEMPLETS

Post by jhewitt »

I wish someone would take good panels as these and do temp lets and offer Laser cut replacements, I found a guy in Canada that does similar stuff and his designs has small laser slits along bend lines so there is small tabs every so often, you then can place part in a vise and bend to 90 degree angles and then lay a weld bead perfectly down the bend line filling in the laser slits.

I would add along with his great designs a tab and slot design, the mating parts would have a male/female tab and slot mating.
Griffin GA 1965 F100
Have 3, one daily driver others in different state of repair/disrepair
Post Reply