Page 1 of 2
My 65 F100/Ford Lightning Swap build
Posted: May 16, 2013, 10:57 pm
by Tyler 54
I've wanted to do this project forever. This was my first vehicle in High school. It's been sitting for ten years waiting for me to learn how to paint and get ambitious. I bought a wrecked Lightning drive train (motor trans wiring), and some other misc parts and am stuffing into my 65 F100. Seeing is that my cab is was ready started swapping some L parts over to it first.
Enjoy.

I'll be using the fulll L wiring harness, seats, and gauges.


Re: My 65 F100/Ford Lightning Swap build
Posted: May 16, 2013, 11:19 pm
by Tyler 54
These first two post were the progress I made last summer.
I had a heck of a time figuring out how to get the engine over far enough to clear the steering box. I'd love to just hack it all off and put some mustang II stuff on it, but that wasnt in the budget and as I said before I like the feel of an old truck.
So I took 1/2inch out of the passenger side mount and added in some 2inch blocks into the driver side setup.
Pass Side


Driver Side


This is pretty much how it sat all winter. I found out I had to re spray the back of my Cab, found an even nicer set of inner fenders and decide to paint them to match the truck. Also changed plans for wiring. Next post will be of the prgoress I've made so far this month.

[/QUOTE]
Re: My 65 F100/Ford Lightning Swap build
Posted: May 16, 2013, 11:50 pm
by foodstick
This is going to be a cool build.
A friend of mine had a first year LIGHTNING, man that thing would go, and talk about nice seats.
Re: My 65 F100/Ford Lightning Swap build
Posted: May 17, 2013, 12:43 am
by Tyler 54
Once I found that the back of the cab needed re sprayed, I opted to fill the gas tank hole in the cab. Thus freeing up space for my seats, and room for other stuff in the cab.

Mind you, I'm no body man, I'm pretty happy with the results.

Another reason for filling that hole in the cab was the fact that I'm using a sending unit and stock fuel pump assembly to make my stock gauge work out of the 00 truck. Friend of mine is a master fabricator so he took my stock lightning tank and cut it up then came out with this fuel cell. The driver side tail light will now be a trap door with a quick fill spout behinf it to add fuel. This tank should hold around 17 galons.


Re: My 65 F100/Ford Lightning Swap build
Posted: May 17, 2013, 12:45 am
by Tyler 54
Next to adress was my seats. The passenger one sat just fine. The driver sad had an electric unit which made it sit 3 inches higher than the passenger seat, I didnt like the look or the feel. So I bought some manual seat tracks and hacked up my brackets. Here is were it sits now. Just enough adjustment for my needs.

The Gauge cluster is really starting to come along, I did a test fit tonight into the truck. I stil need to do some fine tuning but here it is.


Thats all for now, Sorry to pust so much at once!
Re: My 65 F100/Ford Lightning Swap build
Posted: May 17, 2013, 9:36 am
by ironminer
cool build! hope to see more of it.
Re: My 65 F100/Ford Lightning Swap build
Posted: May 17, 2013, 6:47 pm
by kstones63
Great looking truck and a good choice for engines.
Here is what my taillight filler looks like.
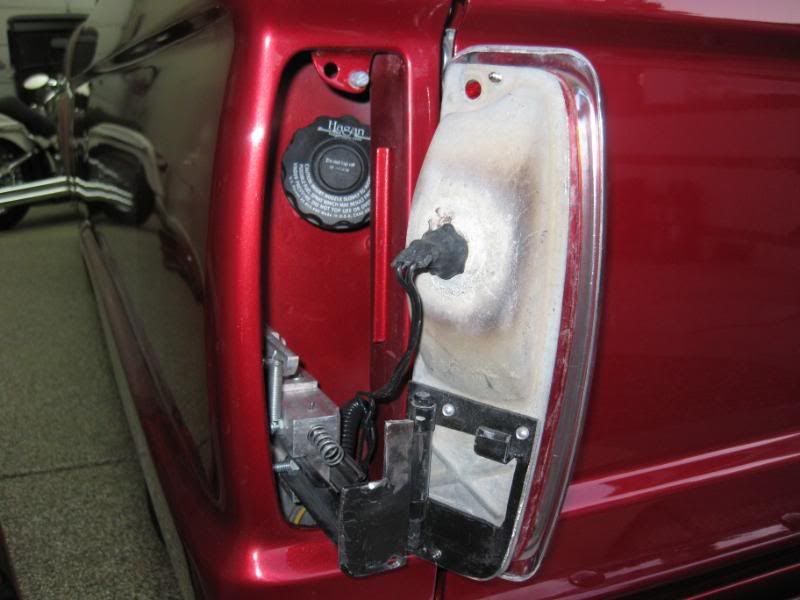
It is kind of tight to get the fuel nozzle into the opening but it does fit.
I think the dash will look good in the Slick.
Kevin
Re: My 65 F100/Ford Lightning Swap build
Posted: May 21, 2013, 7:23 am
by eddieschopshop
nice job..
thats an awesome color..
Re: My 65 F100/Ford Lightning Swap build
Posted: June 2, 2013, 8:26 pm
by HawaiiKid
Hell yeah! Is that Sonic Blue? I've got a 03 Sonic Blue, bolt on truck thats run a best of 12.6s and am doing a 01 CVPI/63 F100 swap...love your set up!
Re: My 65 F100/Ford Lightning Swap build
Posted: June 3, 2013, 9:10 pm
by Tyler 54
The color is Flame blue. I didnt know it at the time but its the Ford raptor color.
My DD Lightning is a 99. It's a got a built motor, no local truck and I'm poor so I have no clue what it runs lol
Re: My 65 F100/Ford Lightning Swap build
Posted: June 3, 2013, 9:59 pm
by HawaiiKid
Ahhh, the new SB with less purplish tint-love that. What kinda stuffs been done to your L? Mines a stock block bolt on truck
Re: My 65 F100/Ford Lightning Swap build
Posted: June 4, 2013, 9:31 pm
by BiffWilley
Sweet build man! I'll be tagging along and drooling all over this! Congrats and thanks for sharing!
Re: My 65 F100/Ford Lightning Swap build
Posted: August 12, 2013, 11:36 pm
by totten
Nice work! Keep the pics . coming
Re: My 65 F100/Ford Lightning Swap build
Posted: August 16, 2013, 10:34 pm
by Alan Mclennan
Nice build Tyler, I like the colour as well...........

Re: My 65 F100/Ford Lightning Swap build
Posted: September 22, 2013, 7:29 pm
by totten
Any progress! Like the blue color,seats. Like to see pics of engine setup when done. Thanks,Tony
Re: My 65 F100/Ford Lightning Swap build
Posted: January 17, 2014, 1:13 am
by Tyler 54
Its been a while since I made progress. Finally got some money and been ordering parts like crazy. Also got some help from a friend and gutted the lightning wiring harness to were I have just engine management, datalink and gauges.
First off, got my fuel tank and fuel lines done.


My gauge bezel cracked so I scrapped the idea and started over with a simpler cleaner idea....I like it!! Got all the interior wired for the newer gauges.


And finally, got my shoes picked out!!

Re: My 65 F100/Ford Lightning Swap build
Posted: January 17, 2014, 1:54 am
by 1965fordf100
Good work, Tyler! It's hard to get in the time to work on these projects sometimes!
Re: My 65 F100/Ford Lightning Swap build
Posted: January 20, 2014, 8:43 am
by edselcomet
The gauge cluster looks good. keith
Re: My 65 F100/Ford Lightning Swap build
Posted: January 20, 2014, 9:19 am
by thenephilm
That color looks fantastic. Will be a really nice truck when you get'r done!
Re: My 65 F100/Ford Lightning Swap build
Posted: January 21, 2014, 6:24 am
by Shadow
That Dash Bezel Turned Out Really Nice, Good Work..


