Page 2 of 3
Re: 66 F250 project
Posted: March 19, 2016, 9:29 am
by ICEMAN6166
bruceandersson wrote:I have used the rust seal products for a while now. They are supposed to be an upgrade tot he Por products in that they contain a UV block and do not require an overcoat. I've been happy with the results. Two things wear gloves, it will not come off if it dries on your skin. Buy more smaller cans. I know this is more expensive, but once open it does not store well.
hope it lasts as i used the por products and after 15 years i am unhappy as it seemed to help the rust and actually created it where ther was none before.
i peeled about 95% of it off the firewall and underside of my cab over the winter, heat from a heat gun,some brake fluid and a scraper with sharp blades did a good job
i have been working a bit at a time on getting it off the frame , not easy with a cab and bed on but eventually i will get it all off.
cost a lot of $ for that por 15 years ago, now im using rustoleum which held up very well over time in the places i used it before and its way less expensive
Re: 66 F250 project
Posted: March 22, 2016, 5:47 am
by White97
Ice - couldn't agree more.
Re: 66 F250 project
Posted: March 24, 2016, 2:08 am
by BarnieTrk
MN66 wrote: I talked to a machinist earlier this week about some other work, I'll call him and see what the head work would cost.
I'm hoping to have a spare 390 rebuilt eventually to replace my 352, so if the heads from a 69' truck 390 flow better than my 352, does it make more sense to get them reworked, rather than my 352 heads? I guess I'll pull the 390 heads off and see what condition they're in, comparatively.
Hi Corey,
So how did the 390 heads look once you got them off?
What did your machinist quote you on surfacing the 352 heads?
Because they are newer, it would be my guess that the 390 heads may not have as much rust/corrosion on the exhaust manifold flanges, saving you from machining them smooth. Assuming both are truck-intended castings, the valve sizes, runner flow and combustion chamber volumes are likely the same between the 352 and the 390 cylinder heads. To get a better idea, post the casting numbers from the 352 and the 390 heads just to be sure of what you have. After all these years, you just shouldn't ever assume....
Probable cylinder head castings #s you have are one of these listed below:
Casting# /Engine / Valve sizes / Combustion chamber size
C4AE-G / 352 / 2.02/1.55 / 71-74cc
C6AE-R / 352,390,428 / 2.02/1.55 / 71-74
C6AE-U / 352,390,428 / 2.02/1.55 / 71-74
C7AE-A / 390 / 2.02/1.55 / 71-74
C8AE-H / 352,360,390 / 2.02/1.55 / 71-74
** DISCLAIMER: I did not research the above stats, thus I am not 100%POSITIVE on their accuracy, I simply located them on the web & reposted them here....
BarnieTrk
Re: 66 F250 project
Posted: April 1, 2016, 7:45 pm
by MN66
Can anyone offer advice on how to remove the support bearing from my drive shaft? I don't have a puller long enough to reach the bearing and the shield next to the bearing doesn't allow much access to the back side of the darn thing.
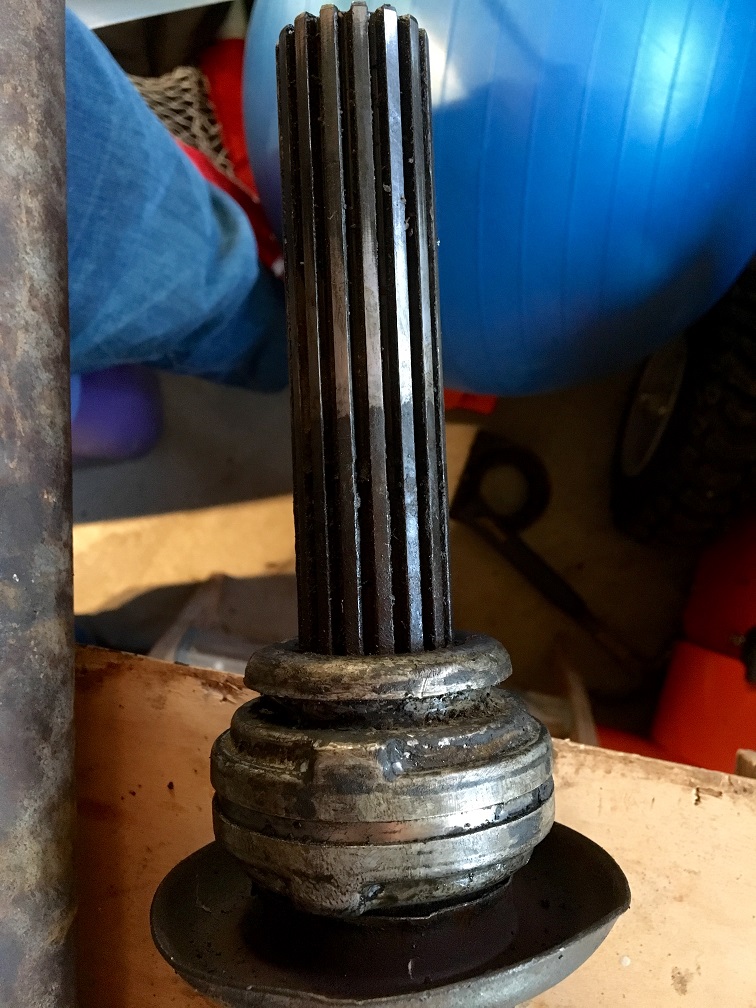
- File_000(8).jpeg (262.51 KiB) Viewed 1577 times
My new diaphragm clutch arrived this week - has anyone used a Luk clutch on their slick? I'm hoping that it's a little lighter on the pedal pressure than the original.

- File_001(1).jpeg (278.3 KiB) Viewed 1577 times
Thanks,
Corey
My rear end.
Posted: May 7, 2016, 11:18 am
by MN66
It's been a while since I posted any updates. I need to be better at taking photos along the way.
I decided to take a look at my donor Dana 61 with 3.08 gears this morning to see what condition it's in. When I opened up the cover I saw this:
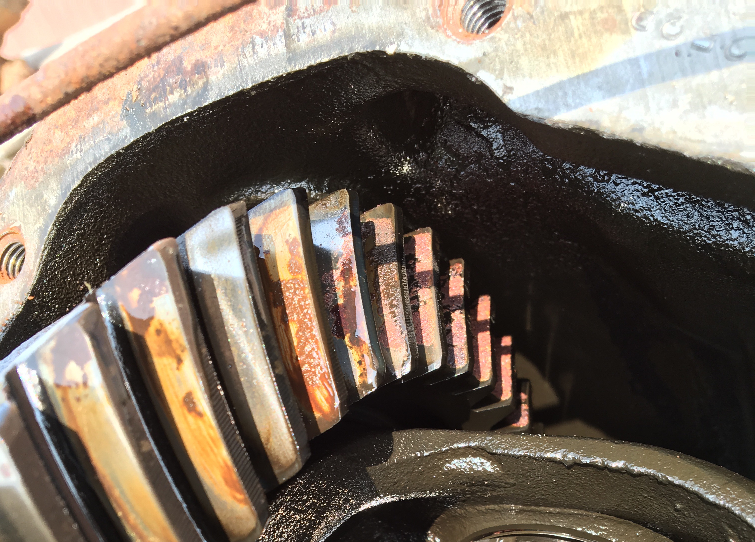
- rustygear.png (771.76 KiB) Viewed 1532 times
I'm sure this thing has been sitting for a lot of years,
Is the rust a problem, or will it disappear with use?
The axel shafts had some spots of rust as well, but the splines looked clean
Should I put any effort into this D61 (needs spring perches narrowed and shock supports moved) or should I look elsewhere?
Thanks,
Corey
Re: 66 F250 project
Posted: May 9, 2016, 6:50 am
by bruceandersson
If there is any pitting form the rust, I think the ring gear will fail. I'd see if you could get a new ring and pinion put in.
Re: 66 F250 project
Posted: May 9, 2016, 8:03 am
by MN66
Thanks Bruce - I scrubbed the rusty teeth with an abrasive pad and it seemed to just be on the surface. I'm going to see what the cost is to get the 4.10 gears swapped out for 3.54 gears on the D60 that's original to my truck. It will save me from replacing rear brakes and e-brake cables that I just replaced last year. The D61 needs drums and shoes, at minimum.
Rust removal
Posted: May 21, 2016, 9:17 pm
by MN66
Did some surgery on my rusty driver side door pillar today. The tricky part will be to get the replacement pieces cut to fit.
Here's what I started with:
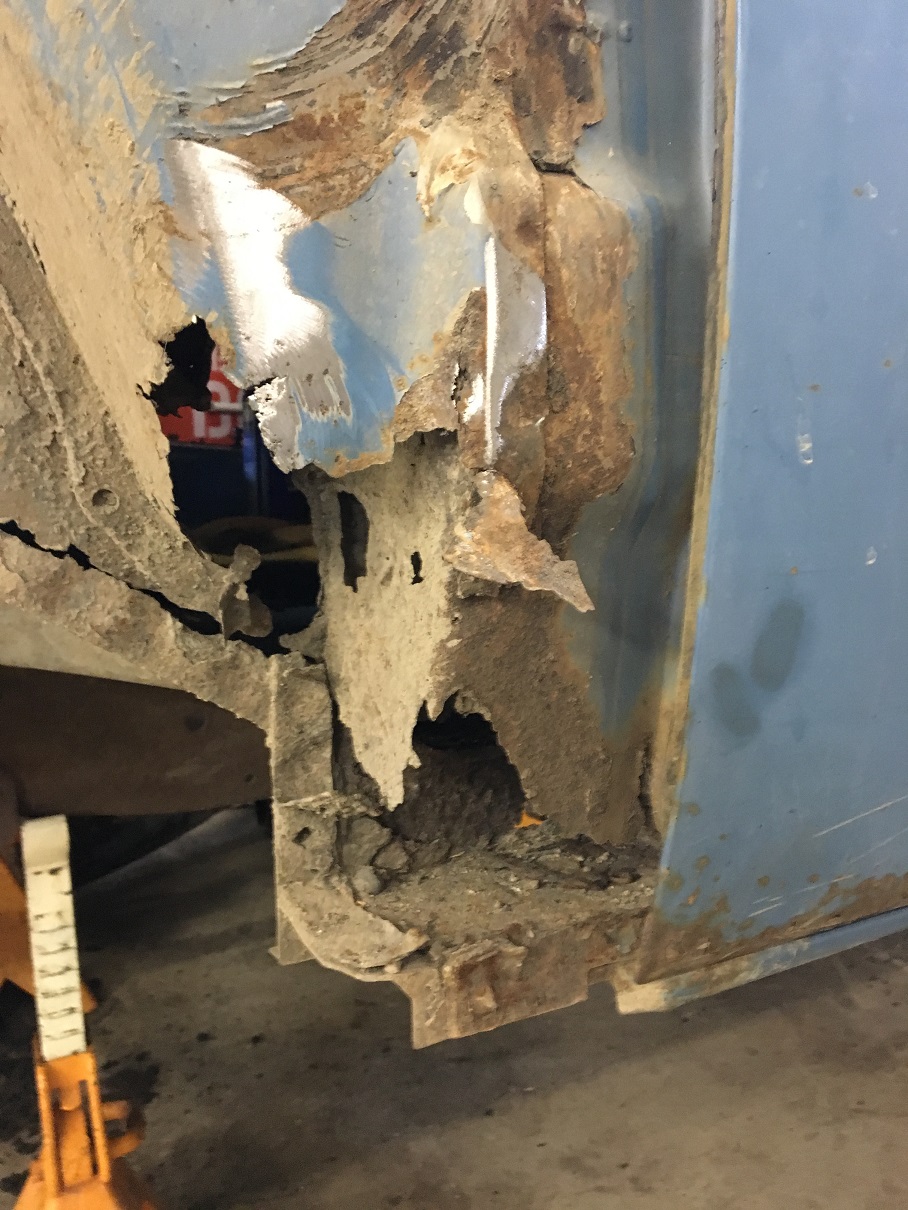
- DriverPillarRust.jpg (355.63 KiB) Viewed 1495 times
Got rid of most of the cancer:
- DriverPillarCut.jpg (419.71 KiB) Viewed 1495 times
Here's the donor piece that needs minor patching, trimmed to fit and welded in.
- DriverPillarDonor.jpg (430.57 KiB) Viewed 1495 times
Has anyone tried to weld in an entire structure like this, or would you advise disassembling it first?
Thanks and Regards,
Corey
Re: 66 F250 project
Posted: May 23, 2016, 7:04 am
by bruceandersson
If you can get at all the places to weld, I'd put it in in one piece. The more edges, the harder it is to get everything aligned before welding. The advantage of taking it apart is that you could get some paint on the inside.
Re: 66 F250 project
Posted: May 23, 2016, 10:52 am
by MN66
My plan was to treat the inside with Phosphoric acid (Ospho) and then a coat of KBS Coatings' Rust Seal. I think I can cover it well enough with the access I have now. I'll let you know how it goes.
Corey
Re: 66 F250 project
Posted: June 26, 2016, 9:12 pm
by MN66
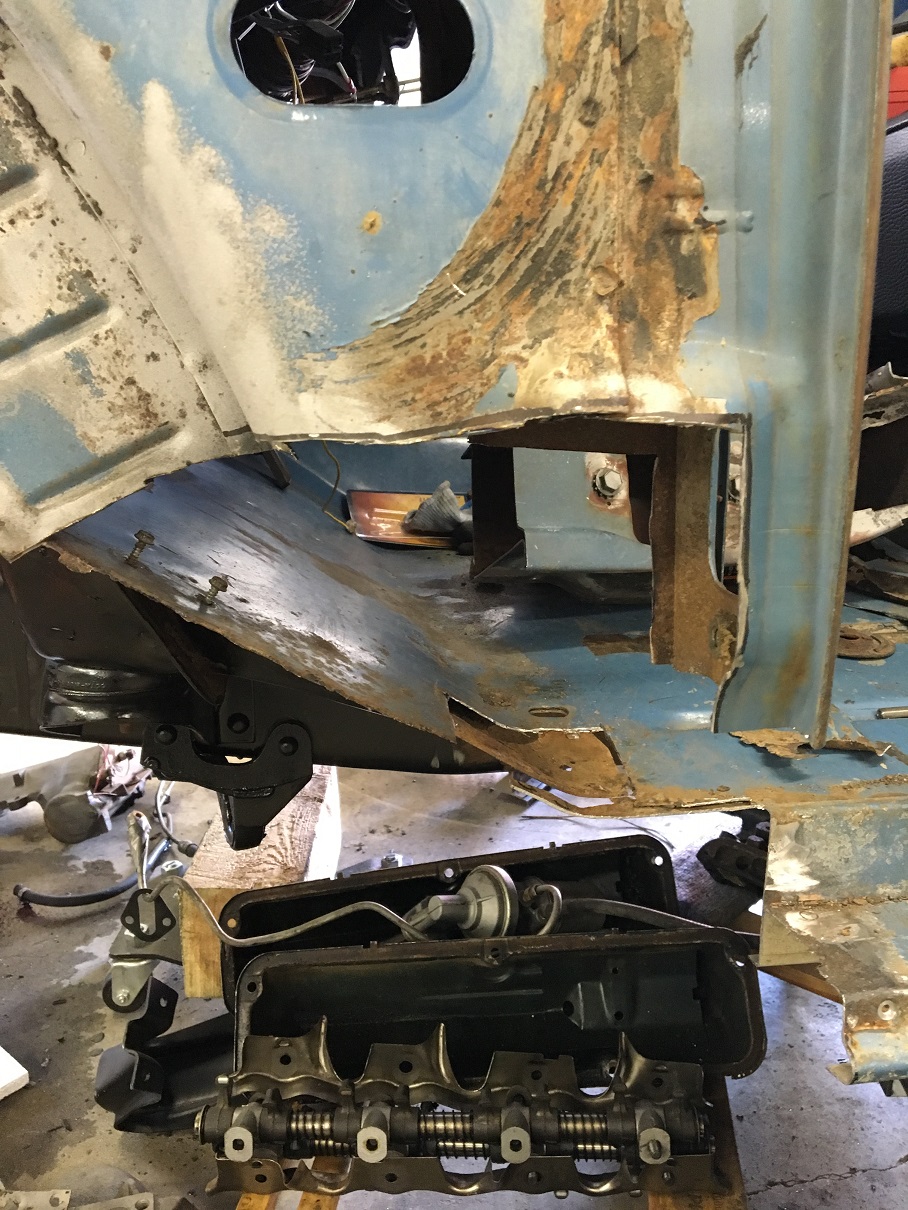
Making some progress on the floors and driver's side door pillar. I pieced in the cowl/kick panel patch as one piece, which ended up working out ok.
Here's are the cuts I made to eliminate the rust:
- cut_DS_pillar.jpg (147.36 KiB) Viewed 1433 times
The donor puzzle piece:

- IMG_1658.JPG (322.71 KiB) Viewed 1433 times
Here's the final result:

- IMG_1758.JPG (243.06 KiB) Viewed 1433 times
Still need to weld the outer cowl piece on after tacking the inner hinge threaded plate in place.
I keep finding more cancer, glad I was able to find donor cowls that were pretty decent.
Pillar lower hinge:
https://drive.google.com/open?id=0Bzgyh ... m9TMlkwRGc
Floor and support repair:
https://drive.google.com/open?id=0Bzgyh ... UdlTGJRd2c
Cowl rust:
https://drive.google.com/open?id=0Bzgyh ... UpvMXE1Ujg
Donor cowl piece:
https://drive.google.com/open?id=0Bzgyh ... VB4cmoxYjQ
Corey
Re: 66 F250 project
Posted: July 4, 2016, 7:13 am
by Mojave922
Corey, did you find out pricing info for cylinder head work? I'd like to know the going rate too. Do you plan to get hardened valve seats? Is there any special machining needed for a hotter than stock cam? I'm considering a 265 Dual Energy from Comp Cams. They say it works with stock exhaust, but I don't know if a cam would make enough difference with a 2v carb to be worthwhile. I'm trying to stay mostly stock to keep costs down.
Thanks,
David
Re: 66 F250 project
Posted: July 5, 2016, 10:50 am
by MN66
Mojave922 wrote:Corey, did you find out pricing info for cylinder head work? I'd like to know the going rate too. Do you plan to get hardened valve seats? Is there any special machining needed for a hotter than stock cam? I'm considering a 265 Dual Energy from Comp Cams. They say it works with stock exhaust, but I don't know if a cam would make enough difference with a 2v carb to be worthwhile. I'm trying to stay mostly stock to keep costs down.
Thanks,
David
Hi David,
I just finally dropped my heads off with a guy so I won't have a final number for a few weeks. He will be installing hardened seats, new guides, port work, milling exhaust surfaces, minor work on the combustion chambers, chasing exhaust threads, new valves, springs, viton seals for about $1000. For the price difference, I probably should have bought a set of fully loaded aluminum heads. I may still do that depending on the results of the magnaflux inspection.
The guy doing the work does a lot of old marine engines and really knows his stuff.
He had a Scripps V12 that he was just finishing that looked quite impressive - similar to the one below:

- Scripps.jpg (202.55 KiB) Viewed 1398 times
Re: 66 F250 project
Posted: July 5, 2016, 1:23 pm
by Mojave922
Are you doing a 352 or 390? I'm new to FEs. I'd enjoy finding a 390 but fear the price tag. I'd have to learn too how to identify it from a 360.
Do you have experience putting headers on an FE? Local machinist warned it's a pain, with the vertical bolts.
Re: 66 F250 project
Posted: July 5, 2016, 2:54 pm
by beater_renix
I admire your solution. I hadn't thought of using a donor part quite like that. I'm doing the exact same thing in the same place on my 65. Keep up the good work.
Re: 66 F250 project
Posted: July 5, 2016, 6:59 pm
by MN66
Mojave922 wrote:Are you doing a 352 or 390? I'm new to FEs. I'd enjoy finding a 390 but fear the price tag. I'd have to learn too how to identify it from a 360.
Do you have experience putting headers on an FE? Local machinist warned it's a pain, with the vertical bolts.
Mine is a 352, but I have a 390 that I'll rebuild eventually, if not for this truck, a future project...
Search this site, there are plenty of explanations on how to verify whether you have a 352, 360 or 390, etc.
I don't think headers are a big deal to bolt up, other than possible interference with the starter, or where the collector dumps out at the same level as the trans cross-member.
Post some pictures of your truck - everyone likes those!
Corey
Re: 66 F250 project
Posted: July 5, 2016, 7:12 pm
by orangeRcode
MN66 wrote:My new diaphragm clutch arrived this week - has anyone used a Luk clutch on their slick? I'm hoping that it's a little lighter on the pedal pressure than the original.
File_001(1).jpeg
Thanks,
Corey
I installed one in my daughter's mustang several years ago and has done well. I have one to be installed in my pickup in the next few days.
Re: 66 F250 project
Posted: July 5, 2016, 9:21 pm
by MN66
I installed one in my daughter's mustang several years ago and has done well. I have one to be installed in my pickup in the next few days.
Great - look forward to hear how you like it in your truck.
Status update and a question.
Posted: September 17, 2016, 9:37 pm
by MN66
I'm a little embarrassed that I haven't updated my project since July... Seems like I've been working hard at it, but the incremental progress seems a little slow when you're working on hidden rust.
The past few days I've made good progress on getting my front suspension back in place.
I was debating whether I should drill holes in the frame and install the '78 brake line brackets or just use my existing brackets - decided on the latter.
https://drive.google.com/open?id=0Bzgyh ... 1YxalFWd1k
The brakes went on easily once I remembered where all the pieces were. I was a little disappointed that the new brake rubber lines didn't include the banjo bolt.
https://drive.google.com/open?id=0Bzgyh ... XRPb2xMb0E
I drilled the frame for the swaybar brackets - always love the hot shower of metal shavings on my face.
https://drive.google.com/open?id=0Bzgyh ... mZiNnJjeUk
I'm excited to have it back on four wheels again.
I'm waiting to hear back from the guy who is re-working my heads. I've pretty much decided to have him build me a 390 from whichever block looks like the best candidate (352 or 390). Hoping to use the crank from the 390 and get new rods and pistons, etc. Initial quote was $3600 for all the work and parts (including the head work already done). I already bought the comp cams timing kit with a mild 252DEH cam, springs, lifters and timing chain. I'll get his final quote next week before delivering the blocks to him.
Question:
Can anyone tell me where under the hood these bolts came from? It might become clear as I reassemble my front clip, but for now I'm drawing a blank.
https://drive.google.com/file/d/0Bzgyhe ... sp=sharing
https://drive.google.com/file/d/0Bzgyhe ... sp=sharing
Regards,
Corey
Re: 66 F250 project
Posted: September 18, 2016, 5:43 pm
by foodstick
Clicked on the painted front suspension picks... a shiver ran up my back.....Can you imagine if it was EVER that good on a stock truck? WOW!