'62 F100 SWB Step Side - yes another Crown Vic swap

A place just for our project & build threads.

Moderators: Kid, Casey 65

Blanger
Posts: 404
Joined: August 17, 2017, 7:55 am
Location: Indiana
United States of America

Re: '62 F100 SWB Step Side - yes another Crown Vic swap

Post by Blanger »

I have mentioned a couple times that when the flair side build was finished my father-in-law wanted us to build him a truck, he has a saw mill business in central Kentucky and wanted a truck he could haul or pull a trailer with, we knew that any slick on a car chassis wasn't what he needed so we started looking around at what could be done and what would be a cool truck to use for this purpose.

The same guy that had the green '65 we bought for parts had a '53 C600 COE grain truck, he had started to rehab the front end sheet metal and ran out of time or interest not really sure which, but he offered us both trucks as a package deal that was hard to turn down.

So after the flair side build this will be our next project, it will go on a GM or Ford 1 ton dually chassis and it will be something like the CV that is modern fuel injected disc brakes and a automatic trans, our idea is to build something kinda' on this theme (pic below) with a regular bed that I'm sure will have to be stretched in length to fit the wheelbase...lol

Image

( I doubt we will try to extend the cab like the truck in the picture above, it would require another cab to cut up, but you never really know, at this point we just need to get a donor with the appropriate wheelbase and start fitting things together, then stand back and look at the symmetry, it's going to be hard not to make it look kinda' funny being a 2 ton cab on a 1 ton chassis even with everything lowered to a standard height from the ground or even a lowered stance.)

And since it doesn't fall into the category of a "slick" I doubt the mods here will allow me to post about it (if I have this wrong please PM or post in this thread), which is kinda' a shame, looking around on the net there isn't much info about doing this type of build even though a quick google search will turn up lots of pictures of built trucks just no build info that I could easily find, it's probably out there somewhere, you can find build threads asking questions but I couldn't find any actual build threads with pictures and info about the build in progress.

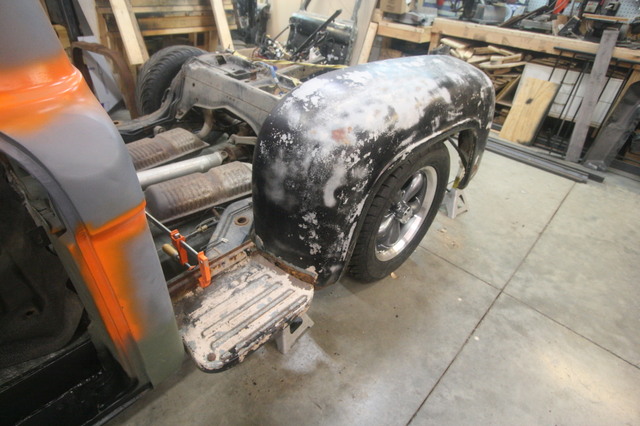
So like our first build this will be uncharted territory for us, I have a few ideas from looking at the cab and how it was originally mounted, I'm sure that it will incorporate the donor firewall and floor like the current flair side build, there are just too many benefits from taking the time to graft them together with really no downside other than the time involved. There does seem to be sources for sheet metal like cab corners and door skins so fixing the rot in the cab should be just like doing a slick cab, other than a missing V8 emblem on the grill this is a complete truck, all the glass is good with the exception of the drivers side door glass which looks to be the same as a '60s slick door glass from the little research I've done.

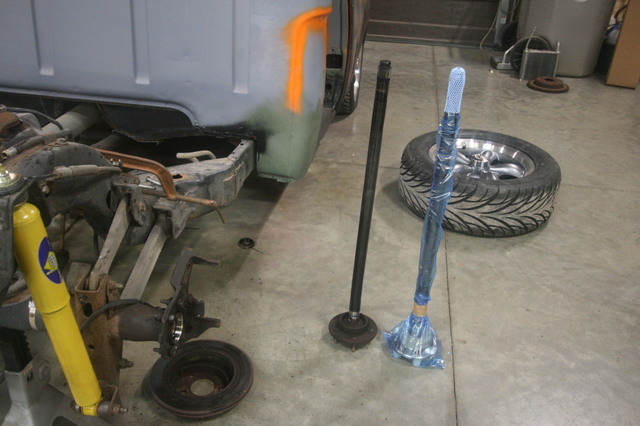
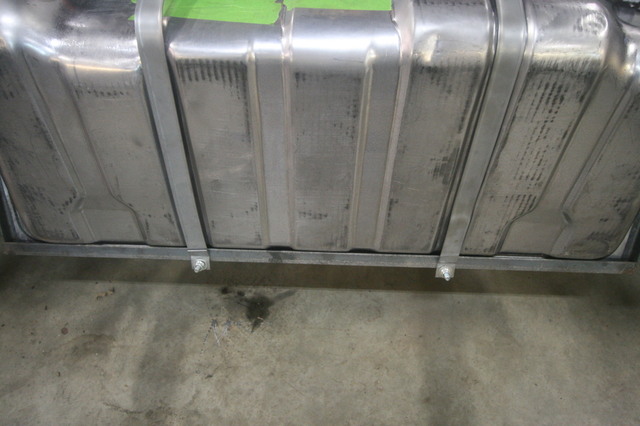
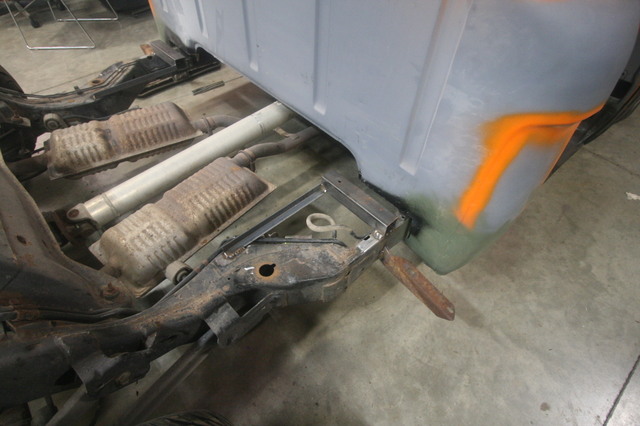
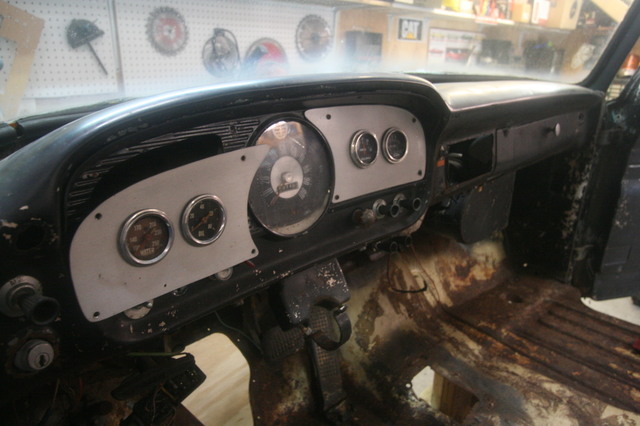
The cab interior-wise is smaller than a slick cab, the dash is a lot shallower than a slick sitting much closer to the firewall which doesn't leave a lot of room for modern devices or wiring at least that is how it looks at this point, with the front end disassembled the engine bay looks plenty large enough to accommodate anything we would want to do, the inner fenders are large and basically good parts that I'm sure will have to be cut down to fit on a modern chassis or just replaced with donor inner fenders like we did on the flair side build.

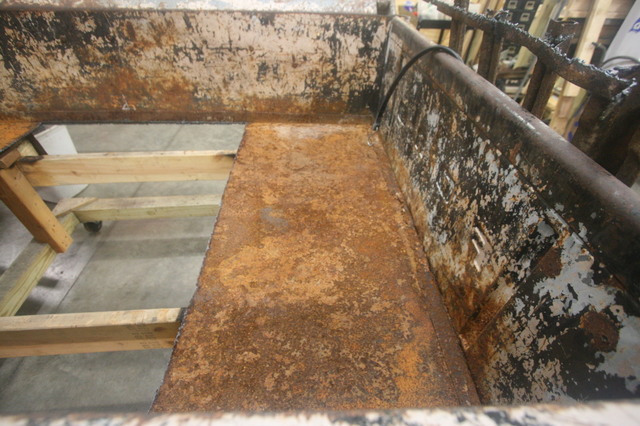
The truck has sat for a number of years, the engine was pulled to be rebuilt but like the rest the owner lost interest and it was left with him, we have no use for it and maybe he can find a home where someone will reuse it, the grain bed needs a new wood floor but the hydraulics supposedly are good so it should go to someone who needs those parts but we will see if there is any interest before it goes to scrap (which would be a shame)....all we really wanted was the cab and front end (dog house) parts to transplant.

It will be awhile before we start this project, in our spare time we will get the cab pulled off and look for a donor, we have in mind putting it on a Ford or GM 2000 up either a "E" or "F" series Ford or a "C" or "G" series GM product, we are kinda' leaning towards a GM "G" series like a Express van box truck with a 140" wheelbase, these vans have a solid kinda' flat rear frame rails, the 3500 (1 ton) should have a 5.7L or a 6.0L V8 and 4 speed electronic automatic transmission (4L60E or 4L80E), this is a long running and proven platform that is very reliable. The Fords would have a bigger variety of engines including everything from a V10 to a 7.3L diesel, I'm not a big fan of the Triton engine platform which includes the 5.4L and the 6.8L V10, and while the 4.6L is really a Triton it is what I like to think of as a first generation engine that they screwed up as they increased the displacement, a 7.3L diesel would be a good motor but a 6.0L diesel has so many issues and for our budget would probably not be cost effective to buy something with low enough mileage to ensure a long life, I have also looked at a Dodge 3500 with a Cummins 5.9L and while the Cummins engine is a big draw towards that make everything else about a Dodge is a detraction...lol

So anyway that's the next project, probably be summer before we really get going on it, there is no time frame to complete it but as you all know we don't drag things out for years and we have to finish the '62 flair side build first. The '53 will again not be a shiny paint project, prolly not a "patina" truck unless it's a fake patina but not a shiny paint job, the father-in-law likes both of our trucks (and the current build) and has offered to be involved in the build which will be nice having the help and direct imput from the guy that will be driving the truck.

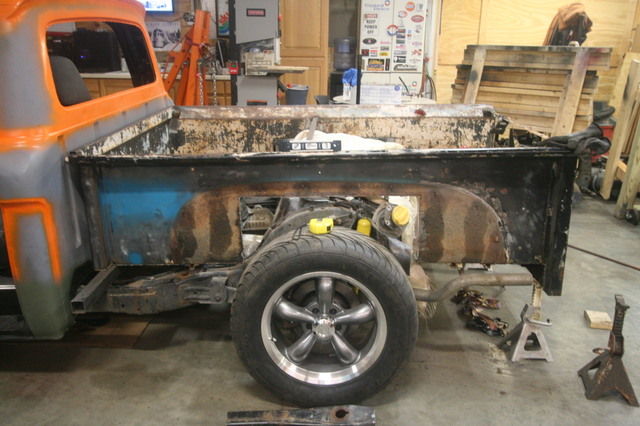
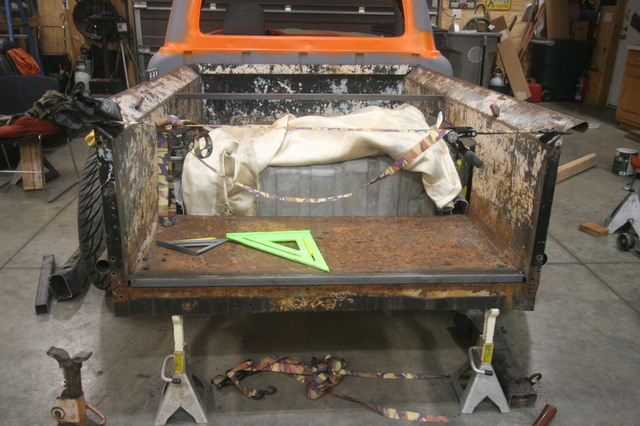
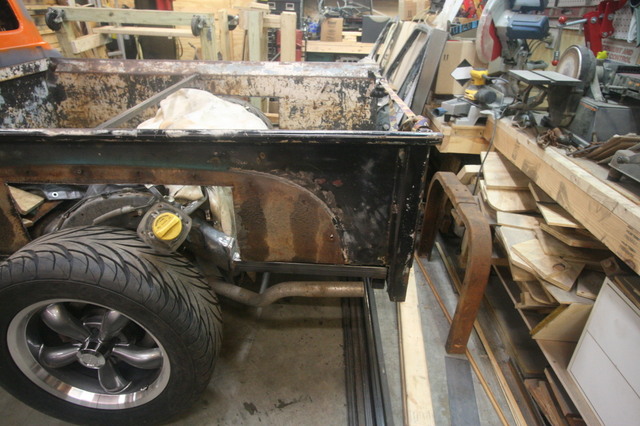
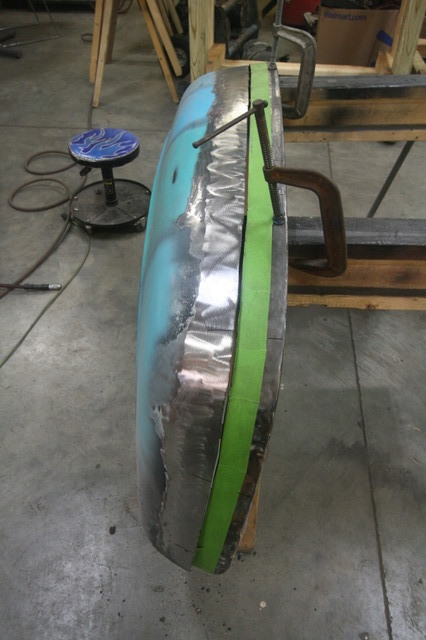
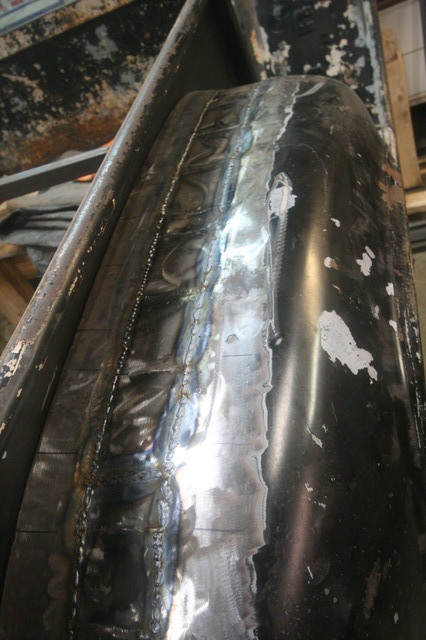
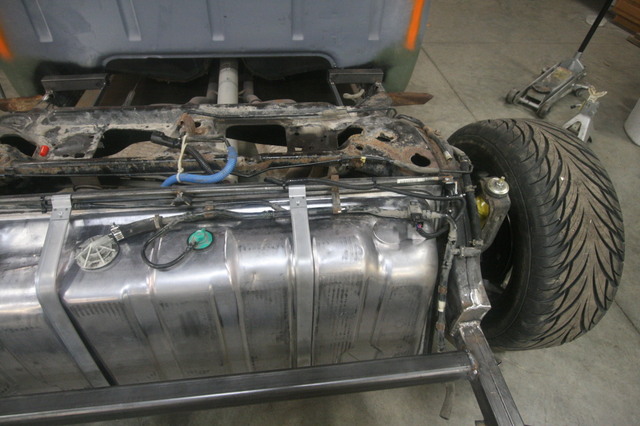
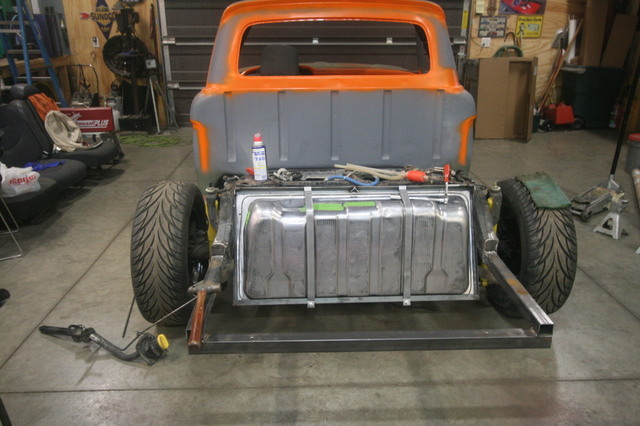
Here's a few pictures.

Image
Image
Image
Image
Image
Image

(Note: While I do understand that this forum was conceived to provide a place for "Slicks" and related topics and builds, with the advent of Facebook more and more people are choosing to post there about their projects, it might be something to consider for the owners and mods of this board to broaden its scope of topics, I'm merely making a suggestion and it's not a big deal to me either way, I don't use Facebook and never will because I have my own issues with all social media platforms where the users are the commodity being sold to profit "big tech" but that's a different topic for another day.)

Hope everyone has a safe and happy new year!

Jon
grump
Posts: 959
Joined: September 14, 2006, 6:47 pm
Location: ohio

Re: '62 F100 SWB Step Side - yes another Crown Vic swap

Post by grump »

You have your work cut out for you with that project, but that's going to be awesome when it's done. Is the body in as good shape as it looks in the pics? It looks pretty decent.
Blanger
Posts: 404
Joined: August 17, 2017, 7:55 am
Location: Indiana
United States of America

Re: '62 F100 SWB Step Side - yes another Crown Vic swap

Post by Blanger »

grump wrote:You have your work cut out for you with that project, but that's going to be awesome when it's done. Is the body in as good shape as it looks in the pics? It looks pretty decent.
Honestly it is your typical Mid-Western old Ford truck, the only real rot is in the cab corners and very bottom of the external door skins, cab floors are not that bad but that is probably because the floor is so high and away from the path of the front tires that not much could get to them, then consider it was for all of it's life a farm truck, probably was never on the road in snow, and if in the rain it would have been a necessity to just get in from the field or back to the farm. I can't say it was kept in a barn or that it sat outside but I'd expect it to be much worse if it sat out all of it's life. From what I was told it has been sitting outside for the last 15 years, the front sheet metal is really in good shape but has been off the truck for almost 10 years so there is that...lol

The nice thing about these old Ford and Chevy 2 ton trucks is that for the most part they used the same cab as the smaller trucks (1/2 and 3/4 ton), it's not inconceivable to take one of these cabs that came from a F600 and use it on a F100 by stripping all the mounting and filler panels of course the C600 is different than a F600 same as a Chevy 3400 is different from a 6400 COE, but the F (Ford) and C (Chevy) series basically uses the same cab from 1/2 ton to the 2 ton trucks as long as it wasn't a COE version, they just used bolt-in mounts and filler panels to raise the cab up to the desired height.. at some point in the '60s - '70s both manufactures started "Super-Sizing" their 2 ton trucks and created a similar but bigger cab and sheet-metal front end parts, but in the 40's and 50's it was all about using what they had to create a truck that would sell and do the work required with a minimum of frills.

Like any project we are eager to get started but you are right it's going to be a lot of work, but really not a lot more than what we have done on the '62 flair side build, we just have a lot of measuring and figuring before we buy a donor to put it on, then there is a rear fender issue if we make a traditional bed like the truck in the picture above, just looking around replacement rear fenders in steel are about $300+ each, then they make steel rear fenders that are 3" wider that run around $750 a pair, we could do a lot of different things bed-wise from using a newer more modern dually bed and lengthening it then making it look like old metal I've seen a few pictures of trucks done that way and it's not bad, but we want it to look like it was made that way not just a bunch of parts homogenized into a truck. We could even do a custom flat bed which isn't out of the question right now, all of that can be decided once the cab is mounted and it's movable under it's own power on the donor chassis.

Jon
Blanger
Posts: 404
Joined: August 17, 2017, 7:55 am
Location: Indiana
United States of America

Re: '62 F100 SWB Step Side - yes another Crown Vic swap

Post by Blanger »

Back to the flare side build.....

More progress!

Spent the holidays working on the '62 flare side, it's ready for it's trip to the body shop for straightening the rear frame rails which hopefully will happen this week.

Now have both interior steps completed and the first coat of bed liner applied, the firewall and floor insulated and sound deading applied, the old vinyl floor mat from the CV cut down and installed, and the drivers side trim (edging) cut, holes drilled, and installed. Some of is temporary and will have to come back apart until final assembly but is all working towards the end game of wiring the interior and putting the truck together for the last time and needed to be done to get it in a position to be easy to load and unload on a trailer for it's trip to the body shop.

Image
Image
Image

A few weeks ago we bought one of those fender rollers that attaches to the spindle via the hub/wheel studs and has a big roller on the other end to roll the fender lip up and away from the tire, the fenders are so thick compared to modern vehicles that we had to use a little heat and forming pliers to help it roll the fender edge, in the end it worked really well and did a good job not only rolling the edge of the fender but moving the wheel opening out away from the tire, for the less than $50 it cost on Amazon it was well worth the investment as it'll be used on the Uni and other projects in the future.

So with the cab/truck ready or as much done that I really could do until it comes back from the body shop we pulled the bed out of the corner and started making some measurements.
One of the things that has been on my mind is that when Fred built his truck (Rudy) he cut his bed in half length-wise and widened it by 10", I kept scratching my head trying to figure out where he got that idea and why. the bed is basically 49-50" wide, the bed opening or actual cargo area is 49" the suspension area from the CV that has to go through the bed floor into the cargo area is at it's widest point in the area of 53" wide which includes the shocks and brake hoses/lines.

All of this will fit with the bed floor cut out and the area of the bed side where the fenders attach opened up, the only area that is in contention is the area of the frame right behind the cab where the bed steps would be, that area of the frame is 59" which is where Fred got his 10" that needed to be added to the width..... I'm guessing here.

So the issue will be the bed steps and a portion of the fenders that fall in this 59" wide area, I think we are going to take a different approach to this problem, cutting the bed in half is a lot of work and would include widening the tailgate as Fred did in his videos. I'm not picking on Fred but I don't want the bed wider and the bed steps sticking out another 5" on each side, just eyeballing that it puts the step where every-time you get in or out of the truck it is sticking out far enough to be a hassle and I'm not real sure I'm like the appearance of how wide it would make the bed look.

Image
Image
Image
Image

At this moment I have a rough opening cut from the bed floor that should clear the suspension and fuel tank, I have not cut the wheel openings yet and will wait until the truck comes back from the body shop to do that because the position of some of the items is going to more from left back over to the right (car was hit on the right side, and the rear frame rails are pushed to the left) so it's better to wait and get that measurement and position after it's straightened back to where it's suppose to be.

I'm going to ask the body shop to see if after its straightened out if they can pull the rear frame rails behind the suspension down towards the ground so they are more flat, they have a gradual rise towards the sky the further they go towards the rear of the vehicle, Fred cut his and pulled them down flat then fish plated the frame, I'm willing and will have to do the same thing so the bed will sit low enough, but while it's on the frame rack if they can do it it will save us some time and effort.

As far as the bed fitting the frame without widening like I said the only area where it's going to be a issue is right behind the cab and that is a area about the length of the bed step, there are a few choices I see right off the bat, one is to just omit the steps altogether and make a filler panel to cover the frame between the cab and the front of the bed fender might even have to notch the fender corner depending on how low the bed will sit. The other is to just cut the step down length-wise making it narrower so it more fits in the area and doesn't stick out so far past the cab corner, this is the idea I like the most, it has it's challenges as far as mounting the step but should be doable and look reasonably well. It would require removing a filler panel and part of the lower stake pocket from the front corners of the bed but shouldn't be real noticeable to the casual observer just looking at the truck.

The truck sits really low with no suspension mods, the bed needs to carry that look on out the rear of the vehicle, the amount of cargo area left in the bed is of no consideration to us, we don't care if the depth of the bed where the CV suspension comes through the hole is less than a foot, this truck will get a stepped floor where only the CV suspension gets covered not a full raised floor like we did on the Uni. It will eventually also get a bed cover so it will all be hidden and protected from weather.
We'll see how this all plays out when it returns from the frame rack! lol

Here's a few more pictures...

Image
Image
Image
Image
Image
Image


Jon
Blanger
Posts: 404
Joined: August 17, 2017, 7:55 am
Location: Indiana
United States of America

Re: '62 F100 SWB Step Side - yes another Crown Vic swap

Post by Blanger »

So this morning the flare side goes to the body shop....hopefully it will be back by Saturday.

While the Flare side is at the body shop I had a few more things to share, first look at what showed up at work over the weekend....lol

Image

My brother is going to build a truck, he has found a '65 1 ton and is buying the remainder of the green '65 we bought for parts, that should give him a complete front end, two cabs, and a long bed that needs lots of help, and of course would have to be cut down (two cuts) to make it a short bed to fit a CV chassis, the donor he bought is a 2010 P71 with right at 100k on the clock, has a bad transmission but came with a used (good) transmission that just needs to be swapped out with the defective unit.

At my suggestion he is going to drive the donor for a month or so before cutting it up just to make sure it has no issues, my wife said it's too nice to cut up and while we have had that discussion before I'll agree it is nice but just makes for a better donor in the end.

------

Next item is mounting the E-brake pedal, I manipulated the cable around the frame where I got enough slack in it to mount the pedal right to the left kick panel without it pulling on the cable and trying to apply the E-brake, of course I lost the left side fresh air vent in the process which I made a cover for and sealed it up, there just wasn't enough room without spacing the pedal out to make the vent functional and I really didn't want the pedal sticking out in the floor.

Image

The brake and throttle pedal assembly (power pedals) required a little manipulation of the steering column to get mounted with no interference, this was because of the two motors that move the pedals back and forth to adjust for each driver, but once mounted the pedal placement is spot on because of reusing the CV firewall and floor.

Image

I have the steering column in it's final position, but it's just a temporary mount to get it to the body shop, once it's back the column will come back out one more time for the wiring and I'll fab up a mount to secure the column to the dash.

I also a few days ago lengthened the wiring for the wiper motor and ran it through the firewall where it connects to the motor, I'm really currious how this is going to work or if there is any problems....we'll see once I get to wiring it all up and can run the motor.

------

Of course the front end will have to come apart, all the sheet metal is just hung temporarily and the mounts for the core support are just tacked in place and it needs a couple places patched yet and a coat of black paint before reassembly, this time the fenders and doors, hood will all be stripped down to bare metal and etch primed, then we will build up the color and aging from there. We have gone back and forth on the color, had settled on the orange and cream, but have recently found that we really like the green of the left front fender, so it may turn out green.... the clock is ticking on that because once it comes back from the frame shop and gets tore down.....paint will be part of that process.

Image

The green '65 as I said above we sold to my brother for his build, but we did rob the doors off it, we will give him whichever set of doors we don't use, the doors from the '65 are better than the doors we got with the '62 cab and has two working wing windows unlike the ones from the '62 that had the pivot bolt broke at the bottom from someone forcing them open. We have already stripped out the '65 doors and they are ready to be rehab'ed, we also got another set of wing windows that was in a box in the green truck sitting on the floor, we thought they were the same but they are different and for a newer truck....maybe a '67? not real sure but they don't fit a slick.

--------

When the '62 comes back from the frame rack the first item is to replace the passenger side axle, the flange is bent, we thought it might be but didn't know for sure if it was the rim or the flange (it's the flange), so that means pulling the inspection cover, c clip, and replacing the axle, not a big deal, I have new brake pads and rotors to install and we'll just make a day of rehabbing the rear-end...lol Then it's on to making a fuel tank mount and installing the tank, after that I'll prolly continue on with the bed get it mocked up and its mounts made along with tie-ing together the rear frame rails so I can mount a trailer hitch.

Then........ blow it all apart, thin the interior wiring harness, find mounting places for a few components like the inertia switch and side impact sensors (air bag stuff), wire up the interior and rear end lights, fuel pump, ABS sensors basically all the wiring that goes to the rear of the cab, most of the front end wiring is just basically the lights and grounds for the engine harness along with mounting the battery, then paint and start final assembly.

We have come a long way from this...

Image

And this...

Image

To this.......

Image

There is a lot left to do, the reality is we are about half way to having a driving truck, we have accomplished a lot but still have a lot of things to scratch off the list, I'll be happy when it runs again and can get it out on the street or highway getting up to cruising speed, I don't think there are any issues but remember we only lot drove this CV after it was crashed there could be other issues or problems that won't show themselves until it's back on the road.

More later.

Jon
SteveCanup
Posts: 1096
Joined: November 7, 2014, 11:08 pm
Location: Wytheville, Virginia
United States of America

Re: '62 F100 SWB Step Side - yes another Crown Vic swap

Post by SteveCanup »

Jon, again great work! I like the green too...(so that's my vote...lol.) Can't wait to see this one painted and put together.
1964 F-100
Image
Blanger
Posts: 404
Joined: August 17, 2017, 7:55 am
Location: Indiana
United States of America

Re: '62 F100 SWB Step Side - yes another Crown Vic swap

Post by Blanger »

SteveCanup wrote:Jon, again great work! I like the green too...(so that's my vote...lol.) Can't wait to see this one painted and put together.
Thanks Steve, it's much appreciated! We both like the green also but are having a hard time finding a matching color in a rattle can...lol I wish that this '62 had been all that green color and looked like the left front fender we would just put it back together like that and call it a day, the grill will stay exactly as it is with it's natural patina but everything else will have to be painted then aged.

We have taken a lot of extra time and steps on this build correcting mistakes I made on the other two, nothing was really done wrong on the other trucks but you notice little things that need correcting like on the wife's '65 the wiper pivots leak in heavy rain because we didn't replace the old gaskets, now it will require some disassembly to correct that problem, it's just a few little things like that that I'm making sure are taken care of on this build. On the Uni I have air leaks from different areas coming inside the cab, it's only a issue in the winter till the heater gets warm, but it's a area on this build that I'm trying to make sure that doesn't happen.

Thanks again for the kind words.

Jon
SteveCanup
Posts: 1096
Joined: November 7, 2014, 11:08 pm
Location: Wytheville, Virginia
United States of America

Re: '62 F100 SWB Step Side - yes another Crown Vic swap

Post by SteveCanup »

Jon, just a suggestion. My wife and I were going to paint a Corvair turquoise. It was going to be a 'low budget' paint job, so I purchased 3 small cans of oil based rustoleum in royal blue, white, and hunter green. I meticulously mixed them together to get the shade of turquoise we wanted. You could reproduce that green color in the same way and shoot it on with an inexpensive gun. It is the same paint that you get in a rattle can. Once it is dry, scuff it with green 'scrubby' pads or fine grit sandpaper to get the patina look. My '64 is painted semi-gloss white with oil based rustoleum. That was about 3 1/2 to 4 years ago and it has held up excellently...and it isn't garaged. I have gone back and touched up 'little areas' as needed because of rust or scratches, etc. It took 2 quarts of paint and some thinner (whatever you choose to use) to paint it. The quarts were $10 each at the hardware store.

Our Lowes Hardware also carries an oil based 'tintable' paint in quart sized cans just like Rustoleum. The guy there told me that you can mix rustoleum of different colors together to get a 'custom' color...he also said that they could even mix a custom color for us in the oil based quart size.

Just my 2 pennies worth...hope that it gives you another option.

Steve-
1964 F-100
Image
Blanger
Posts: 404
Joined: August 17, 2017, 7:55 am
Location: Indiana
United States of America

Re: '62 F100 SWB Step Side - yes another Crown Vic swap

Post by Blanger »

SteveCanup wrote:Just my 2 pennies worth...hope that it gives you another option.
Thanks Steve, yeah it does give us another option that I hadden't really considered, we have a cheap (disposable) HVLP spray gun that would work to do that.

Thanks again.

Jon
Blanger
Posts: 404
Joined: August 17, 2017, 7:55 am
Location: Indiana
United States of America

Re: '62 F100 SWB Step Side - yes another Crown Vic swap

Post by Blanger »

Another monologue while we wait....

I wanted to mention that I'm really happy with how the interior cab steps turned out on the '62 flareside build, I know I've mentioned it before but other than the time, it was a cost saving measure that I think turned out well. IMHO

Image

I also wanted to remind people who stumble upon this thread and are "purists" when it comes to these trucks, that we are using parts and trucks that are destine to go to scrap, we are not taking build-able or restore-able trucks for our projects, for the most part we are saving these trucks from going to scrap and becoming a file cabinet in someone's office, think of it as recycling of sorts. In the case of the current '62 Flareside build it is comprised of a bunch of parts that were just sitting around and a totaled CV P71, what we are doing is kinda' a "last chance" for these two vehicles.

The wife's '65 is kind of a exception, it was a nicer truck but sill needed a lot of work like floor pans, cab mounts, and cab corners, the cab roof along the drip rail was rotting away, her bed was probably the best piece but still needed some re-work to get the tail gate to not bind and open and close like it should, and I guess the truck could have been restored, and the guy we bought it from said it was too nice to part out in his opinion but he doesn't build trucks, he travels all over the back roads of the Mid-West buys them and parts them out. The '62 Uni was just a few steps from scrap after sitting in a barn with a dirt floor for many many years, it's only saving grace was that it was a short bed Unibody which is kinda' desirable in some circles but few actual Unibody specific body panels are reproduced so in a restoration everything would have to be made.

And I do know that anything can be brought back from the dead, it's just a matter of economics as to whether it's worth the money and effort to do so, in a lot of cases someone who wanted to restore a slick could find better candidates for just a little more money that would need a lot less effort and money thrown at it than the trucks we have used.

-------

I've also mentioned that when the '62 flare side is finished that our next project will be a non-slick '53 C600 COE and since my brother has decided to build a slick and most of the work will be done here at work in our spare time I may create a thread and post about it, not really sure how that will go as my time is limited at work but we'll see if I can work it out. We also have a limited amount of shop space so a lot of shuffling will have to be done during the process but we have a fork lift and a couple car lifts that will make things easier and faster than what I can do at home.
Also it will probably turn out to be a group effort with the guys using free time to work on the project, and I think that's my brothers plan, he will avoid a lot of mistakes of doing a first build because I'll be here for advice, it will also add other opinions into the mix which could be a good thing...lol

It should be a interesting build using a '65 cab which has no interior steps like the earlier models and using the CV donor firewall and floor, the end result will be interior cab steps of some sort like the '62 to get the cab low enough on the chassis to cover the frame and have a lowered stance which I'm sure he is going to want although we haven't discussed it.

I'm not going to "drive or steer" this build, I'm going to offer advice if asked but let it go it's own course unless asked for input, I don't want to see him make any mistakes but then again it's not my build and I have only a opinion to offer, he should have his own direction and thoughts on what he wants it to turn out to be. As I've said before there are many roads to get to the same place and no right or wrong way to do something of this type, the only consideration to me is that the vehicle is reliable and safe to drive when it's finished everything else is up to the builders desire and ideas within the limits of what you have to work with.

A good example of that is our '62 flare side build, the dash has a gaping hole cut into it for a double-din radio, we are going to put either the CV factory radio in that opening or the double- din radio that we normally have used in the console on the other trucks for tunes and backup camera viewing, I'm not real sure which but we will have to fill the hole with something, my gut right now sez that the CV factory radio will go into that opening and the other radio will go in the console like we have done before.

My point is we were dealt this huge hole in the dash that we wouldn't have cut in it that we have to deal with, yeah I could weld a patch in and close it up which might be a better idea but since we have the factory CV radio with a clock in it we will probably just put it in that hole and plug back in the interior harness. That might look kinda' cool or it might look like crap, we will see in the end which it is. lol

Image

I welded up so many holes in that dash already from all different junk that people added and drilled screw holes for, not to mention all the holes in the cab roof, B pillars, and cowl that were plugged and welded up which made closing up the original fuel filler hole in the cab just a everyday thing... We started out with a real POS cab and today it's a real nice piece but it took hours and days worth of work to make it something usable and we still have the doors to sort out which have their own issues, but we do have those green '65 doors from the parts truck....lol

Image
Image
Image
Image
Image

------

So it's been a week and still no word on the '62 at the frame shop, I'm anxious to get it back, I have a stack of parts to rehab the rear end including the axle, bearing, and seal. I want to call but I'm keeping myself from buggin' them which might reflect in the final price...lol But it'll be a week on Thursday and it's at best a couple hour job, they had nothing on the frame rack when it was dropped off and said they were kinda' slow work-wise. We'll see how much longer it is going to take, this is one of the reasons I don't like sending stuff out or sub-letting work, granted I couldn't straighten the frame correctly so I have little choice.

Body shops have a tendency to just let non-insurance jobs sit around, don't really know why but it's not like they will have to wait to be paid either, at least on this job, maybe it's just a cool old truck that their customers might ask questions about seeing it sitting there....don't know why but it is taking longer than either of us want. (turns out the guy that does the frame work has been sick with the flu the last few days)

I was going to work on the bed for the '62 while it was gone and did get a few things mocked up and a few ideas, but I need measurements that I can't get from the chassis while it's gone, so it basically has me at a stand-still which I'm sure you can tell I'm not real fond of.

And it's not that we are on a schedule or time table for this build, but I hate having allotted time to something and not being able to follow through, I could go out and get the C600 cab ready to pull which if this goes on much longer I'll be doing but that shouldn't take more than a day to have it ready to lift off the chassis. On that regard our friend Ryan said he'd lift it off for us either using a loader or mobile crane, I'm thinking a sling through the side windows and a crane might be the best option to lift it straight off the frame and set it on one of the dollies.

-------

Someone who has a FB account was at the shop the other day and was showing me all the people posting about their truck projects, I was really amazed at some of the projects, a lot of people were replacing the front-end with a CV IFS and a Explorer rear-end giving them better brakes and suspension.

There are of course people doing CV body swaps....it looks like a lot more trucks are in the works waiting to be finished and put back on the road which I'm really glad to see. I guess the thing that puzzles me is that a CV chassis swap is easy to do and in some ways easier than grafting a CV IFS and Explorer rear end, then doing all the other brake work ie master cylinder, booster, proportioning valve and lines to support the improved brakes along with the steering connecting to the CV rack and pinion....but it of course has it's down sides, it's no longer a truck ( it just looks like one) and if you want to use it as a truck with a full-size bed, car suspension isn't really made for hauling or towing like a truck is.

Of course I understand that a lot of people have to do the projects in steps or phases, that money, space, and time are considerations for most people, and in a lot of cases it's probably easier to just do a front end upgrade, then at a later date do the rear-end, then do other aspects as time and money allows. I consider myself very lucky to have the space and time to do these builds in a nice shop at our home I know a lot of people don't have that luxury.

What really got me was a few I saw that people were doing all the drive train and suspension mods from above but then installed the 4.6L and the 4R75E transmission, kind of like a LS swap a lot of people do on vehicles which includes the ECU, necessary wiring, electronics, into a truck while still using the original Ford riveted frame, it's at this point that I'm just scratching my head as to why would not just do a complete chassis swap? It just looks like to me with the added horsepower and torque you would want a frame or chassis that was more ridged and had less potential flex. Of course I've seen people use the original frame and rehab it by welding all the joints and cross-members that are riveted, there are a lot of different ways from back-halving the frame for more modern suspension like a 4 link and notching the frame rails for clearance when using air bags to get that on the ground look a lot of people like....as they say: different strokes, for different folks.

Yeah, I'm biased I'd guess, it's just an opinion which we all have, I'm just glad to see a lot of old vehicles being repaired, rebuilt, modernized or restored instead of just being scrapped..

Anyway it was a nice look into what others are doing.....

--------

We'll get back to our regular build posts as soon as the '62 returns!

Image 
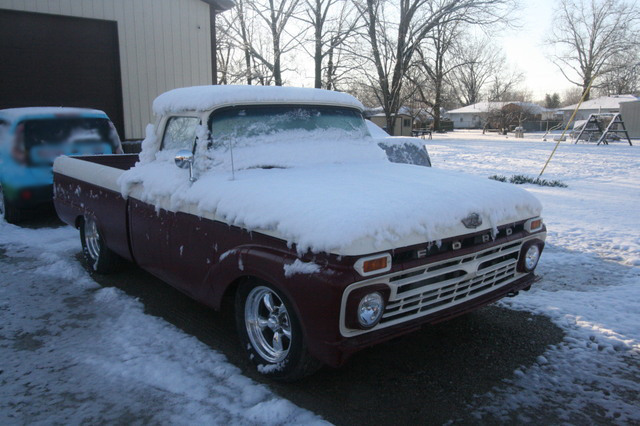
(Yup, it's winter again!)

Jon
Blanger
Posts: 404
Joined: August 17, 2017, 7:55 am
Location: Indiana
United States of America

Re: '62 F100 SWB Step Side - yes another Crown Vic swap

Post by Blanger »

The '62 came back from the frame shop today and they did a great job on it, even heated the rear frame rails behind the suspension and bent them down to level with the ground which will save us having to cut, bend, and fish plate the frame, these rails had to be moved so the bed would sit flat (or flatter) on the chassis, the rear rails had a nice rise to them that had to eliminated or the bed floor would have had to be cut out, now we can get the bed much lower on the chassis and still keep some of the floor intact.

Image
Image
Image
Image

It took a little longer than we would have liked, but in the grand scheme of things for what they charged us it was worth the wait, I was a little worried that we would get another snow storm (scheduled for tomorrow) and they would get loaded up with insurance jobs pushing it to the back burner for another week or so, but they came through and we can get back to work.

--------

So tomorrow we will get started replacing the right axle, bearing and seal, then replace the rear brake rotors, pads, and the rear shocks, after that we can start fab'ing the fuel tank mount and once it's mounted we can go back to fitting the bed to the chassis which is where we were going before the trip to the frame shop. lol

Jon
Blanger
Posts: 404
Joined: August 17, 2017, 7:55 am
Location: Indiana
United States of America

Re: '62 F100 SWB Step Side - yes another Crown Vic swap

Post by Blanger »

A productive weekend on the '62 flare side build.....

Started Saturday getting the axle out, rear end grease was nice and clean with no moisture which was good to see, looked to be the original Ford factory fill but with a 100k on the clock of the CV it's just a guess. The right axle flange was bent along with the caliper bracket and backing plate, the caliper bracket straightened right back as did the stamped steel backing plate, axle bearings were fine but I did replace the seal.

While it was apart we checked the ring and pinion - spider gears, all looked great with no issues, so we installed the new axle, replaced the inspection cover gasket and gave it a fresh fill of 70w-90 synthetic grease, then replaced the brake pads, rotors and rear shocks, reinstalled the wheels and set it back on the ground, rolling it back and forth the right rear tire wobble is gone...yippee!

Image
Image
Image

With that chore completed we moved on to making the fuel tank mount, when the CV was wrecked the fuel tank got damaged and when we tore the CV apart we just sat it aside since it has 7-8 gal of gas in it, when we dug it out to use I noticed it had a hole punched in it which wouldn't normally be a big deal to fix, but the lower right corner took a lot of damage which keeps it from fitting in the frame we built like it should, so this morning I ordered a new tank.

Image
Image

The tank was square enough to build the frame to support the tank and get it tacked in place until the new tank arrives.

--------

So with that hurdle jumped we moved back to the bed which I'll post about later this week.

Jon
Blanger
Posts: 404
Joined: August 17, 2017, 7:55 am
Location: Indiana
United States of America

Re: '62 F100 SWB Step Side - yes another Crown Vic swap

Post by Blanger »

The Bed....... (part 1)

I've mentioned several times about Fred's build "Rudy" if you don't know who or what I'm referring to here's a link.

https://www.youtube.com/channel/UCmjiK4 ... rBw/videos

Like I said I've mentioned a few times how Fred over came mounting a narrow flareside bed on a wide CV P71 frame by cutting the bed in half length-wise and widening it by adding 10" to the width. It was probably a novel way to over come the problem and I considered it for a long time, but now that I'm at that point in our build we have decided to go a totally different direction.

The problem is that with the cab mounted on the CV chassis the area of the frame right behind the rear of the cab extending about 10-12" is too wide for the bed, after the roughly one foot the frame moves back in towards the center line and becomes narrow enough to be covered by the flare side bed and fenders and basically continues that way all the way to the rear of the chassis.

So that one foot area is a huge problem, it's the area where the bed steps reside and we had already decided to cut the steps down so they don't stick out past the cab much. The area also interferes with the front edge of the fenders which will have to be cut off or notched in some way to clear part of the frame and suspension.

Image

Is it possible to make this work without following Fred's solution? I think so, will it look ok? I'm not sure at this point, we do know that the fenders will have to be moved out about 4-5" on each side to cover the wheels, making a filler or stretching the fenders isn't going to be that big of a deal which I'm less concern about it's just that step area that will be the biggest issue.

After giving it much thought, Fred's solution was probably the easiest thing to do, yes it widened the bed and tail gate, to the casual person they probably wouldn't notice the bed went from 49" to 59", purists would most definitely notice something doesn't look quite right, or that the bed has been super sized...lol

We have a plan that I hope will workout, because of the lowered stance of the cab and front end the bed has to be lowered also, there is a limit as to just how low the bed can be and we have set it 2" off the frame just behind the cab, to get the proper stance of the bed the rear frame rails that I worried about getting flat (in relationship to the ground) had to be cut off completely, and replaced with 2" x 2" square tubing (basically made a sub-frame), this aspect worked out great (still needs more reinforcement to be complete), the bed sits at the proper height from the lowered cab to the tailgate so the stance is continued throughout the truck it has symmetry and basically flows as it should.

Using the square tube allows for using the original rear bed mounts which fit right over the top of the tube with the rear valance of the bed covering the square tube perfectly, We had removed both of the front and rear side filler panels from the bed but with the bed mounted the rear fillers can be welded back in place in their original location which with the fender will cover the square tube completely from view.

So the bed is mounted..... now we'll turn our attention to the front of the bed and figure out the filler panels to cover the frame and widen the fenders.

Image

Image
Image
Image
Image
Image
Image

I might also mention that any other bed type this wouldn't be a issue at all, it's just because of it being a flare side bed and the fact that they are narrow, we could of course find a style side bed and not have any of these issues, but we like the "old school" look of the flare side so we will deal with what we have, and do the best we can do to make it fit and look as well as our abilities allow.

If we had the the proper sheet metal tools and the knowledge to use them making a cool looking filler panel to cover the frame wouldn't be any problem, but we will have to fabra-cobble something using the tools and abilities we have, hopefully it won't look stupid!

More later.....

Jon
Blanger
Posts: 404
Joined: August 17, 2017, 7:55 am
Location: Indiana
United States of America

Re: '62 F100 SWB Step Side - yes another Crown Vic swap

Post by Blanger »

Bed (part 2)

So we decided the best way to approach the issues I spoke about in the last post was to widen the fenders first, they are the deciding factor on where the bed steps and filler panel to cover the frame will reside.

The first step in widening the fenders was to strip all the paint from them getting down to bare metal in the cut area, then strike a line length-wise on the fender to use as a "cut line", then cut the fender in half. The next step is to cut metal (18g) in 5" strips and flange 1/2" on each side, this will allow the flanged area to sit under the two half's of the fender and provide the 4" filler we need to widen them.

Image
Image
Image

It's a pretty straight forward process and easiest to do on the bed, mounting the piece of the fender that mounts to the bed side then tacking a couple of the strips to that part of the fender, then positioning the rest of the fender on the strip clamping it in place and tacking the parts together.

Then it's just repeating the same process over and over until the area is covered, if the fender needs some support from being widened some round bar can be bent and welded on the interior of the fender to add structural support.

Image
Image
Image

All in all it turned out ok, I had some sag at the top of the fender that will require body filler to straighten out...... overall it looks great, and accomplishes getting the tire covered, it looks like the wheel well will now accept a very wide tire as long as the rim has the proper backspace and offset.

Image

We then moved on to mounting the step, as it turned out we didn't need to cut the step to make it fit...and the area left to make a filler panel for was just a simple flat sheet with a 90 degree bend to fit the flange on the step.

Image

The bed sides were really flimsy after being cut out to clear the CV suspension and fuel tank, they let the fender move around which caused me a few problems, so I just added reinforcement to the inside in the area where the new bed floor will be, the 1 x 1 tubing tied both sides of the bed together making it stronger and more rigid.

Image
Image

(the bar at the top is just to lift the bed on and off the chassis it will be cut off later when the bed goes on for the last time)

Here's a pic of the $50 render roller we bought a few weeks ago, came in handy for rolling the fender lip and pushing the side of the fender out for tire clearance.

Image

Here's how it looks......

Image

Next weekend we'll do the passenger side...

-------

On a different topic we came across a guy on Youtube that just this year got a TV show on Discovery (I think), he's a odd fellow that is really rough around the edges but is interesting to watch, he builds custom cars along with doing some repair / restoration work in his shop in Canada.

Here's a few links if any of you folks want to check him out, like I said he's a little rough but if you can get past that aspect I'm sure you might find some of it interesting.

https://www.youtube.com/channel/UCeSLXP ... dPA/videos
https://www.discovery.com/tv-shows/bad-chad-customs/
https://www.imdb.com/title/tt9397406/

If you get a chance check out "Bad Chad" and let me know what you think.

Jon
SteveCanup
Posts: 1096
Joined: November 7, 2014, 11:08 pm
Location: Wytheville, Virginia
United States of America

Re: '62 F100 SWB Step Side - yes another Crown Vic swap

Post by SteveCanup »

Great job on the fenders, they look great. I like the 'green' color on them also. I'm going to catch the "Bad Chad" show tonight...will give feedback.
1964 F-100
Image
Blanger
Posts: 404
Joined: August 17, 2017, 7:55 am
Location: Indiana
United States of America

Re: '62 F100 SWB Step Side - yes another Crown Vic swap

Post by Blanger »

SteveCanup wrote:Great job on the fenders, they look great. I like the 'green' color on them also. I'm going to catch the "Bad Chad" show tonight...will give feedback.
Well.... they are not without their issues like the sag at the top of the fender, I have absolutely no experience doing anything like this and so I'm kinda' feeling my way along, the next problem is making the passenger fender "look" like the drivers side, about mid stream I welded up the brace in the bed to strengthen the bed sides so I won't have to deal with that again, hopefully I can make them both look close to the same or it'll look stupid from the back of the truck view.....we will see how that goes.

It's funny how I was way too concern about the filler panel that turned out to be a 10 minuet nothing job when I thought it was going to be the big issue, the fender took almost all day (a good 6 hours) to do, my wife cut and flanged the metal while I trimmed and welded them in, the fender will still need more welding before it gets a coat of filler but once the passenger side is finished the bed can come back off and be welded, sanded, and painted.

------

"Bad Chad" is like I said a odd guy, not just in appearance but mannerisms also, he's nothing like what I'd expect to see on TV and if his show goes more than a season I'd be surprised, he's been on YouTube for a couple years and if you go back to his earliest vids you can see his progression, then watch the TV show and it's interesting to see how he either changed or was schooled on how to be more appealing to a wider audience. I'm not a big fan of "Rock-A-Billy" which he is, the old chopped top Mercs with fender skirts are cool but not my choice in something I'd like to own and drive, but I can appreciate any type of custom car/truck without wanting to own one and also appreciate the amount of work someone went through to build anything custom.

It's like "Rat Rods" some of them I like but most are just too weird or dangerous looking, I think the dangerous aspect is part of the draw or appeal, then just using what you have to build a vehicle is kinda' cool in a way, it's also a way to recycle old parts, but I doubt I'd ever build or own one, some people think what we build as being Rat Rods but the truth is there is nothing Ratty about our builds, we do recycle donor parts but the end result isn't ratty at all, I like to call it "bastardizing" a vehicle but it's really just Rust-O-Mods in my mind. lol

BTW nice progress on your garage......stay warm.

Jon
Fjcaldwell
Posts: 6
Joined: March 29, 2017, 9:26 pm

Re: '62 F100 SWB Step Side - yes another Crown Vic swap

Post by Fjcaldwell »

Jon
Just catching up on your build. It's coming along great! I really like to see the different directions people take on their projects. I have learned so much by seeing builders approaches to challenges. Your solution to fitting your bed is going to look great. I admire your vision, and you have the skills to make it reality. Nice work!
Cheers
Fred
Blanger
Posts: 404
Joined: August 17, 2017, 7:55 am
Location: Indiana
United States of America

Re: '62 F100 SWB Step Side - yes another Crown Vic swap

Post by Blanger »

Fjcaldwell wrote:Jon
Just catching up on your build. It's coming along great! I really like to see the different directions people take on their projects. I have learned so much by seeing builders approaches to challenges. Your solution to fitting your bed is going to look great. I admire your vision, and you have the skills to make it reality. Nice work!
Cheers
Fred
Thanks Fred, I've had my doubts at times as to whether we chose the correct road for us, the fenders are less than prefect, will they work? yes, will they look dumb? at one point I thought they would, kinda' like a fat dually with single tires under those wide fenders, but after seeing it from the rear I'm happy with the results.

Thanks again for the kind words, how's Rudy doing? we miss your posts on YouTube.

Take care,

Jon
Blanger
Posts: 404
Joined: August 17, 2017, 7:55 am
Location: Indiana
United States of America

Re: '62 F100 SWB Step Side - yes another Crown Vic swap

Post by Blanger »

Bed (part 3)

Saturday we widened the passenger fender, same procedure as the drivers side and it turned out just fine. I can't say it turned out any better but both are work-able but will require filler to smooth everything out.....lol

Image
Image
Image
Image
Image

Then mounted the passenger bed step, made the filler panel, then pulled the bed back off the truck. With the bed off we went back to the fuel tank mount, we along with buying a new fuel tank bought the tank straps, and a new fuel pump assembly. Test fitting the new tank it fit the frame we made a few weeks ago, we just needed to make mounts for the straps to hold the tank in the frame securely.

The aftermarket tank was formed just a little differently with a larger area at the top that has a depression made into it, not sure why ( I guess to fit different range of years) but it left the top of the drivers side strap unsupported, it holds the tank in the frame just fine but look like it wouldn't....it does.

Image
Image
Image
Image
Image

With that finished we moved on to finishing the sub-frame, just a little more bracing for piece of mind and I added a angle iron brace to the front bed mounts to give them a second point to mount to tie them to the frame, the bed will probably never haul much but needs to have the ability to carry a few hundred pounds because you just never know what it'll be asked to do down the road.

Image
Image
Image

--------

So with that completed next week we will start pulling the rest of the truck apart to prep for paint and final assembly, I plan to devote most of my time next week to thinning the interior wiring harness and getting it installed in the truck, this will allow us to basically start the final assembly portion of the build, still have some work inside the cab to do like fixing the interior of the upper B pillars where someone in the past has cut holes for access to what we figured were giant antennas that were mounted to the exterior of the B pillar at some point in the trucks life.

Still lots to do, it will be a lot of weeks before the truck is finished, I'm at this point thinking April or May if we can keep the same pace, but the wife is booking more work so that may get pushed back to June, in some ways this build seems like it's just dragging' on but that's only because that C600 is sitting outside waiting for it's turn...lol

--------

On a unrelated note: The donor for the '53 C600 showed up this week, it's a 2k GMC G3500 box truck, it's pretty rough exterior-wise but we are not concern with that at all, it only has 124k on the 5.7L engine and the 4L60E transmission. It's been sitting for about a year so the fuel is really old and stale, and of course the battery was junk, but it does run and should make a decent donor for the C600. (pictures in the future)

This project while just really in the planning stages has evolved a couple times, like I mentioned before it's for my father-in-law to use in his business, we have discussed with him several times about what he wants out of the build and while he says to just do our thing (he trusts us) he does have opinions and desires as we talk to him about the project.

One of the changes we agreed on was the bed, originally we were going to use a couple flareside beds to make a stretched (to fit the wheelbase) bed that would end up being probably 10-12' long, you see this a lot in COE builds and it looks like a cool old pickup truck.

But because of his business and the need to haul and pull a trailer we have agreed on making it more of a flatbed truck utilizing the original floor and frame-work from the 14' box that is on the truck now, and enclosing the sides of the bed under the bed floor, think of that as skirting. The bed floor may get narrowed, at this point we just don't know, the bed will come after the cab is mounted and the truck is running / driving so the proper perspective can be achieved as far as the look of the cab and bed together.

The chassis will probably get lowered, at least the rear will be lowered, this can be accomplished rather cheaply with what is called "drop shackles", it will lower the rear 2-4" without changing the load, hauling, or handling characteristics and will give the chassis a lot less "rake" making it more flat from bumper to bumper (front to rear).

We chose a GM "G" (express) series van because the cab layout, placement on the chassis, firewall, and cab floor mimics the old C600 cab about as close as anything new-ish, is it going to fit together perfectly? no, but it should be close enough to make it work. We chose the van over a 1 ton pickup (same chassis) for this very reason and the fact that it has a HVAC box that takes up little room inside under the dash along with having a cover to access the rear of the engine built right into the existing floor/firewall.

We did consider using a Ford E series van but as I have stated before the engine combinations are a issue for me, when this leaves our shop I want it to be easy to service, they live about a hour away and would be using someone in their area to do any service work it will need including oil changes, I don't want to create something that is harder to service than the donor was originally which any modern GM or Ford van are already kind of a PIA to work on depending on what needs to be done.

The GM G 3500 has hydro-boost for brake assist along with a engine oil cooler, it has a towing capacity of 8-10k (8k with the 5.7L small block) the transmission is a 4 speed overdrive trans so it should cruse on the highway fine and get 12-14mpg, it also has a 34 gal fuel tank.

More later....

Jon
Blanger
Posts: 404
Joined: August 17, 2017, 7:55 am
Location: Indiana
United States of America

Re: '62 F100 SWB Step Side - yes another Crown Vic swap

Post by Blanger »

Wiring: (yes we are getting closer to running!)

We started off Saturday finishing some work left over from last weekend, that included making the mounts, plumbing, and installing the EVAP canister. I normally mount this to the bottom of the bed floor behind the fuel tank, but since we built a subframe it made more sense to just mount it to that so the bed could be removed if needed without touching any of that system. In the end it made for a cleaner install that would go hand in hand with all the wiring, when I'm finished it should be easy to pull the bed (if needed) leaving everything basically intact like most modern vehicles are built.

After that was completed we painted the subframe and surrounding area and moved on to the wiring harness. We then moved around to the cab and removed the drivers seat, roll bar, and rubber floor mat then dropped the steering column to provide access for the wiring that goes under the dash.

Image
Image

Sometime between the '98 CV and the '09 CV Ford changed the interior wiring harness separating it into two sections kinda' like the Buick RM we used for the wife's truck. Ford did a good job separating the interior harness into everything under the dash which needed nothing done to it but finding the space under the dash, and the rest of the harness which had all the doors and rear wiring that had to be thinned of unnecessary wiring for the build.

It took 4-5 hrs to thin the second harness, lots of wire had to be removed and in the end it reduced the size of the wiring bundle by about 2/3 rds (removed more wire than was left), this pretty well finished off Saturday and by Sunday afternoon we were installing the second half of the interior harness.

Like the '98 CV we used for the Uni the passenger side of the harness only had the right rear ABS wiring and the cable for the backup camera exiting that side of the cab heading to the rear of the truck. The drivers side was a lot more wires, most like the rear tail lights worked out fine that bundle was long enough to reach the rear. Some of the wiring had to be lengthened which included the EVAP, fuel pump, inertia switch, back up lights, there were also two grounds that had to be made on the exterior frame for the portion of the harness that exited the cab one for the lighting and the other for the fuel pump.

Image
Image

The wiring bundle that had to exit the drivers side was rather large, we used one of the rubber door conduits from the CV to run the wires through exiting the cab behind the seat, this makes a weather tight seal keeping the wires protected and dirt / water out of the cab.

With the rear wiring ran we took the time to set the bed back on the chassis, we had sanded, primed black, and painted the front of the bed and the back of the cab in the green color we are using, it looks pretty good and close to a correct paint color for the age of the truck.

Image
Image
Image

I used a different color loom for the wiring going to the inertia switch, I wanted it to stand out in-case later I had to find that wiring.

Image
Image

After the rear was finished I started tucking the under dash harness in and finding places for the lighting module and fuse panel, with the steering column dropped to the floor it was pretty easy to route the harness, I mounted the fuse panel to the drivers kick panel above the E-brake pedal, and found a location between the steering column and the radio opening to mount the lighting module, both of these were the biggest bundles of wires and it was important to find good locations that could support the devices and the wiring, the placement closely mimics the original locations in the CV so the the plugs from the harness basically fall into the same location as the CV which kept everything fitting without straining any of the wire connections.

Image
Image
Image

The under dash wiring is the hardest to deal with, it has to be routed around things to provide room for the defroster ducts, wiper motor, power pedals, steering column, I just kinda' work side to side tucking the harness going back over each area several times till it's location works, I've tried to just mount one end and work my way across from say left to right but always have to go back and redo some portion so going back and forth several times moving it around in small increments seems to work best or has the best results. The harness wants to go back where it was in the CV which does work sometimes, but also has to be manipulated to fit the Slicks dash which is much shorter in height.

--------

So that pretty well took all the weekend, next week we want to try to get the dash and cowl area painted which will put us in a position that the glass can be put back in, it will also allow us to remount the steering column which will let us start putting the interior back together.

The under hood wiring is next, I have two areas inside the cab that need grounds made along with 4-5 areas of the harness under the hood that have to be grounded, I plan to run my own grounds back to the battery since we reused the CV plastic inner fenders, running our own grounds will ensure that everything is grounded properly instead of relying on ground points made through the core support (mounted in rubber) or the fenders (old metal) it just will be a better way to ground the engine harness.

We are not that far from firing it back up, a couple weeks at the most.... ;)

Image

More next week!

Jon
Post Reply