Page 1 of 4
Greg's 62 Uni long wheel base
Posted: January 30, 2009, 8:01 pm
by Greg D
I don't have a picture of it when it first arrived but these are a few days later I after started some of the rust repair, except for some of the work this is just the way she arrived.
[albumimg]1974[/albumimg]
[albumimg]1981[/albumimg]
[albumimg]1980[/albumimg]
Posted: January 30, 2009, 8:14 pm
by Greg D
Most of the truck is pretty solid, what wasn't was also pretty bad - still WELL worth fixing! The truck was originally from Colorado.
This what was left of the lower cowl on the drivers side where the bottom fender bolt is.
[albumimg]1977[/albumimg]
I had to fabricate this patch from sheet. Not quite done but you get the idea, lol.
[albumimg]1978[/albumimg]
This stepwell patch was cut from the passenger side of my old beater 64 lwb. I have yet to add the reinforcement underneath, I made it from 3" channel stock.
[albumimg]1976[/albumimg]
Here is the piece I cut out on top of the repair. You can see the rain drops in some of the pics - turned a weekend of work into 2 weeks, lol.
[albumimg]1975[/albumimg]
Posted: January 30, 2009, 8:20 pm
by Greg D
These are the basis for my new cab mounts - 2 x 3 thick wall tubing. They aren't original looking but are about 3 times as thick as the ones that Ford made. I will adding some gusset sections to both ends that will make them look similar to stock - not for the look but I want to spread the load over a larger area.
[albumimg]1979[/albumimg]
Posted: January 30, 2009, 8:44 pm
by Greg D
Here are a few pics with her looking like a truck. The front clip is actually from the 64 swb I had at the same time. I gave that truck (99% rust free) away to a guy who had a good running 64 lwb that ran well but had rust issues. He got the 62 front clip with it. I like the slightly more spread out letters on the 64 valance.
I installed the 223 - 4 speed from the 64 lwb I cut up for patches, it ran and I had it. The 62 was originally a 292 3 speed so I had to remove the front frame mount and cut the floor for the 4 speed tunnel cover. Anyway, I finally had her on the road!
[albumimg]2258[/albumimg]
[albumimg]2260[/albumimg]
This is the only modification made at this time. All the stock steering wheels I had would slice your fingers to ribbons if you tried to drive with them. I didn't mind this - I already knew where I was headed with it.
[albumimg]2261[/albumimg]
Posted: January 30, 2009, 8:49 pm
by Greg D
Next mod made to the truck. I swapped out the fruit jar MC for a dual chamber with a Mustang brake light switch. The Uni didn't want to stop too well after I got her assembled, she hadn't been plated in a decade. The brake work didn't stop here..........
[albumimg]2205[/albumimg]
[albumimg]2206[/albumimg]
[albumimg]2207[/albumimg]
[albumimg]2208[/albumimg]
Posted: January 30, 2009, 9:05 pm
by Greg D
OK it's not much but is was the first exterior step in the direction I had for the truck, lol. Fresh coat of Cherry Red on the steelies which were also pirated from the 64 lwb. The old 64 had been reliable transportation for over 2 years for me, I had kept her around because I had become rather attached to her. Sadly she was FAR too gone to repair - I saved what I could.
[albumimg]2374[/albumimg]
About this same time I started having vertigo driving her, lol. I pulled 3 leaves from the front spring packs to get her down a touch. If you look close you will see the next mod but I'll just post a link to that thread.
[albumimg]2814[/albumimg]
Disc Brakes!
http://fordtruk.com/forums/viewtopic.php?t=2647
BTW, here is my old 64 which made the ultimate sacrifice to save my Uni............
[albumimg]5083[/albumimg]
Posted: January 30, 2009, 9:16 pm
by Greg D
Now that I had the truck stopping it was time for the next step. I spent about 6 months bouncing around numerous engine & tranny combinations. I really wanted a Y block in the Uni but I couldn't find one, that is until Rose ran across this.................


This 62 short wrongbed is another sad story. It ran good, had a great looking bed and probably close to $400 worth of new parts on it or in boxes. The cab was simply horrid! Anyway $300 later I had my bed floor patch, a new windshield and my 292 which even came with a 4bbl.
Posted: January 30, 2009, 9:19 pm
by ezernut9mm
great thread greg. and your 223 will live again. it is at the shop as i speak.
Posted: January 30, 2009, 9:21 pm
by Greg D
I've done more detailing & paint work on it but here is the same 292 cleaned up a bit. It also has a car manifold on the passenger side, I'll get the header pipe made and get the drivers side one on this summer.

Posted: January 30, 2009, 9:26 pm
by Greg D
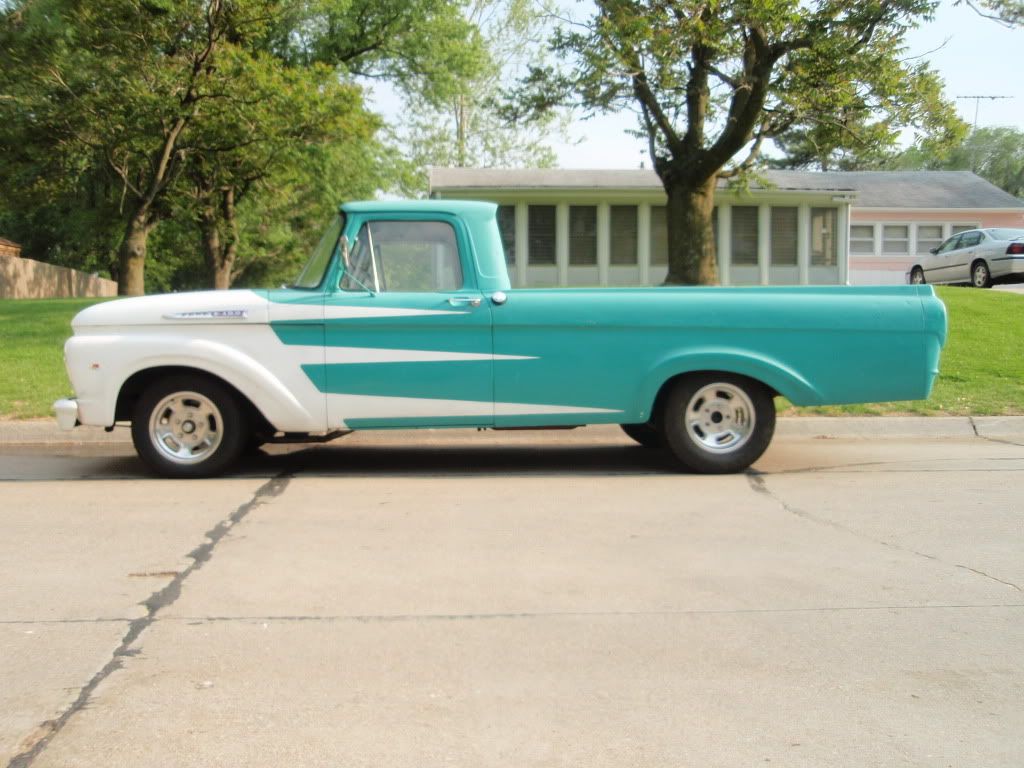
Here is another present she got about the same time as the 292.
15 x 7 & 15 x 8 American Racing Rodmasters with BFG 225 x 60s on the front & 275 x 60s on the rear. Although I seriously considered the gray centered Salt Flats for quite awhile these were my first choice, I like how they are reminiscent of the old Halibrands but without the repop's price.

Posted: January 30, 2009, 9:40 pm
by Greg D
This sketch is where the paint job that's on her started. I had originally thought of this for my old 66 SWB but the "points" would have started long on the top and got shorter as they went down, the break line on the fender would have been the same.
The 66.........
[albumimg]3433[/albumimg]
The Uni concept.........
[albumimg]2735[/albumimg]
I get alot of compliments on the paint scheme for my truck - Thanks Guys!
Now for those of you who don't know this really isn't a nice paint job. See I was one day literally standing in the door of the garage with my compressor charged and a brand new pad on the DA. I just stopped and looked at my truck and decided that a "test" was in order. After you spend what seems like 1/4 of a life time and hundreds of dollars is NOT the time to realize; Crap - I shouldn't have done that!
So here it is $45 worth of Rustoleum spray bombs and a bunch of masking tape later - believe me it doesn't look even this good up close. Funny thing is the sort of rat rod quality it has at present has kind of grown on me - it may end up flat, lol.


Posted: January 30, 2009, 9:51 pm
by Greg D
Another item that believe really sets the look and most defiantely the stance is the reverse eye Mono leaf front springs (Thanks Unibodyboy). As you can guess they were purchased from a member here, he wasn't that fond of them and I love them - we are both happy! The next item on my list is to try the same staggered leaf removal on the rear as I did first on the front. Rear monos will lower the truck more than I want, I do think it needs to come down maybe a tad in the rear too. I like the side view but she looks too high from the back to me. Either way the back is WAY too stiff especially now that the front rides so good. If you want a low straight axle truck the Mono's are worth it just for the ride quality!
There are alot of small things done that I haven't detailed yet and ALOT more to come. I'll keep posting as I get more pics off of discs.
 Height difference.

Posted: January 30, 2009, 9:59 pm
by 65f100_Thug
BTW, here is my old 64 which made the ultimate sacrifice to save my Uni............
[albumimg]5083[/albumimg][/quote]
GREATER LOVE HATH NO TRUCK that lay down its life for THE UNI..

MAN I would never have guessed it was a rattle can job. It looks great in pics IVE seen.In fact I have went through every members profile and looked at pics(WAY BORED WITH BROKEN HEEL LOL) anyway I always thought yours was way up there in the top 3. I really like the sceme and colors.I knew a kid when I was 14 that had a simular paint job on a uni. Awesome job for a trashy trucker LOL.
Posted: January 31, 2009, 6:07 pm
by BackyardRest
Nice Greg!
I really like the way it sits. The RAKE is perfect. I dont really care for totally slammed vehicles but lowered like yours is is perfect.
Hopefully mine sits as nice as yours.
Posted: January 31, 2009, 11:26 pm
by Anthony
I really like the scallops and I think running them from top to bottom is the best look. AND....I am glad to see that I am not the only person driving a rustoleum vehicle (my 74 Mav I drive [albumimg]5090[/albumimg] daily) I think the truck looks great..keep up the good work and keep the pictures coming. Anthony
Posted: January 31, 2009, 11:55 pm
by blackagatha
Aggie's in Flat Black Rusto.
Very Rat Rod. Get too close and it looks like hell. BUT THAT'S OKAY....
When I first sprayed it, the finish was driving me mad.... then the stripes and the rough texture and all the other anomalies of a cheap spray job grew on me.....
About the time that it struck me.... I work Aggie too hard to have a pretty paint job and have to worry about destroying a beautiful finish....
I loaded that other truck on top of the bed rails and scraped off all the paint, I loaded a bunch of brush WAY over the top of the cab, and it scratched little lines all over the top of the cab, and crap like that. If it was beautiful, I would have been hysterical. But It was all good.
I like being able to hook tiedown straps to the fender braces and cinch them down tight. The fenders are made oldschool tough, and the paint dont matter. Yeah, they got chafing from the straps in the corners, but who gives? I dont!
And even in all it's imperfection, It still looks decently good, and It still draws compliments. Maybe not as many as if it were Perfect, but Aggie still gets her share of compliment.
Oh yeah, I dont think I have any pics of the rusto on here. The pics I have are still from the crappy coat of primer I had on. It's all the same though.
Posted: May 17, 2009, 11:47 am
by Greg D
Well, step one of this summers list was done yesterday. Got the garage organized again.
Now to get the Uni back across the street and start dis assembly so I can finish all the stuff I had to skip over when I put it together the first time.
Posted: May 17, 2009, 10:10 pm
by Greg D
Well I started welding up the seam around the top of the roof. I also was checking around the drip rail to see how the panels would line up if I shaved the drip rail - looks doable on this truck. I'll take some pics after I get enough done to show it off. It's a pretty slow job and if you intend to try it be warned - there are spots where the stampings leave the metal pretty thin.
Posted: May 23, 2009, 7:25 pm
by Greg D
Weather is a little off & on for welding & sheetmetal work today so I decided to work under the truck.
Old Stance;
 New & Better Stance;
Posted: May 23, 2009, 11:33 pm
by Alan Mclennan

Did you get a load of dirt like Shiny did?