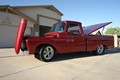
First off, Merry Christmas everyone. I got little time at the shop yesterday and got the valve mounted and all of hte hard line ran for the air ride. Hoping to connect up to the valve with soft lines on Monday. I've got to pick up a couple more fittings for the 4 throttle valves. Then get the cab and front end back on the frame. Depending on the weather, I might even wash off the dust before reassembly. Plan is to make new exhaust hangers and fire the engine next week. I'm excited.
Reds Rod Shop wrote:I've made a little more progress on the truck. I've gotten the floor of the bed raised 1 1/2" for clearance of the new "C" notches. I decided to go the easy route with the bed inner fender wells and purchased 2 already made. $30 vs. the 6 hrs I spent on the first 2. Good investment in my book. Repainted the frame on up front where the new upper bag mounts were installed. Hopefully I'll get is all put back together tomorrow but 2 Christmas parties are going to cramp my slick time. I'll post pics as soon as I get it back together.
Hmmm... pre-made tubs for $30 - have any details to share? They might prove handy when I expand my flareside...
Reds Rod Shop wrote:I've made a little more progress on the truck. I've gotten the floor of the bed raised 1 1/2" for clearance of the new "C" notches. I decided to go the easy route with the bed inner fender wells and purchased 2 already made. $30 vs. the 6 hrs I spent on the first 2. Good investment in my book. Repainted the frame on up front where the new upper bag mounts were installed. Hopefully I'll get is all put back together tomorrow but 2 Christmas parties are going to cramp my slick time. I'll post pics as soon as I get it back together.
Hmmm... pre-made tubs for $30 - have any details to share? They might prove handy when I expand my flareside...
Project's looking great! Merry Christmas!
I got them from a local utility trailer supply company. they have many different sizes and shapes. I think that Northern Tool and Equipment sales them also.
Fired up the engine today. Was almost a total disaster. had a small gas leak that I didn't see. Well it wasnt much but it leaked down the back of the intake and down right to the starter. As soon as I turned it over, boom, those fumes ignited at the starter and it followed the trail up to the top of the engine. It was only a small amount and the entire fire only lasted about 45 seconds until my buddy, completely covered my truck with a fire extinguisher. Yes, the white all over my engine is from the fire extinguisher. Man those things are messy.
All the dust from the fire extinguisher.
Well, you can't keep a good man down. It took us 2 hours to clean the mess up and get all of the dust out, then 5 minutes to fix the small leak and fire it off. Boy, she sounds sweet.
What a mess that looks like.
I see that you got your tilt hood put together and on the truck.
It's always good to hear them run for the first time even if you have a mess to clean up.
Kevin
kstones63
_______________________________________
63 F100
29 Ford Sedan Delivery
99 F250 PSD, 4x4, CC
95 F350 Flatbed Dually Diesel
Got a little done on the truck yesterday, I got the side panels and head board panel fit on the bed. I had planned on fitting the inner fenderwells but with the ones i bought are 9" wide, i will only have 1" of clearance on the inside of the wheel so I'll swap out for some 10" wide ones next week. I also got another dash cut out of a rusted up cab. My plan is to modify my dash and either make it smooth all the way across or add an extra hump on the passenger side. Leaning toward smooth but a lot of people that come by the shop tell me I should add the hump. Well see. Here are a couple of picks of the inner panels.
This as low as she goes. Ride height will be about 6" higher.
Just a quick poll - should I smooth out the indentions on the back of the cab to match the smoothed inside of the bed? You can see them in the 2nd picture down. Just curious on everyone's thoughts.
As detail as you have been I would say yes. That would keep with the look at that angle. Are you going to get rid of the seam where the bedside and the rear housing meet?
I think I'd be at least tempted to do it.
IMHO if you do just fill them down below the bedrail, if you do them all the way down it will lose alot of rigidity. Could make noise too over bumps.
1964 F 100 - I am going to do "something" with it.......
Greg D wrote:I think I'd be at least tempted to do it.
IMHO if you do just fill them down below the bedrail, if you do them all the way down it will lose alot of rigidity. Could make noise too over bumps.
I second that. They are there to keep it from acting like a drum and to keep the cab from flexing.
Just cut it out and mover them down 2" and fill the gap with some sheet.
I that sheet you could french in a cool third brake light too.
Greg D wrote:I think I'd be at least tempted to do it.
IMHO if you do just fill them down below the bedrail, if you do them all the way down it will lose alot of rigidity. Could make noise too over bumps.
I second that. They are there to keep it from acting like a drum and to keep the cab from flexing.
Just cut it out and mover them down 2" and fill the gap with some sheet.
I that sheet you could french in a cool third brake light too.
My thought was to just smooth over the indentions with an additional piece of metal. I'd be afraid to take them completely out due to the sheet metal making noises. If I smooth them, I'll probably take them all the way down. I hadn't thought of placing a 3rd brake light below the window. I'll have to give that some thought. I do plan on installing one but was looking at the doing it just below the ridge above the window.
I was trying to make a third brake light or bed light out of a Twin I Beam fender emblem. But something smoothed into the roof overhang would be slick.
Ok, its been a while since I posted an update. Vacation in NY and work and just plain ole life seems to steal my fun time from me. But, I got a lot done this weekend. A lot of long hours starting Friday night , 16 hrs Saturday and another 12 today, but I got the inner fenders for the bed fitted. The indentions on the back of the cab filled, the bed and front clip is blasted and made a huge dent on the dash modifications. I still have to fab the face but the hard part is done. I know that I'll probably get some mixed emotions on the dash changes but I wanted it to be different. So, here are some pics of the progress.
Blasted and ran across with 80 grit on a DA.
No turning back now.
Donor Dash from a rusted out cab.
Like cutting a funnel apart and welding it back together backwards. A real pain to get it tweaked out.
Red I like it alot. I thought about it on my Uni but did not think about the clever approach you took. I think it would look really nice with one of the dakota digital panels. I got to get more done on my truck. The last couple of months has got me behind.
Red, I like the dash the way you are doing it. It is something different that you don't see everyday. What are you going to do for gauges? I assume that you already have that planned out.
Kevin
kstones63
_______________________________________
63 F100
29 Ford Sedan Delivery
99 F250 PSD, 4x4, CC
95 F350 Flatbed Dually Diesel