
sgart80's 64 f100 rebuild


just so you know... it is not called "orange peel" when you are doing it yourself... unless you do it for a living of course..... It is called character on you own.... or at least that is what I keep telling myselkf about the few runs I have in my cab...  your truck is looking great... keep up the progress and keep those pics coming...
I sanded out the orange peel and I took another whack at spraying paint. my results were marginally better, but I ended up with a couple if runs. I decided I'll worry about the paint later. Sunday was a beautiful day outside so I got out the cherry picker and hoisted the cab on the frame. I installed new rubber mounts on the back, and I need to get things lined up before I install the front cab mounts. I bolted up the steering column at the frame and connected the steering linkage. I also mock fit my drivers seat and steering wheel.
[albumimg]8491[/albumimg]
[albumimg]8492[/albumimg]
The new rear rubber cab mounts were about 1/2" taller than the ones I took out. Should they compress that much when I tighten down the bolts?
[albumimg]8493[/albumimg]
[albumimg]8491[/albumimg]
[albumimg]8492[/albumimg]
The new rear rubber cab mounts were about 1/2" taller than the ones I took out. Should they compress that much when I tighten down the bolts?
[albumimg]8493[/albumimg]
-
ebentraywick
- Posts: 580
- Joined: November 22, 2009, 1:40 pm
- Location: ukiah ca

I installed a new brake master cylinder. It's for a 1986 f150, It bolted right up to the firewall brake plate for the 64, I just had to lengthen the rod on brake pedal so it would work. I also bent, flared and ran all new brake lines. I had to redo about 6 of my flares because they weren't sealing the first time around. I still have to secure the lines to the frame and adjust everything, but the brake are functional!
[albumimg]8631[/albumimg]
[albumimg]8632[/albumimg]
[albumimg]8633[/albumimg]
[albumimg]8631[/albumimg]
[albumimg]8632[/albumimg]
[albumimg]8633[/albumimg]
That 2x3 tubing makes a great base for a cab mount.
Before you get too far you might want to gusset it into the kick panel & floor similar to the original ones. For the floor you could also maybe just rosette the pan to the top of the 2x3. I'd use a break and make the gussets so you can rosette weld it in place. It holds up fine till you start driving it then it bend the lower kick panel & the floor pan/patch settle because the end isn't tied into enough material over enough area.
I found this out the hard way.
1964 F 100 - I am going to do "something" with it.......
viewtopic.php?f=32&t=15942
1987 Mustang LX Convertible, 2.3 Auto - cruiser.
1994 F 150 XLT 2WD
~ Yes - I adopted another cat..............
Cam L Milan,
You'll be missed my friend.
viewtopic.php?f=32&t=15942
1987 Mustang LX Convertible, 2.3 Auto - cruiser.
1994 F 150 XLT 2WD
~ Yes - I adopted another cat..............
Cam L Milan,
You'll be missed my friend.
Thanks for the tip Greg, I'm actually glad you said something about it, because I had been thinking about just letting the cab just rest on top of the 2x3's and not reinforcing the floor anymore, and the last thing I need is for the cab floor to cave in.
I need to put my front sheet metal on because I think the cab is going to have to be tilted one way or the other still, so I'll get the cab aligned with the body and shim the cab as needed, then I'll reinforce the floor/cab mounts as you suggested.
I need to put my front sheet metal on because I think the cab is going to have to be tilted one way or the other still, so I'll get the cab aligned with the body and shim the cab as needed, then I'll reinforce the floor/cab mounts as you suggested.
wow  the last time I posted here about the project truck was November of last year. Not much has changed since then. I did cut out the floor of the truck bed, but I haven't taken any pictures of that. I did abandon using the galvanized metal because it was making me feel bad after I welded on it, I never got really sick or anything, but I could tell it was having an effect on me, so I bought a sheet of cold rolled steel to use from now on. I don't have much progress to report, but I've started welding and patching my core support and an inner fenders. The core support is a mess, in hind sight I should have probably just sprung for a three hundred dollar repop, but I'm cheap, so I spent 8 hours Sunday and about 3 hours Monday working on it.
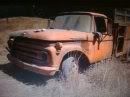
The first two pictures I think I've posted before, but they are lost in the beginning of this thread, so I thought I’d repost them to show what it looked like in June of 2009 before I sandblasted it:
[albumimg]6855[/albumimg]
and then after sandblasting and cutting out some rot:
[albumimg]6956[/albumimg]
I ended up cutting out some more metal over the weekend, but I didn't have my camera around, so no pictures of that, but here are the progress shots:
[albumimg]9077[/albumimg]
[albumimg]9078[/albumimg]
here's a picture of the back of the support.
[albumimg]9081[/albumimg]
I'm not even half done with it yet.
Here is one of the inner fenders after I sandblasted it in 2009:
[albumimg]8069[/albumimg]
cut out metal last week but before welding in the new patch piece:
[albumimg]9079[/albumimg]
new patch:
[albumimg]9080[/albumimg]
Last night I set the fenders on to get a general idea of how much my cab mounts are off, and they were way off, I didn't take any pictures of how they sat initially, but I had to jack up the cab another inch or so to get the fender to come even close to parallel.
This board shows how much I had to jack up the front of the cab to make the fenders close to parallel with the cab, its 1-1/4" tall (it’s called "five quarter board" it's decking material) and it still needs to go up another 1/4" or so...
[albumimg]9082[/albumimg]
[albumimg]9083[/albumimg]
[albumimg]9084[/albumimg]
I have a hard time believing that the sheet metal that I replaced is off by that much. I have about 2 different variables to look at, it's either the front cab sheet metal or the rear cab mount rubber spacer, but it could be a combination of the two.
Part of the reason your cab is off is that the original cab mounts are thicker than 2". Your original insulators will also be crushed some.
I think they are 2 1/8 in front and 2 3/8 in the rear.
Look up how Charlie McCraney made his for his Unibody - you can use the same idea to make insulators that will take up the difference.
I think they are 2 1/8 in front and 2 3/8 in the rear.
Look up how Charlie McCraney made his for his Unibody - you can use the same idea to make insulators that will take up the difference.
1964 F 100 - I am going to do "something" with it.......
viewtopic.php?f=32&t=15942
1987 Mustang LX Convertible, 2.3 Auto - cruiser.
1994 F 150 XLT 2WD
~ Yes - I adopted another cat..............
Cam L Milan,
You'll be missed my friend.
viewtopic.php?f=32&t=15942
1987 Mustang LX Convertible, 2.3 Auto - cruiser.
1994 F 150 XLT 2WD
~ Yes - I adopted another cat..............
Cam L Milan,
You'll be missed my friend.
Well I knew I was going to have to adjust and shim everything, that's why the cab mounts still aren't welded in yet. Thanks for the hint Greg. I've done a lot of reading on what people have done to replace the cab mounts, I just thought I was closer than I was when I did mine.
I've been crawling around under my truck for the last couple of days trying to get the transmission crossmember to sit on the top of the bottom part of the frame’s c-channel like it sits in this picture. I want it there because having the frame underneath the crossmember will provid the most support.
[albumimg]9094[/albumimg]
If you look between the crossmember and the transmission, I have some spacers in there, but they are not the ones that came with my transmission cross-member kit, the one that came with the kit is too tall to fit.
I went back and forth trying to make everything fit with the transmission crossmember sitting on the inside of the frame c-channel, I even cut a huge hole in the floor of the truck so I could get the transmission up a little higher.
[albumimg]9095[/albumimg]
No dice, I couldn’t get it to work, when the transmission sets up inside the transmission tunnel, then I can’t get the drive shaft in and out because of the an existing frame crossmember. So, against my better judgment, I had to mount the transmission cross-member to the bottom of the frame c-channel. It took me about three hours of laying on my back with a drill to get 4 holes lined up and drilled in the frame. Not fun.
[albumimg]9093[/albumimg]
I tried to salvage as much of the battery tray as I could. The parts that mounted to the fire wall were salvageable but the actual tray was not, there wasn't enough of the old sheet metal left to get an idea of what the original looked like, so I just improvised.
[albumimg]9118[/albumimg]
[albumimg]9120[/albumimg]
I also finished the patchwork on the radiator support, it's not the prettiest, but it will be functional. Hopefully I can get a coat of paint on it tonight.
[albumimg]9119[/albumimg]
Oh, and I had a visitor in the garage on Thursday, I don't think he came over to give me a hand. He's not the biggest I've seen in my gargage, but people found it hard to believe that I've seen spiders in the garage bigger than my hand, so I was told to take pictures if I saw another big one. This one isn't quite that big, but he's a healthy little guy. By the way, I hate spiders, this guy gives me the creeps.
To get a sense of scale, that's a 4x4 sitting next to the battery.
[albumimg]9121[/albumimg]
ugly!!
[albumimg]9122[/albumimg]
painted drivers side inner fender:
[albumimg]9128[/albumimg]
painted radiator support:
[albumimg]9129[/albumimg]
installed radiator support:
[albumimg]9132[/albumimg]
got out my sandblasting stuff so I could blast the passenger side inner fender, looks pretty solid!
[albumimg]9130[/albumimg]
and then before yo know it, you have swiss cheese!
[albumimg]9133[/albumimg]
[albumimg]9131[/albumimg]
messy garage:
[albumimg]9134[/albumimg]
-
dotcentral

- Posts: 1341
- Joined: August 18, 2006, 5:13 pm
- Location: Charlotte, NC
sgart80 wrote:got out my sandblasting stuff so I could blast the passenger side inner fender, looks pretty solid!
and then before yo know it, you have swiss cheese!
Looks like you're doing good work.
Driver: 71 F100 Shortbed: Disc swap, 5.0 HO EFI & AOD
Project Vehicle/Mild Custom: 66 F100 CC longbed: Sold
Project Vehicle/Mild Custom: 66 F100 CC longbed: Sold