OPWK's DD Build

A place just for our project & build threads.

Moderators: Casey 65, Kid

User avatar
TheOPWK
Posts: 131
Joined: December 15, 2008, 2:59 pm
Location: AZ
Contact:

OPWK's DD Build

Post by TheOPWK »

Building a daily driver out of my 64 longbed. Im all about driving shitty stuff around, but this thing is just gross. and I hate gray primer. So, here we go.
Fair warning, i dont take enough pics, or very good ones for that matter.

Heres how this roach looked when I got it.
Image

After putting everything back on the motor, and sorting out a couple wiring issues, i drove the pig to work. had a missfire, but hell, i didnt care.
Image
Image
Scott R.
User avatar
TheOPWK
Posts: 131
Joined: December 15, 2008, 2:59 pm
Location: AZ
Contact:

Post by TheOPWK »

after tooling it around the neighborhood for a while, and driving round town, i decided that I was tired of having an open hole where the column goes through the floor (kinda like having a hair dryer blow up your shorts) The floor plate that came with the truck was rusty, and rather than unhook the clutch rod, they just cut the plate. so, i got a hand drawn template from someone on here, scanned it, drew over top of the scan on Corel. Took my template and cut some steel on the bandsaw, and threw it in the bead roller. Gave the Corel file to my buddy who has a laser, and we cut a cardboard template, then a rubber gasket. Need to redo the gasket, as I dont like the material, but it works for now.

Image
Image
Image
Image
Image
Image
Scott R.
User avatar
TheOPWK
Posts: 131
Joined: December 15, 2008, 2:59 pm
Location: AZ
Contact:

Post by TheOPWK »

I ended up sorting out the misfire, at some point, this thing had a stuck valve, so, the pushrod bent and went into the valley pan. I replaced the pushrod, adjusted the valves, and did some general tuning, now she runs great.

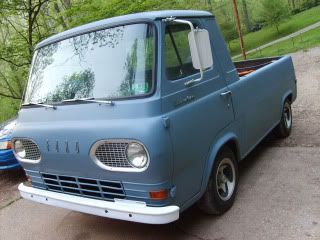
Since thats outta the way, i decided to start getting rid of this primer. One of the PO's decided it was genius to primer without actually doing any kind of bodywork. i wish it just had original faded paint. Then i would just leave the damn thing alone.

As I said, not great at pics, but, you can kinda tell thaty im doing stuff.
Image
Image

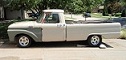
This was awesome, the bedrail was bent so bad I had to cut a section out just to get it back to shape, and then reweld it together.
Image

Shotgun bedside done and in primer.
Image
Image
Image
Scott R.
User avatar
TheOPWK
Posts: 131
Joined: December 15, 2008, 2:59 pm
Location: AZ
Contact:

Post by TheOPWK »

The driver side bedside was worse that the shotgun side and required a little more love.
Good Times ahead.
Image
lots of hammer and dolly and welding work on this side. The wheel arch was shoved in probably an inch and a half, which made the bed crack and tear around the bedside supports.
Image
Image
Image

Divers side, done and in primer.
Image
And, apparently. that the only pic i took. I'll get more though. The bed is now guide coated, rust is fixed in the tailgate, and it has been shot with its 1st coat of primer. Didnt get pics of any of that, but it happened. Swear. Pics tomorrow.
Scott R.
Bill W
Posts: 1166
Joined: December 26, 2007, 1:32 pm
Location: Tucson AZ.

Post by Bill W »

Great Work Scott!
User avatar
Anthony
Posts: 1422
Joined: July 12, 2010, 4:56 am
Location: Huntington, West Virginia
United States of America

Post by Anthony »

looks great... so what kind of time frame are we talking about to get both bedsides done and the tail gate??? It would ...will... take me forever... :lol:
User avatar
TheOPWK
Posts: 131
Joined: December 15, 2008, 2:59 pm
Location: AZ
Contact:

Post by TheOPWK »

Anthony wrote:looks great... so what kind of time frame are we talking about to get both bedsides done and the tail gate??? It would ...will... take me forever... :lol:
Ive done lots and lots of bodywork over the years. I have 10 hours or so in the shotgun side, and its already been primed, blocked, fixed, and re-primed. I think I have 12 in the driver side, and its just been primed the one time, I know there is more bodywork to be done on it though.
Tailgate, including rust repair, I might have 6 or 7 hours in.
Seems like a lot, but i have more time than money.
Also, im moving kind of slow right now being that its 110-116 degrees out.
Thanks for the props guys.
Scott R.
User avatar
TheOPWK
Posts: 131
Joined: December 15, 2008, 2:59 pm
Location: AZ
Contact:

Post by TheOPWK »

Heres the pics from when I started tonight. Didnt get a whole lot done. Had to fix a toilet and do the yard. But now it is blocked, did some minor repair, and ready for a prime again. Probably going to get it primed tomorrow night and maybe spray some color on it Saturday. I really want to see how this color will look in person as i've only seen pics.
Disclaimer: im not doing a show quality type job on this truck. Especially the tailgate. Factory tailgates were never super sweet, and this one is wrong for the truck anydamnways.. . . .
Image
Image
Scott R.
User avatar
TheOPWK
Posts: 131
Joined: December 15, 2008, 2:59 pm
Location: AZ
Contact:

Post by TheOPWK »

Well, got the tailgate blocked, re primed, wetsanded and sprayed with color. Not sure how much I like the color yet. Its still wet as I type this. Kind of pain in the ass to keep the finish uniform on the tailgate with how many bumps and angle changes it has. Final color will be Hot Rod Flatz Steel Blue with a white roof, grille, and bumpers.
Final Prime
Image
After Wetsanding and a bath
Image

Then I used 3M seam sealer to seal the skin around the sides and shot it with ACME whiter sealer (didnt get a pic). while waiting for the sealer to flash, i mixed up the paint, poured it in the cup only to realise that the needle seal on my other paint gun leakes like a bastard. So I had to scramble to clean my other gun and change tips.

Good times
Image

1st Coat, then wait 15 minutes for it to flash.
Image

Final Coat
Image
Image
You wil also notice that it looks like I lef the original spot welds on my gate, and you are correct. This isnt a street rod.
Scott R.
User avatar
Anthony
Posts: 1422
Joined: July 12, 2010, 4:56 am
Location: Huntington, West Virginia
United States of America

Post by Anthony »

Sweet!!! and I kinda like the flat blues... I did my first econo that way...

Image
a flat blue/gray epoxy primer...

I like the idea of "not perfect" and the hot rod flat paint... I say fix 'em to drive 'em!!!! keep up the great work...
User avatar
TheOPWK
Posts: 131
Joined: December 15, 2008, 2:59 pm
Location: AZ
Contact:

Post by TheOPWK »

Thanks man. After the finish flattened out, I really dig it. Its a winner for sure.
Image
Scott R.
Bill W
Posts: 1166
Joined: December 26, 2007, 1:32 pm
Location: Tucson AZ.

Post by Bill W »

Very Nice! is the white going to be gloss?
User avatar
TheOPWK
Posts: 131
Joined: December 15, 2008, 2:59 pm
Location: AZ
Contact:

Post by TheOPWK »

Bill W wrote:Very Nice! is the white going to be gloss?
Affirmative
Scott R.
User avatar
TheOPWK
Posts: 131
Joined: December 15, 2008, 2:59 pm
Location: AZ
Contact:

Post by TheOPWK »

Not much happening here. Been helping my freind work on his 52 Chevy truck, still dicking around with the drivers side bedside. I had two small spots that are right above the bodyline that have been giving me trouble. I think I got them licked last night though. I hate bodywork.
Last edited by TheOPWK on July 14, 2011, 10:48 am, edited 1 time in total.
Scott R.
User avatar
slickmainer
Posts: 2555
Joined: October 8, 2007, 6:41 pm
Location: Auburn Maine
Contact:
United States of America

Post by slickmainer »

I like that!!
--Gregg--
you can't get there from here
User avatar
Greg D
Posts: 10113
Joined: September 13, 2006, 4:39 pm
Location: Podunk Iowa
United States of America

Post by Greg D »

Scott,
if you dont like doing body work in all that heat it's only in the 90s at my house.
whistle.gif

Looks really good - that looks kind of like one of the stock blue's on these trucks.
1964 F 100 - I am going to do "something" with it.......

viewtopic.php?f=32&t=15942

1987 Mustang LX Convertible, 2.3 Auto - cruiser.
1994 F 150 XLT 2WD


~ Yes - I adopted another cat..............

Cam L Milan,
You'll be missed my friend.
User avatar
TheOPWK
Posts: 131
Joined: December 15, 2008, 2:59 pm
Location: AZ
Contact:

Post by TheOPWK »

Drivers side bedside = done. Those different color spots are SEM rattle can primer, as I was sick of cleaning my paint gun after spraying 2 square feet of bedside.
Image
On to the roof!
Seams cleaned out.
Image
Image

Roof then got completely stripped using a Norton Blue Rapid strip wheel on a grinder. Then I had to treat the bare metal with Naval Jelly since it was pitting really bad under the factory paint. So this is after that.
Image
Image

It is now almost done being bodyworked. How the hell do you get so many dents on a roof? weird. Ill try to get pics before I blow some primer on it tonight.
Scott R.
User avatar
TheOPWK
Posts: 131
Joined: December 15, 2008, 2:59 pm
Location: AZ
Contact:

Post by TheOPWK »

Greg D wrote:Scott,
if you dont like doing body work in all that heat it's only in the 90s at my house.
whistle.gif
it was in the 90's anyways. ha ha. My freind lives in Newton. He said it was brutal yesterday.
Scott R.
User avatar
Max
Posts: 3456
Joined: July 11, 2006, 11:53 am
Location: 29°35'07.00"N 95°09'07.49"W
Contact:
United States of America

Post by Max »

Nice work. Are you planning on putting seam sealer back in the seams or welding them up? I've done some research on seam sealers and apparently the two-part types are the best but require a special applicator gun depending on what brand you use: SEM, Lord Fusor, etc.
"If you don't want to stand behind our Troops, feel free to stand in front of them."

1964 Ford F100
1967 US Army M416
Brian Taylor
Posts: 1469
Joined: August 18, 2009, 3:52 pm
Location: Dallas , Texas
Contact:
United States of America

Post by Brian Taylor »

Roof dents happen with my 2 kids, I have to chase them off it all the time. Maybe they did yours too. LOL
1966 Ford F-100 LWB 300
Post Reply