The Bluebird build thread 66 F100 Camper Special

A place just for our project & build threads.

Moderators: Casey 65, Kid

cnsmoore
Posts: 48
Joined: November 11, 2011, 8:53 pm

The Bluebird build thread 66 F100 Camper Special

Post by cnsmoore »

First off, thanks slick members for the help thus far.
I am finally starting my build thread to give something back to the forum (WARNING! this will be PIC heavy).

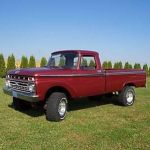
My new "old" 1966 F100 Camper Special
FE390
Dana rear end with posi track
Caribbean turquoise/Wimbledon white paint

First pic already tucked away (CRAMMED) into my garage
Image
cnsmoore
Posts: 48
Joined: November 11, 2011, 8:53 pm

Post by cnsmoore »

I did not enjoy taking any photos before I made this truck mine. Well, I can take some pics now.

My first mod complete.
Ditch the throw back drag wheels (no offense draggers) for a more traditional look.

Here it go's:
15x7 wheel vintique smoothies front
15x8 wheel vintique smoothies rear
Both with 4" BS
Image

Next:
255 70R 15 3 1/2" WW Diamond Back III's rear
205 70R 15 2 3/4" WW Diamond Back III's front
Image

Beauty rings and baby moons round out the package
Image
cnsmoore
Posts: 48
Joined: November 11, 2011, 8:53 pm

Post by cnsmoore »

I talked Tom of Carolina Custom Powdercoat in Cary N.C. into letting me tag along for some powder action.

Let me first say that I had no idea that powder coating was so involved in order to achieve the right outcome.

Here's a pic of some phosphoric acid in action
Image

Then after a quick rinse, it's off to the oven for some dry and heat.
Image

And finally...some POWDER!!!
Image
cnsmoore
Posts: 48
Joined: November 11, 2011, 8:53 pm

Post by cnsmoore »

This morning I visited a buddy up at Pep Boys to mount and balance all four tires (grand total of $45.00).

Before you see the pic remember, I want the wheel color to match the truck.

We went through several samples and none matched even close to my paint.
I decided to go with white and I can live with this until it warms up and I can spray these babies an exact match to my Caribbean Turqouise.

Here's Bluebird before:
Image

And after:
Image
cnsmoore
Posts: 48
Joined: November 11, 2011, 8:53 pm

Post by cnsmoore »

One more up close...THANKS Tom for allowing me to tag along. I was in the way more than I helped. The whole process probably took twice as long just because of me! :shock:

Image
User avatar
Alan Mclennan
Posts: 9324
Joined: October 14, 2006, 6:16 pm
Location: In the shed... Cranebrook NSW
Australia

Post by Alan Mclennan »

I think the body colour will look better!, but it`s like a new pair of joggers!, they seem bright when you first put them on! :D
Honey, If I say I`ll fix something I will, there`s no need to remind me every 6 months!!
66 f100 tabletop swb 351 Clevo C6 "Beryl"

Slick Stock 3 KCMO
Slick Stock 4 Altoona
Slick Stock 5 KCMO
Slick Stock 6 Altoona
Slick Stock 7 Salina KS
Slick Stock 8.............................. cry.gif
cnsmoore
Posts: 48
Joined: November 11, 2011, 8:53 pm

Post by cnsmoore »

Yeah, the traditional low rider down at the shop today said, "ESSAY, you don't need to paint those wheels.....thum beeches POP yo!"

I think that means he liked them.
User avatar
ezernut9mm
Posts: 9141
Joined: July 21, 2006, 9:37 pm
Location: KCMO
Sweden

Post by ezernut9mm »

which trim rings are those?
always
"i believe i've achieved satisfaction".-bubbles
"should i be gettin" baked for this boys?"-bubbles


i could no longer keep "r.i.p.ing" all of our fallen brothers and sisters, so i say here, slick loads of love and much respect to all you beautiful people.
fire truck
Posts: 2141
Joined: January 17, 2010, 9:06 pm
Location: Down in Mississippi and up to no good
United States of America

Post by fire truck »

nice! gotta love wwws!!
So good lookin' that I've attracted an international stalker.


Rest in Peace Bumpstick....I miss ya man.
cnsmoore
Posts: 48
Joined: November 11, 2011, 8:53 pm

Post by cnsmoore »

Ezer, they are the smooth trim rings that fit the smoothie wheel from wheel vintiques. I can get you the part number when I get home if u need it
cnsmoore
Posts: 48
Joined: November 11, 2011, 8:53 pm

Post by cnsmoore »

It has been a busy couple of days. The relocation of the gas tank mod turned out to be a little more difficult than I imagined. Here she is:
Image
No BALD jokes please!
Image
Frame welded up
Image
Ready for some hangers. Background 1970 Mustang 22gallon tank
Image
Mounted up with some POR15 topcoat
Image
Close up of the hanger
Image
Sender and fuel line
Follow the Bluebird build thread at:
http://fordtruk.com/forums/viewtopic.php?t=24327
cnsmoore
Posts: 48
Joined: November 11, 2011, 8:53 pm

Post by cnsmoore »

Heres a better shot underneath.
Image
Follow the Bluebird build thread at:
http://fordtruk.com/forums/viewtopic.php?t=24327
cnsmoore
Posts: 48
Joined: November 11, 2011, 8:53 pm

Post by cnsmoore »

Today I removed the old tank and cut a temporary access hole for the filler.
Before
Image
Image

After
Image

Image
Follow the Bluebird build thread at:
http://fordtruk.com/forums/viewtopic.php?t=24327
cnsmoore
Posts: 48
Joined: November 11, 2011, 8:53 pm

Post by cnsmoore »

Oh, and the fillerImage

Image

Not to worry, there will be some WOOD in the near future...Will keep the flush mounted cap though.
Follow the Bluebird build thread at:
http://fordtruk.com/forums/viewtopic.php?t=24327
cnsmoore
Posts: 48
Joined: November 11, 2011, 8:53 pm

Post by cnsmoore »

Garage ART

Image
Follow the Bluebird build thread at:
http://fordtruk.com/forums/viewtopic.php?t=24327
User avatar
Alan Mclennan
Posts: 9324
Joined: October 14, 2006, 6:16 pm
Location: In the shed... Cranebrook NSW
Australia

Post by Alan Mclennan »

Don`t forget to seal the filler hole on the tank!, they can be very explosive!!
Honey, If I say I`ll fix something I will, there`s no need to remind me every 6 months!!
66 f100 tabletop swb 351 Clevo C6 "Beryl"

Slick Stock 3 KCMO
Slick Stock 4 Altoona
Slick Stock 5 KCMO
Slick Stock 6 Altoona
Slick Stock 7 Salina KS
Slick Stock 8.............................. cry.gif
cnsmoore
Posts: 48
Joined: November 11, 2011, 8:53 pm

Post by cnsmoore »

Good catch Alan...got er sealed!

Don over at Sound Deadener Showdown just sent a box of goodies to keep me busy for a while. I will post a pic of the contents when it gets here.

TIME FOR THE BLUEBIRD TO QUIET DOWN A LITTLE....EXCEPT FOR THE TUNES (to be continued...)
Follow the Bluebird build thread at:
http://fordtruk.com/forums/viewtopic.php?t=24327
User avatar
BigMike
Posts: 1066
Joined: November 27, 2010, 2:58 pm
Location: Roswell, GA
United States of America

Post by BigMike »

Nice work! I really like the tank relocation. I should consider that when I have the bed off in the Spring. I miss having the extra room behind the seat.

How is the tank attached to the frame that you made?
1965 F250 352 4spd/Dana 4.10 (sold)
1991 Porsche 964 Cabriolet
2006 Cheby Silverado
2011 Jeep Grand Cherokee - yeah, it's a HEMI
cnsmoore
Posts: 48
Joined: November 11, 2011, 8:53 pm

Post by cnsmoore »

BigMike wrote:Nice work! I really like the tank relocation. I should consider that when I have the bed off in the Spring. I miss having the extra room behind the seat.

How is the tank attached to the frame that you made?
Thanks BigMike, if you look closely at the pic of me welding the frame, you can see the tank lip on the right with pre drilled holes. I drilled some holes in the frame and used screws about 1/2" long.
It has been a few days now and everything is still solid. I did use some plastic spacers I between the hangers and the frame rail to eliminate any unwanted noise. OH, I HAVENT EVEN RUN OUT OF FUEL YET...22gallons YEAH!!!
Follow the Bluebird build thread at:
http://fordtruk.com/forums/viewtopic.php?t=24327
User avatar
qwertyd10n
Posts: 496
Joined: September 13, 2007, 9:47 am
Location: Southern Alberta
Canada

Post by qwertyd10n »

I'm thinking of doing a tank relocation this winter as well... I've ready Uncle Skip's instructions on his method, but yours seems a little different.

Here are some questions I've got for you:
  • You just bolted your tank frame to the bottom of the truck frame?
  • Did you have to move any of the frame cross-members?
  • Is that 1" square tubing you used?
  • What thickness of metal did you make the tabs/brackets out of?
  • Did you weld the heads of the bolts to the topside of the frame/cross-member so they wouldn't turn? Or were you able to figure out a way to get a wrench in on them?
  • What did you use and where did you get the hardware for the filler neck and cap?
Cheers,
Dion
Post Reply